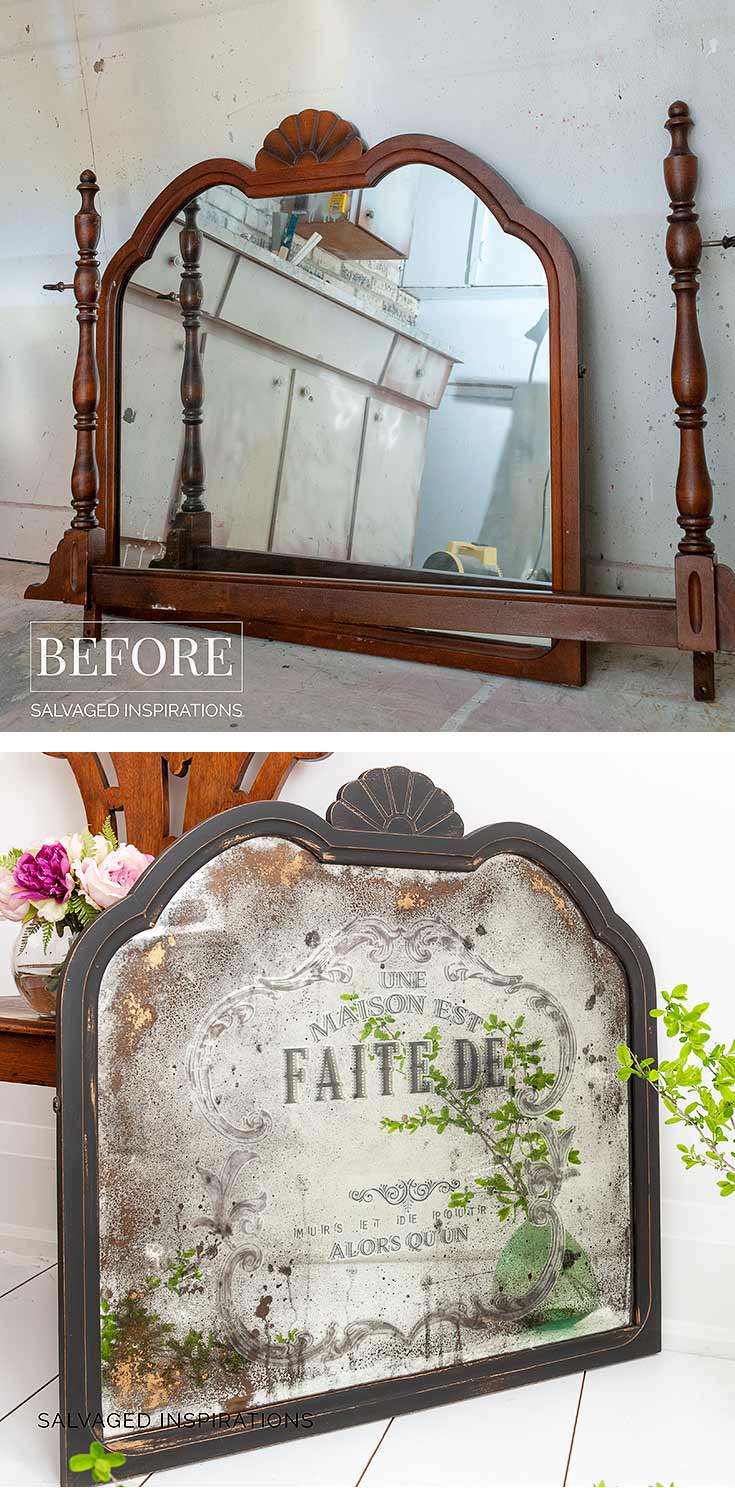
You’ve found the perfect vintage frame at a flea market, but the mirror inside looks too clean, too new. It lacks soul. What you need is a way to transform that shiny glass into something with history. Faint tarnish at the edges, subtle clouding, the kind of imperfections that suggest decades of quiet use. You’re not just decorating. You’re storytelling. And the good news? You can create a convincingly antique mirror at home using one of several proven methods, each tailored to your skill level, tools, and desired authenticity.
Whether you’re restoring an old piece, upgrading a thrift store find, or crafting a custom vintage-style wall mirror, there’s a technique that fits. From chemical aging that mimics real oxidation to beginner-friendly spray paint tricks, this guide walks you through three professional-grade methods to make mirror glass look authentically aged. We’ll cover exactly what supplies you need, step-by-step processes, safety tips, and how to avoid common mistakes.
Chemical Strip and Bleach Aging
This method delivers the most authentic antique mirror look by chemically breaking down the mirror’s actual silver backing. It replicates natural corrosion over time, creating patterns that closely mimic real-world aging.
Strip Back Paint Safely
Lay your mirror face-down on a protected surface covered with plastic sheeting. Apply CitriStrip gel evenly across the back using a brush. Let it sit for 30 to 60 minutes. Thinner mirrors like dollar store versions need less time. The gel softens the gray protective paint without damaging the silver layer beneath.
Never use metal scrapers. Wrap a clean rag around a plastic putty knife and gently scrape off the paint. Replace the rag often to avoid scratching the silver. Rinse the back thoroughly with clean water to remove all stripper residue.
Bleach the Silver Layer
Mix 50 percent bleach and 50 percent water in a spray bottle. Spray it onto the exposed silver, focusing on edges, corners, and lower areas. These spots are most prone to real-world tarnish. Watch from the front as dark spots form.
Use the watch and blot technique. Spray, wait for darkening, then dab with a paper towel to stop the reaction in certain areas. You cannot reverse over-etching, so proceed in stages. Work in a ventilated space and wear an organic solvent respirator. Bleach fumes are harmful.
Add Patina with Spray Paint
Once rinsed and dried, apply a light mist of Metallic Champagne Bronze spray paint to the back. This adds warm, aged undertones. Follow with a full coat of flat black spray paint to deepen contrast and hide over-etched spots. Let dry completely. Reinstall the mirror in its frame with the painted side facing inward.
Look for soft, irregular dark patches. Real aging is never uniform.
When to Use This Method
Choose chemical aging when you want maximum realism. It’s ideal for vintage furniture, cabinet doors, or statement mirrors where people will look closely. Avoid if you lack ventilation or are uncomfortable with chemicals.
Faux Mirror Spray and Vinegar Aging

Turn plain glass into a convincing antique mirror using layered spray paint and vinegar distressing. No silvering required. This method is fully reversible and perfect for beginners.
Prep the Glass Surface
Remove the glass from its frame. Clean both sides with denatured alcohol mixed 50/50 with water, or use Windex. Dry with a lint-free cloth. Never use plexiglass. Only real glass works with mirror-effect paints.
Any grease or film will ruin paint adhesion. Wipe twice if needed.
Apply Black Base Coat
Spray the back of the glass with matte black spray paint in three to four thin, even coats. Let each coat dry fully before applying the next. Thick layers cause runs and reduce reflectivity.
The black base creates depth and contrast, making the mirror effect sharper when viewed from the front.
Create Mirror Finish with Vinegar
Flip the glass so the unpainted side faces up. Spritz distilled white vinegar in a fine mist across the front. Apply more vinegar on edges and bottom. Immediately spray Krylon Looking Glass paint over the entire surface.
While the paint is still wet, dab the vinegar-treated areas with a paper towel. This lifts some paint, creating cloudy, worn patches that mimic tarnish. More vinegar equals more paint removal. Less dabbing equals heavier spotting.
Fix Mistakes Easily
If you over-distress, wipe off the paint with glass cleaner and a razor blade. Reapply black base and try again. This method is fully reversible, making it perfect for beginners.
Install with Painted Side In
Let the paint cure for 24 hours. Reinstall the glass with the painted side facing the frame. The front unpainted side becomes your viewing surface. The entire process takes under an hour.
RT Antique Liquid Application
For museum-quality aging, artists and gilders use RT Antique. This is a professional chemical solution that ages freshly silvered mirrors in minutes, producing organic, non-uniform tarnish just like real oxidation.
Buy and Prepare RT Antique
Purchase RT Antique liquid exclusively from angelgilding.com. It only works on freshly silvered mirrors, not store-bought ones. Mix one part concentrate with four parts distilled water in a dedicated spray bottle. Tap water ruins the reaction because minerals interfere with the chemical process.
Never store diluted solution long-term. It degrades.
Spray for Controlled Aging
Apply a fine mist to the mirror surface. The reaction begins instantly. For light aging, rinse after one to two minutes. For heavy spotting, wait five to ten minutes. The solution creates organic, non-uniform tarnish exactly like real oxidation.
Layer the effect for more complexity. Re-silver lightly, then reapply RT Antique for multi-generational aging that looks like centuries of quiet wear.
Best for Professional Results
Use this method when authenticity matters most. Art installations, high-end restorations, or custom gilded mirrors benefit from this technique. It’s not for beginners, but the control and realism are unmatched.
Choose the Right Method
Match your skill level and project needs to the right technique.
Your priority determines the best method.
- Beginner-friendly: Faux Mirror plus Vinegar
- Most realistic: Chemical Strip or RT Antique
- Low cost: Spray paint method
- No back access: Front-side vinegar aging
- Fully reversible: Faux mirror technique
- Professional finish: RT Antique liquid
If you cannot access the back, use front distressing. If you want true aging, strip or use RT Antique.
Design Realistic Aging Effects
Focus on Natural Wear Zones
Real antique mirrors tarnish first at edges, corners, and bottom. These are areas exposed to moisture and touch over time. Spray bleach or vinegar heavily there. Let droplets run slightly to create vertical streaks.
Use a textured brush or sponge to blend and soften harsh spots. The goal is irregularity, not perfection.
Avoid Symmetry
Perfect patterns look fake. Apply bleach or vinegar randomly. Blot some areas, leave others untouched. Embrace chaos. The illusion of dirt or wear is often more convincing than technical perfection.
Layer Colors for Depth
After chemical aging, try light washes of copper or gold acrylic paint on the back. Mix with water and apply with a fluffy wax brush. This adds warmth and mimics century-old oxidation.
Frame and Protect the Finish
Match Frame to Style
Ornate wood frames enhance traditional antiques. Black aluminum creates a modern vintage contrast. Thrifted frames add authenticity. Look for chipped paint or gilding loss.
Seal Against Moisture
Frame edges should be tight. Use silicone or sealant to close gaps. Moisture causes further tarnishing. This is great if you want natural aging over time, but risky if you want to preserve your specific finish.
Clean with a dry microfiber cloth. Never spray liquid directly on the glass.
Troubleshoot Common Problems
Mirror looks too black or flat. Over-etching or thick paint causes dead spots. Use lighter bleach sprays and blot early. For spray paint, apply thinner coats and dab gently.
Paint runs or pools. Too much vinegar or heavy paint causes runs. Use a fine mist, work in thin layers, and dab immediately.
Poor paint adhesion. Glass wasn’t cleaned properly. Always use denatured alcohol before painting.
RT Antique doesn’t react. You’re using an old or pre-made mirror. RT Antique only works on freshly silvered glass.
Safety and Best Practices
Ventilate and Protect
Chemical method requires outdoor work or a respirator and gloves. Spray paint needs an open area with mask and eye protection. RT Antique requires nitrile gloves and avoidance of skin contact.
Test First
Try each method on scraps of glass or the back of a mirror before committing to your final piece.
Label Everything
Spray bottles for bleach, vinegar, and RT Antique should be clearly labeled. Never mix or reuse containers.
Final Tips for Authentic Results
Imperfection sells it. Don’t aim for perfection.
Study real antiques. Photograph them for reference.
Build aging gradually. You can always add more, but you can never take it back.
Seal the frame to lock in your finish.
Use distilled water. Tap water minerals interfere with chemical reactions.
Frequently Asked Questions About Making Mirror Glass Look Antique
Can I make a mirror look antique without removing it from the frame?
Yes. The faux mirror spray and vinegar method works on the front of the glass. Apply vinegar and mirror-effect paint to the front side, then frame with the painted side facing inward. This works when you cannot access the back.
How long does the antique effect last?
Chemical strip and bleach aging lasts 5+ years if the frame is sealed properly. Spray paint methods last 3 to 5 years. RT Antique results last 5+ years on properly sealed mirrors. All methods benefit from protective framing.
Is the spray paint method reflective enough for practical use?
The spray paint method creates a mirror-like appearance but lacks the true reflectivity of real silvered glass. It’s best for decorative purposes, cabinet doors, or pieces viewed from a distance. For accurate reflection, use the chemical strip method.
What if I over-bleach my mirror during aging?
You cannot reverse over-etching with the chemical method. The silver is permanently damaged. Fix this by applying mirror-effect spray paint to the back to restore partial reflectivity, or start with a new mirror.
Do I need special tools for RT Antique?
RT Antique requires freshly silvered glass, the concentrate solution, distilled water, and a dedicated spray bottle. The product is available exclusively from angelgilding.com and works only on new silvering, not store-bought mirrors.
Key Takeaways for Making Mirror Glass Look Antique
Transforming mirror glass into an antique look comes down to three core approaches. The chemical strip and bleach method creates the most authentic aging by actually degrading the mirror’s silver backing. The spray paint and vinegar technique offers a beginner-friendly, reversible alternative that works on plain glass. The RT Antique solution delivers professional-grade results but requires freshly silvered mirrors and more expertise.
Regardless of method, the principles remain the same. Focus aging on edges and corners where real wear occurs. Embrace irregularity and imperfection. Build the effect gradually, checking often. Seal your finished piece to protect it.
With patience and the right technique, your mirror won’t just reflect light. It will reflect history.