Framing a round mirror transforms a plain, functional piece into a custom wall statement perfect for bathrooms, entryways, or living rooms. Whether you are upgrading a basic frameless mirror from Home Depot or repurposing an old one, building your own wooden frame lets you match your decor, save hundreds of dollars, and create something truly unique. This guide breaks down four proven methods to frame a round mirror, using tools ranging from a simple jigsaw to a router with a circle jig. You will learn how to cut precise circles, assemble sturdy frames, finish beautifully, and securely mount your mirror without professional woodworking skills.
With total material costs under $50 and scalable techniques for any mirror size, this project delivers luxury results at a fraction of retail prices. Let us dive into the best ways to build a custom round mirror frame that fits your skill level, tools, and style.
Choose the Right Framing Method for Your Skill Level
Not all methods work equally well for every project. Your choice depends on mirror diameter, available tools, and your experience with woodworking.
Best Methods by Mirror Size
Small mirrors between 6 and 12 inches work best with the double-layer jigsaw method. This approach is simple, low-cost, and requires minimal setup. Large mirrors between 20 and 30 inches benefit from the router circle jig method, which delivers smooth, professional curves with precise edges. For eco-friendly builds, try the reclaimed wood method that uses scrap lumber without requiring complex joinery. The key is selecting the right approach before cutting any wood.
Compare Method Trade-offs
The double-layer jigsaw method ranks as the easiest for beginners and costs the least. The router with circle jig method offers the most precise cuts but requires more tools and experience. The reclaimed wood method has the lowest material cost since it uses scrap lumber. For large mirrors over 20 inches, the square-to-circle router method provides the best results. Start with a dry run on scrap wood if you are new to circular cuts.
Gather Materials and Tools for Round Mirror Framing

You will need just a few core components to build a durable, attractive frame. Getting everything ready before starting prevents delays during the build process.
Essential Materials List
Round frameless mirror (such as 24-inch diameter)
Wood boards (1×10, 2×6, or plywood based on desired thickness)
Wood glue (waterproof for bathrooms, interior grade for dry areas)
Mirror adhesive or construction adhesive (bonds mirror to frame securely)
Stainable wood filler (hides gaps or screw holes)
Finish (paint, stain, or polyurethane)
Sandpaper (120 to 220 grit for smoothing)
Backing material (cardboard or thin wood to seal the rear)
Hanging hardware (chain, D-rings, or mirror clips)
Pro Tip: Buy the mirror first and measure it exactly before cutting wood.
Required Tools by Method
Jigsaw (for cutting rings in small frames)
Router with circle jig (for shaping large, smooth circular edges)
Miter saw (for cutting 45-degree angles for square base)
Kreg Jig (for hidden corner joints in square frames)
Orbital sander (for final smoothing before finishing)
Clamps (for holding layers during glue-up)
Measuring tape, compass, pencil (for accurate layout)
Drill and screws (for assembly and hardware installation)
If you do not own a router, the jigsaw method is your best bet. If you do, the router method gives flawless results.
Build a Double-Layer Frame with a Jigsaw
The double-layer jigsaw method works ideal for small mirrors and beginners. This technique creates a thick, recessed frame with a professional look using basic tools.
Trace and Cut the Back Ring
Place the mirror face-down on a 1×10 board. Trace the mirror outer edge, which becomes the inner diameter of the frame. Decide on your frame width such as 1/2 inch. Draw a second circle 1/2 inch outside the traced line, which defines the outer edge. Drill a starter hole inside the ring area. Use a jigsaw to cut along the outer circle. Then draw a third circle 1/2 inch inside the original trace and cut along this inner circle to remove the center. The result is a wooden donut that forms the back layer.
Warning: Keep cuts smooth because jigsaw wobble shows on curved edges.
Make the Front Layer
Repeat the process on another board. The inner cut should match the mirror diameter exactly. The outer cut should match the back ring outer edge. This creates a clean front-facing surface with flush edges.
Glue the Layers Together
Stack both rings, aligning outer edges perfectly. Apply wood glue between the layers. Clamp tightly for at least 2 hours. Sand the seam smooth after the glue dries completely. Now you have a thick, recessed frame ready for finishing.
Create a Square-to-Circle Frame Using a Router
The square-to-circle method works best for large, high-end-looking mirrors. This approach starts with a square frame that gets transformed into a perfect circle using a router.
Cut Mitered Frame Pieces
Cut four identical boards from 2×6 lumber. Each piece should be about 26 inches long. Miter both ends at 45 degrees so they form a perfect square when joined. The actual height should be around 5.5 inches, which is the standard 2×6 dimension.
Drill Pocket Holes and Assemble
Arrange pieces into a square on a flat surface. Center the mirror on top and trace its round shape. Measure 1 inch outward from the trace to set frame width. Mark center points between the inner and outer lines at each corner. Use a Kreg Jig to drill one pocket hole per mitered end, drilling into the short end of each board. Keep holes centered to avoid exposure after routing.
Apply wood glue to all mitered joints. Join corners with 2 1/2-inch Kreg screws. Clamp until the glue sets, which takes about 1 to 2 hours. Check for squareness by measuring diagonals; they should match exactly.
Cut Precise Circles with a Router Circle Jig
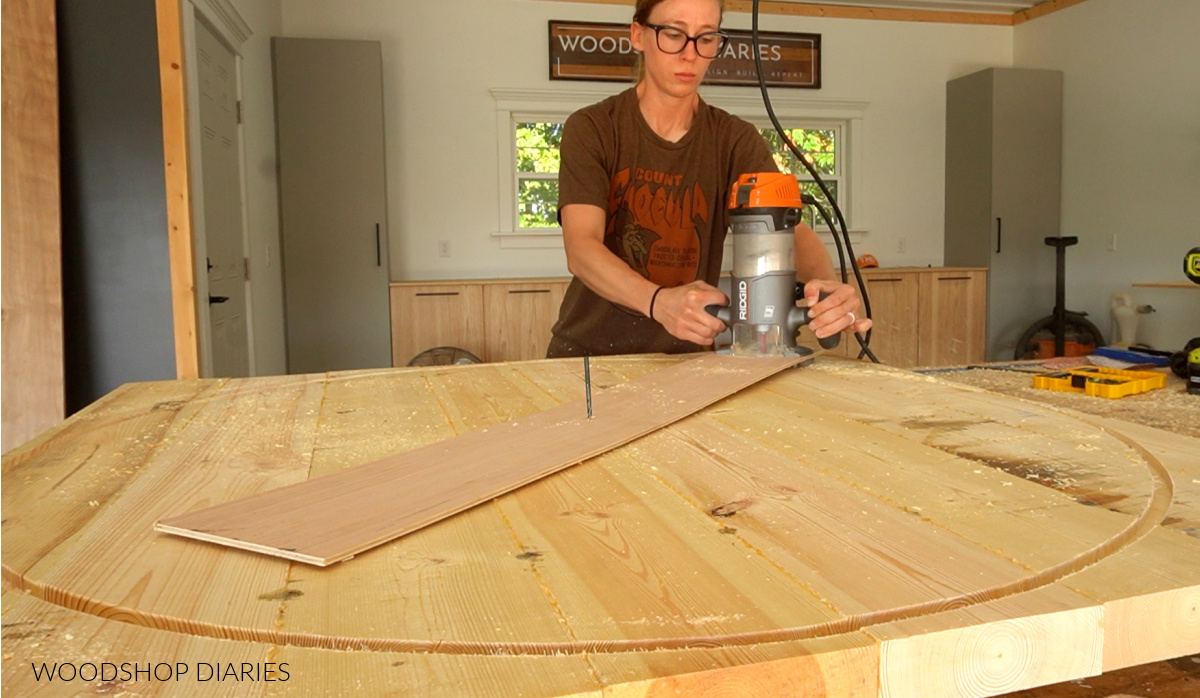
Precision is key in this step. The router circle jig turns your square frame into a perfect circle with smooth, professional edges.
Build the Jig
Cut a straight arm from scrap wood about 17 inches long. Calculate your final radius. For a 25.5-inch outer diameter, the radius equals 12.75 inches. Adjust for router bit width by subtracting half of the bit diameter. For a 1/4-inch bit, subtract 1/8 inch, giving a final pivot-to-bit distance of 12 5/8 inches. Drill a pilot hole at this point and attach a pivot screw to the center of your work surface.
Cut the Outer Circle
Clamp the square frame over the center pivot. Insert the jig hole onto the pivot screw. Secure the router to the jig. Turn on the router and slowly rotate it around the center, following the marked outer line carefully. The result is a perfect round outer edge.
Cut the Inner Circle
Recalculate the radius for the inner cut. With an outer radius of 12.75 inches and frame width of 1 inch, the inner radius equals 11.75 inches. Adjust for bit width to get a final pivot distance of 11 5/8 inches. Reset the jig and cut the inner circle to remove the waste center.
Create a Rabbet for Secure Mirror Fit
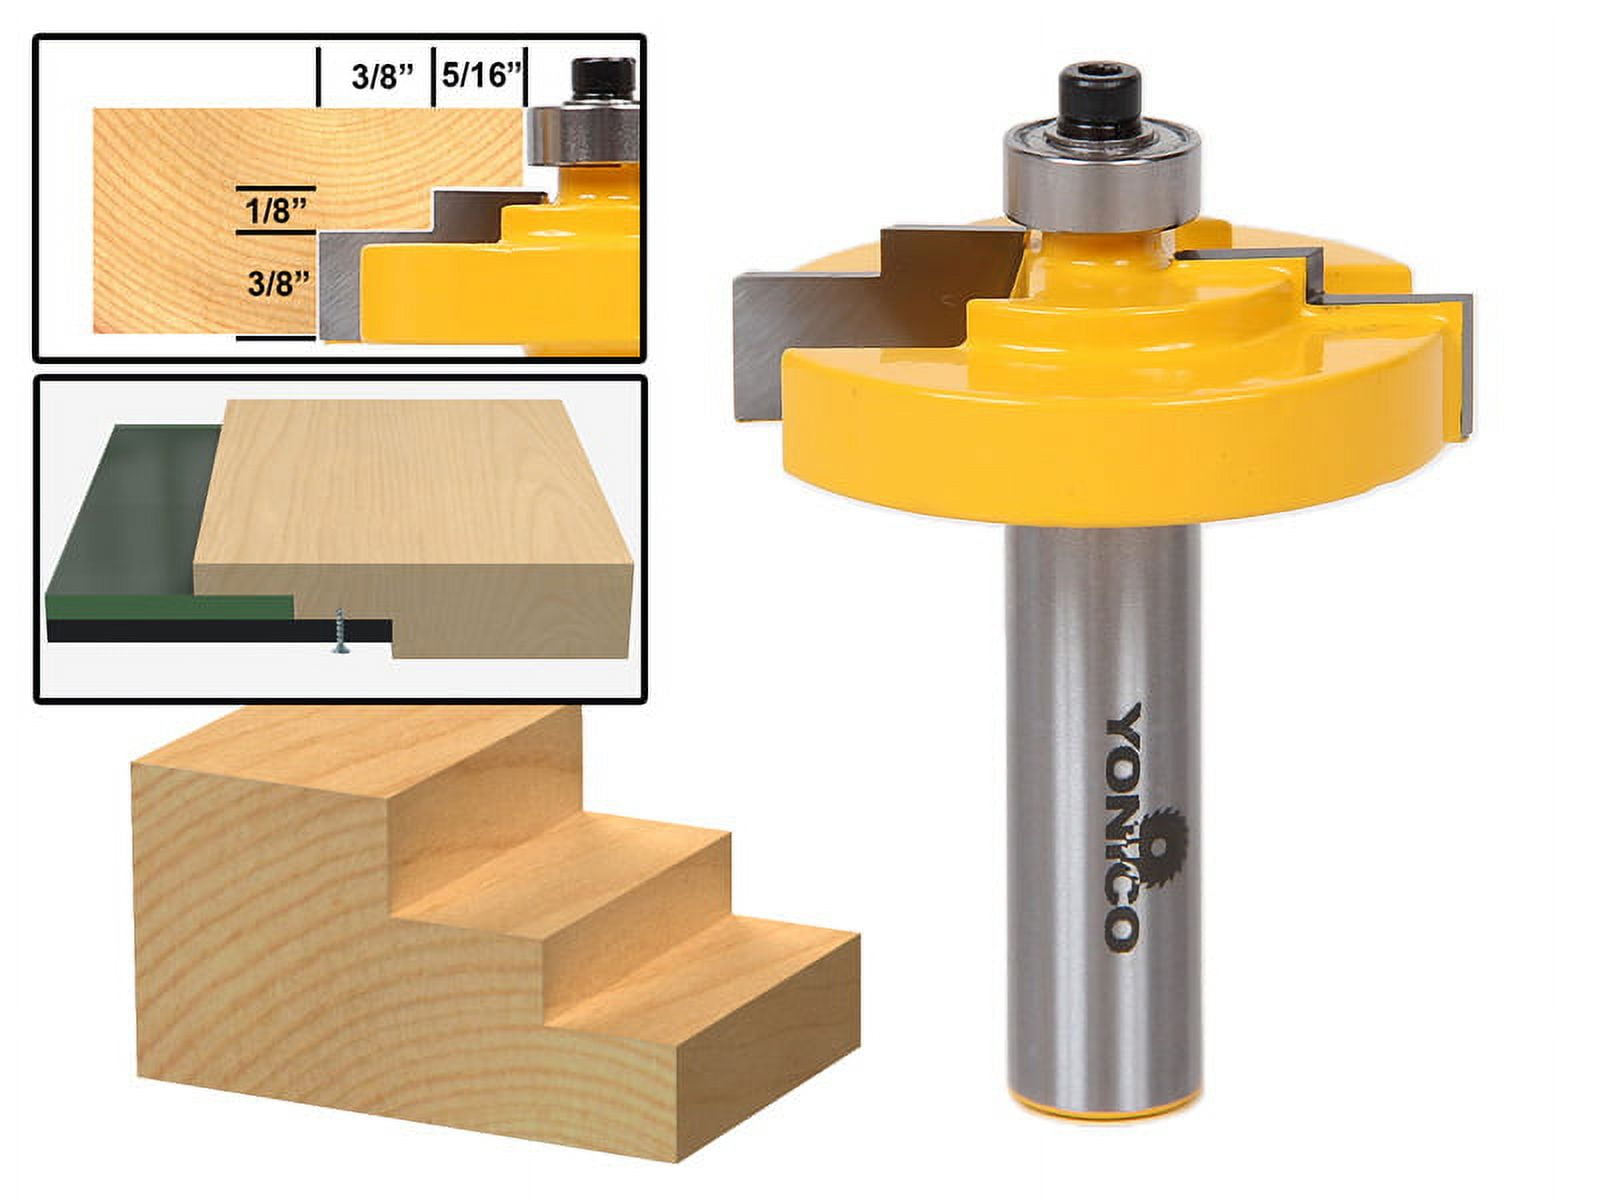
The rabbet creates a recessed ledge that holds the mirror securely in place. Without this step, the mirror would sit unevenly and could shift over time.
Reuse the router jig setup. Set bit depth to 1/4 inch, which matches standard mirror thickness. Slightly reduce the radius by 1/8 inch to create a snug ledge. Cut a shallow groove around the back side of the inner edge. This rabbet holds the mirror in place flush with the front of the frame.
Test-fit the mirror before gluing. It should sit flush with no gaps or wobble.
Sand, Fill, and Finish Your Frame Professionally
The finishing step determines how professional your frame looks. Proper preparation makes the difference between a DIY project and a store-bought appearance.
Sand Thoroughly
Use an orbital sander with 120-grit paper on all surfaces. Switch to 180 to 220 grit for smoothness. Use a detail sander on curves and tight spots. Wipe away dust with a tack cloth before moving to the next step.
Fill Gaps and Hide Holes
Apply stainable wood filler to pocket holes, seam lines from layered frames, and any minor cracks or dents. Let the filler dry completely. Sand lightly until the surface is flush with the rest of the frame. This step makes DIY frames look store-bought.
Apply Final Finish
Choose your finish based on style and location. Paint with black acrylic creates an industrial look; sand between coats for smoothness. Stain with polyurethane adds natural wood tone; use pre-stain conditioner first for even absorption. Glossy polyurethane adds shine and protects against moisture, making it ideal for bathrooms. Apply 2 to 3 coats, lightly sanding between each layer.
Pro Tip: Spray finish provides even coverage on curves.
Install the Mirror and Add Hanging Hardware
The installation step ensures your mirror stays secure and mounts properly to the wall.
Use the Right Adhesive
Never rely on weak glue. Mirror weight demands high-strength adhesive. Use construction adhesive such as Liquid Nails or mirror-specific mastic available at glass suppliers.
Flip the frame over with finished side facing down. Apply adhesive to the rabbet ledge. Carefully place the mirror into the frame. Press down evenly to distribute weight. Place books or clamps on top to weight it down. Let the adhesive cure for 24 hours, following product instructions exactly.
Warning: Do not skip the cure time. Premature handling causes slippage and potential damage.
Seal the Rear and Install Hanging System
Cut a round piece of cardboard or thin wood to fit the back. Attach with wood glue or small nails. This covers exposed edges and protects the mirror. Optional: Add a moisture barrier such as a plastic sheet in humid bathroom areas.
Choose hanging hardware based on weight and style. Chain creates a classic look; attach with eye screws at top edges. D-rings are more secure; mount on the back frame rather than wood alone. If the mirror has pre-attached clips, ensure they do not interfere with wall mounting.
Use a level to mark wall hooks. Hang the mirror and check for even alignment. Adjust if one side sags.
Avoid Common DIY Mistakes
Learning from these common errors saves time and materials.
Misaligned pocket holes occur when drilling too close to the edge. Holes will show after routing. Fix this by centering holes in the mitered end and using filler if mistakes happen. Inaccurate jig radius results in oval or wobbly circles. Double-check your math before cutting. Final radius equals desired radius minus half the bit diameter. Skipping dry-fit leads to problems later. Always test mirror fit before gluing. Check for even gap and full contact. Poor sanding leaves rough edges visible. Sand thoroughly, especially on visible curves where jigsaw marks show most.
Design Ideas and Style Options
Your finishing choices transform the frame into a statement piece matching your decor.
Industrial look uses black matte paint with glossy polyurethane topcoat and silver chain hanger. This creates sharp contrast with a modern edge. Rustic farmhouse style uses reclaimed wood with whitewash or light stain and distressed finish for charming vintage appeal. Modern minimalist frames use thin wood (1/2 inch) with natural oak or walnut and no ornate details for clean, elegant results. Statement pieces use wide frames (2 inches or wider) with dark walnut stain and optional LED strip lighting behind the frame for dramatic focal points.
Cost and Time Comparison
| Method | Time | Cost | Best For |
|---|---|---|---|
| Jigsaw layered method | 3 to 4 hours | Under $50 | Beginners, small mirrors |
| Router square-to-circle | 5 to 6 hours | Under $50 (tools owned) | Pros, large mirrors |
| Reclaimed wood | 3 to 4 hours | Under $20 | Eco-builders, rustic style |
Even with tool costs, DIY pays off over time. The same mirror frame would cost $300 to $500 retail.
Frequently Asked Questions About Framing a Round Mirror
What is the easiest way to frame a round mirror for beginners?
The double-layer jigsaw method works best for beginners. It requires only a jigsaw, basic wood boards, and wood glue. You trace two circles, cut them out, stack them together, and sand the result. This method works well for mirrors under 12 inches in diameter.
Do I need special tools to frame a large round mirror?
For large mirrors over 20 inches, a router with a circle jig provides the most precise results. The router cuts smooth, even curves that are difficult to achieve with a jigsaw. You will also need a Kreg Jig for creating pocket holes in the square frame before routing.
How much does it cost to frame a round mirror yourself?
Total material costs typically stay under $50. This includes the frameless mirror (around $35 on sale), wood boards, glue, finish, and hanging hardware. Store-bought framed mirrors of similar size cost $300 to $500.
Can I frame a round mirror in a bathroom?
Yes. Use waterproof wood glue and apply multiple coats of glossy polyurethane to protect against humidity. Reapply polyurethane every 2 to 3 years in high-moisture environments. Check the adhesive bond annually and reapply if any movement occurs.
How do I make sure the mirror fits securely in the frame?
Create a rabbet (recessed ledge) around the inner edge using a router. The rabbet should match the mirror thickness plus a small lip to hold it in place. Always dry-fit the mirror before applying adhesive to ensure even contact and no gaps.
Key Takeaways for Framing Your Round Mirror
Framing a round mirror is a high-impact, low-cost DIY project. Whether you use a jigsaw for small mirrors or a router for large statement pieces, the result is a custom frame that looks like it came from a design catalog but costs far less. Pick your method based on mirror size and your available tools. Measure twice and cut once. Apply proper finishing techniques for durability, especially in bathrooms. With total costs under $50 and 3 to 6 hours of work, this project delivers exceptional value and a beautiful result you will enjoy for years.