Creating a custom LED mirror transforms an ordinary bathroom or vanity space into a professional grooming station. A DIY LED mirror provides even, shadow-free lighting perfect for makeup application, shaving, and skincare routines at a fraction of retail prices. This guide covers three popular types: backlit mirrors for diffused illumination, infinity mirrors for decorative depth effects, and edge-lit mirrors for quick upgrades.
You will learn how to select the right LED strips with proper color temperature and CRI ratings, build or modify a frame, safely wire the electrical system, and achieve professional-quality light diffusion. Most projects cost between $15 and $250, saving up to 60% compared to store-bought models.
Choose Your LED Mirror Type
Each mirror type delivers a distinct visual effect and varies in complexity and cost.
Backlit vs Infinity vs Edge-Lit Options
Backlit mirrors mount LEDs behind a frosted or sandblasted mirror surface, creating soft, uniform illumination ideal for accurate skin tone and makeup work. Infinity mirrors stack a one-way glass over a regular mirror with LEDs between them, producing a mesmerizing tunnel-like visual effect perfect for modern decor. Edge-lit mirrors attach LED strips to the outer frame or back edge of a standard mirror, generating a halo glow that works well for renters or temporary installations.
| Type | Best For | Difficulty | Cost Range |
|---|---|---|---|
| Backlit Mirror | Makeup, grooming, facial lighting | Moderate | $120–$150 |
| Infinity Mirror | Decorative ambient glow | High | $100–$200 |
| Edge-Lit Mirror | Quick upgrade, photography lighting | Very Easy | $15–$50 |
Match Your Mirror to the Room
For bathroom vanities, choose a backlit mirror with IP65 waterproof rating, CRI of 90 or higher, and color temperature between 4000K and 5000K. For decorative accents in living spaces, an infinity mirror with RGB LEDs and smart control creates striking visual interest. For budget-conscious or temporary installations, an edge-lit mirror using peel-and-stick LED strips provides the fastest path to enhanced lighting.
Select the Best LED Strip for Your Project
Choosing the right LED tape determines both performance and visual quality.
Key Specifications for Mirror Lighting
Color temperature between 3500K and 5000K provides warm to daylight white light without the eye strain caused by cool white above 6000K. A CRI of 90 or higher ensures true skin and makeup color representation. Voltage should be 12V for shorter runs or 24V for longer strips to minimize voltage drop. Brightness should reach at least 1600 lumens for vanity use, and waterproof rating should be IP65 or higher for bathroom environments.
LED density of 60 to 120 LEDs per meter creates even light distribution without visible hotspots. The strip must bend around corners without cracking circuits, and dimmability enables adjustable comfort for different times of day.
Smart Control and Dimming Options
For app or voice control integration, select Zigbee, Wi-Fi, or Bluetooth-enabled strips compatible with Tuya, Alexa, or Google Home platforms. Pair with a remote dimmer module for easy brightness adjustment without smart home setup. Use only UL-listed drivers from reputable brands to avoid flickering or inconsistent color output.
Build the Frame for Backlit and Infinity Mirrors

A sturdy frame houses the mirror and provides mounting surfaces for LEDs.
Cut and Assemble a Mitered Frame
Use ¾-inch plywood or 1×3 wood for the outer frame structure. Cut pieces at 45-degree angles using a miter saw for clean, seamless corners. Glue and clamp joints together, then reinforce with brad nails or wooden dowels for added strength. Sand all surfaces smooth and apply stain or paint to match your room decor.
Alternate grain direction when cutting frame pieces for a visually seamless wood appearance.
Create the Inner LED Cavity
For backlit mirrors, build a 3-inch recessed cavity to hold the LED strips. Attach 1×3 boards inside the frame to create this spacing. Round all inner corners with a router or file to prevent LED strip damage from sharp edges. Sharp corners can crack LED circuits and significantly reduce lifespan.
Paint the interior of the frame white to maximize light reflection and boost overall brightness. White surfaces reflect stray light forward, significantly increasing luminous efficiency.
Prepare the Mirror Surface for Light Diffusion
Standard mirrors block light transmission, so the reflective coating must be modified for backlit applications.
Sandblast the Mirror Back
Sandblasting provides the most professional frosted finish. Tape areas that should remain reflective, then blast the back surface until frosted and translucent. Peel off tape and clean edges for a crisp design. This process takes approximately 30 minutes and requires a sandblaster, sand, and masking tape.
Apply frosted glass spray after sandblasting to correct any uneven spots and achieve perfectly uniform diffusion.
Why Spray-On Finishes Fail
DIY attempts using rattle-can mirror spray and frosted glass spray required eight coats across three cans with poor results. The reflection remained hazy and clarity suffered significantly. Professional etching or sandblasting delivers superior results and avoids wasted materials.
Install the LED Strip Correctly
Proper installation ensures even lighting and long-term durability.
Clean and Position the Strip
Wipe all surfaces with isopropyl alcohol using a lint-free cloth. Allow complete drying before proceeding. Mark the layout with pencil or tape to ensure accurate placement before committing the adhesive.
Mount with Reinforced Adhesion
Peel the backing and press the strip firmly into position. Reinforce with hot glue or 3M VHB tape at corners and every 6 inches along the strip. Factory adhesive often fails over time, especially in humid bathrooms, so secondary bonding prevents future problems.
Handle corners carefully to avoid kinking, which damages internal circuits. Use L-shaped connectors or cut at solder points and rejoin with wire instead of sharp bends.
Wire and Power the LED System

Safe electrical installation ensures reliable operation and prevents hazards.
Calculate Power Requirements
Determine total wattage by multiplying strip length by watts per meter. For example, a 5-meter strip at 14.4W/m equals 72W total. Select a driver with 80 to 100W capacity, never exceeding 80% of the driver’s rated capacity for safety and longevity.
Connect the Driver Safely
Turn off power at the breaker before working near electrical connections. Drill a hole in the frame for the power cord exit. Connect the LED strip to the driver using plug-in connectors or soldered joints. Insulate all connections with heat shrink tubing or hot glue to prevent shorts. Test the system before final assembly.
For smart control options, install a remote-controlled socket or dimmable switch for easy on/off functionality without hardwiring.
Assemble and Mount the Mirror
Secure the glass properly to prevent damage and ensure stable wall mounting.
Secure Glass in the Frame
Place the mirror into the frame and check for even gaps on all sides. Temporarily hold with hot glue, then secure with back-mounted screws for permanent installation. Alternatively, apply Dow Corning 795 silicone sealant along the frame edge for a strong, safe bond that won’t damage etched areas.
Allow adhesives to cure for 24 hours before moving or powering the mirror. Lightly clamp during curing to maintain position.
Mount to Wall Securely
Use angle brackets designed for mirror mounting to attach the finished piece to the wall. Ensure the wall is level and structurally sound. Consider connecting to an existing bathroom light circuit so the mirror operates from the same switch as ceiling lighting.
Create an Infinity Mirror Effect
Infinity mirrors produce a stunning visual illusion of infinite depth.
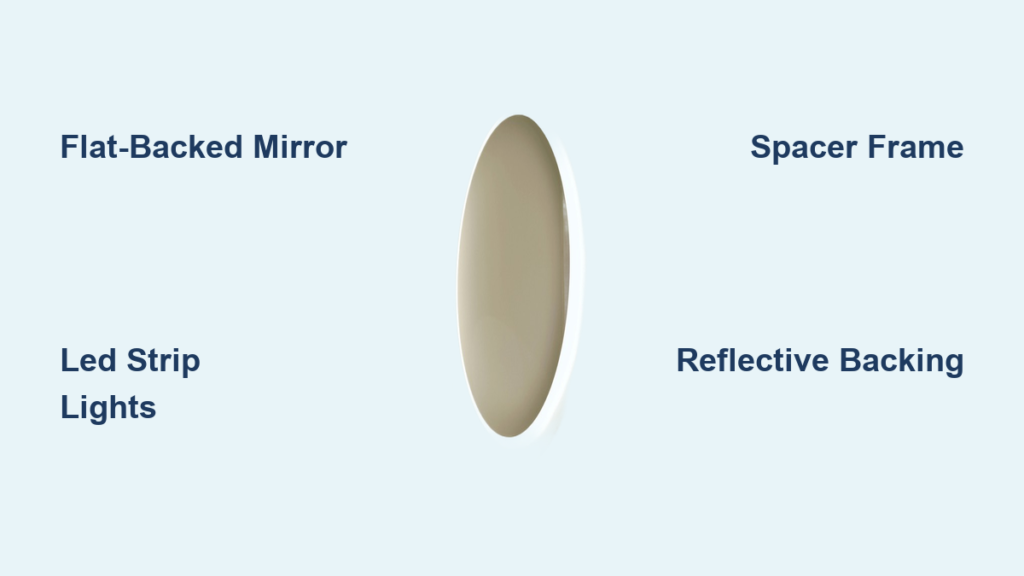
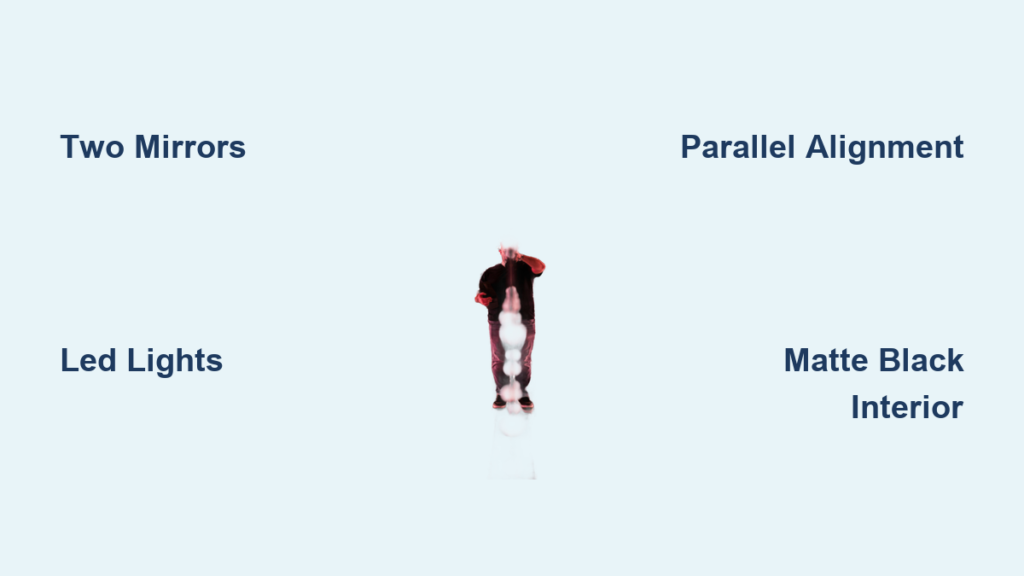
Layer the Components
Mount a fully reflective base mirror inside the frame with edges glued securely. Attach the LED strip to the inner edges of a spacer frame that creates a 1 to 2-inch gap. Leave a hole for the power cord exit. Align a one-way mirror or silver window film on clear glass over the front and secure carefully, avoiding fingerprints.
Achieve the Best Visual Effect
View the infinity mirror in low ambient light to maximize the mesmerizing tunnel glow. Replace standard LED strips with neon LED strips to create glowing text, logos, or 3D patterns for enhanced visual impact.
Optimize Light Performance
Maximize brightness and eliminate common problems through proper techniques.
Boost Brightness and Evenness
Paint the interior white to significantly increase illumination. Avoid gaps in LED placement to eliminate dark spots. Use quality drivers with smooth DC output to reduce flickering. Allow airflow behind the mirror to prevent overheating. Apply frosted spray or diffuser film for smoother light output. For infinity mirrors, paint the interior black to enhance contrast and depth.
Prevent Common Issues
Reinforce adhesive with hot glue to prevent peeling. Ensure continuous strip placement without gaps for even light distribution. Replace cheap drivers to eliminate flickering. Use IP65 or higher rated strips and sealed drivers in bathrooms. Use 24V or parallel wiring for long runs to prevent voltage drop.
Frequently Asked Questions About Making a LED Mirror
What tools do I need to build a LED mirror?
Essential tools include a miter saw for 45-degree frame cuts, isopropyl alcohol and lint-free cloths for surface cleaning, a hot glue gun for securing strips, a drill for routing power cords, and sandpaper or a file for smoothing sharp edges. A soldering iron helps create durable electrical connections.
How much does a DIY LED mirror cost?
Costs range from $15 for a basic edge-lit version using peel-and-stick strips to $250 for a full backlit or infinity mirror with smart controls. This represents savings of up to 60% compared to retail models costing $400 to $800.
What color temperature is best for makeup application?
Color temperature between 4000K and 5000K provides true white light without blue or yellow tint, ideal for accurate makeup application. Avoid temperatures above 6000K, which cause eye strain during prolonged use.
Can I use LED mirrors in bathrooms?
Yes, select LED strips with IP65 or higher waterproof rating and use sealed, moisture-resistant drivers. Ensure all electrical connections are properly insulated and the driver is located outside the wet zone.
How do I prevent LED strips from falling off?
Reinforce the factory adhesive with hot glue or 3M VHB tape, especially at corners and every 6 inches along the strip. This prevents adhesive failure in humid bathroom environments where factory adhesive often degrades over time.
Do I need professional glass etching?
For backlit mirrors, professional sandblasting delivers superior, uniform frosted results compared to DIY methods. The cost of professional etching runs approximately $140, only slightly more than DIY materials, but saves significant time and frustration from failed attempts.
Key Takeaways for Building Your LED Mirror
Building a custom LED mirror delivers professional-quality lighting at a fraction of retail cost. Select the right mirror type based on your needs: backlit for grooming and makeup, infinity for decorative impact, or edge-lit for quick upgrades. Prioritize high CRI of 90 or higher and color temperature between 3500K and 5000K for accurate visibility.
Reinforce LED strip adhesion with hot glue to prevent failure in humid environments. Paint frame interiors white to maximize brightness, and round all corners to protect LED circuits. Test all components before final assembly, and allow 24 hours for adhesives to cure before mounting.
With careful planning and attention to detail, your custom LED mirror will provide perfect lighting for daily routines while serving as a stunning design feature in any space.