Attaching a mirror to a frame requires more than just glue and hope. The right method combines mechanical fastening, proper backing, and smart design to create a secure, reversible, and long-lasting result. Whether you are framing a bathroom mirror, building a decorative wall piece, or repairing a vintage cabinet, understanding the proper techniques prevents safety hazards and ensures your mirror stays put for decades. This guide walks you through every major attachment method, from cutting the perfect rabbet to mounting your finished piece securely to the wall.
You will learn how to choose between glazing points, clips, brads, and adhesives based on your mirror’s size and weight. The article covers essential frame preparation, backing board selection, reinforcement techniques for large mirrors, and professional finishing tips. By the end, you will have the knowledge to attach any mirror to any frame with confidence.
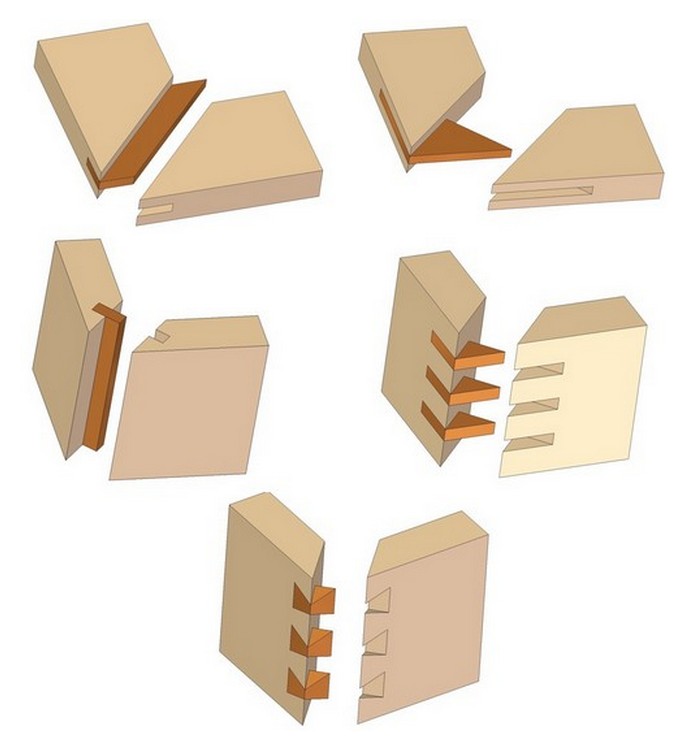
Cut a Precision Rabbet for Secure Fit
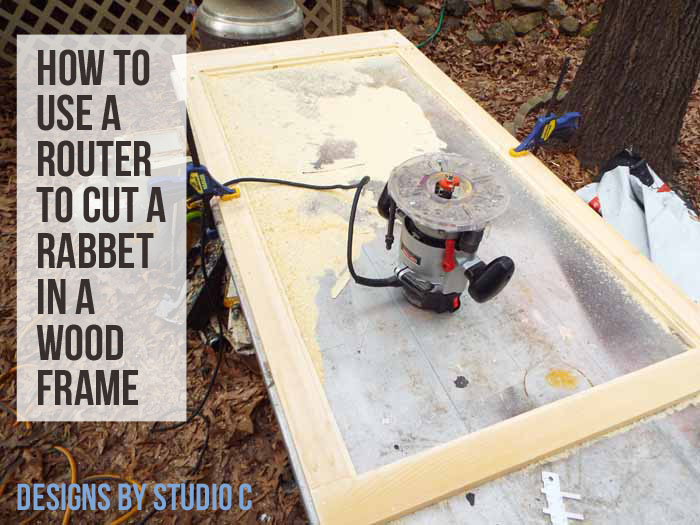
A rabbet is a recessed groove cut into the inner edge of the frame that holds the mirror snugly while hiding its edges. This foundational step determines how well your mirror sits and stays in place.
Determine Rabbet Dimensions
Your rabbet must match the combined thickness of the mirror and backer board, plus a small clearance gap. For example, if your mirror is 3/16 inch thick and your backer is 1/8 inch, the total is 5/16 inch. Cut the rabbet depth to 3/8 inch deep to accommodate the 5/16 inch total plus 1/16 inch clearance. The rabbet width should be slightly wider than the mirror thickness, typically 1/2 inch for standard mirrors. Leave a front lip of 1/4 inch to 5/8 inch to maintain visual balance and structural support.
Use Router for Clean, Accurate Cuts
A router with a straight or bearing-guided rabbeting bit delivers the cleanest results. Set the bit depth to match your calculated rabbet depth. Clamp the frame securely. Route counter-clockwise around the outside perimeter. Flip and route clockwise along the inside to prevent tear-out. After routing, square rounded corners using a wide chisel guided by the routed walls. Always measure from the inside of the rabbet when cutting miters to ensure accurate assembly.
Reinforce Frame Joints for Durability
Even the best attachment method fails if the frame itself cannot hold up, especially with larger mirrors that add significant weight.
Glue and Clamp Miter Joints
For all frames, apply wood glue to mitered corners and clamp until dry. Use corner clamps or a band clamp for even pressure. This creates a surprisingly strong joint on its own. The glue bond often exceeds the strength of the wood itself when properly applied.
Add Mechanical Reinforcement for Large Frames
Mirrors over 24 inches require extra strength at the joints. Biscuit joints improve alignment and add shear resistance. Splines are thin wood strips inserted into kerfs across the joint for maximum strength. Pocket screws hidden on the backside work well for heavy-duty builds. L-brackets or angle iron mounted inside corners provide additional rigidity for oversized installations.
Install Glazing Points for Reversible Hold
Glazing points are small metal tabs that press into the frame to hold the mirror securely within the rabbet. This is the go-to method for most DIYers and professionals because it is reversible and requires no special adhesives.
Position Mirror Face-Down Safely
Lay the mirror face-down on a soft surface like a blanket or foam padding. Place the frame over it, aligned with the rabbet. This protects the mirror surface from scratches and allows you to work on the backside.
Drive Points Every 6 to 8 Inches
Insert a glazing point every 6 to 8 inches along each side. Use a point driver tool available at art supply stores or hardware shops. Alternatively, use a flat screwdriver pushed carefully with a hammer. Push each point into the wood at a slight downward angle so it bites into the rabbet and pulls the mirror tight. Angle matters because incorrect placement reduces holding power significantly.
Use Retaining Strips with Brads or Screws
For heavier or larger mirrors, glazing points alone may not suffice. Retaining strips provide stronger mechanical support by distributing pressure along a wider area.
Build Wooden Retaining Strips
Cut thin hardwood or plywood strips that are 1/4 inch thick by 3/4 inch wide. Length should be slightly shorter than the internal frame dimension. Place the mirror in the rabbet, then position the strips over the edges.
Fasten with Pin Nails or Brads
Pre-drill holes in both the strip and frame to prevent splitting. Use a pin nailer or brad nailer to drive fasteners every 6 to 12 inches depending on mirror weight. Alternatively, use 1-1/2 inch brads driven horizontally into the frame so they do not penetrate the backer board behind the mirror.
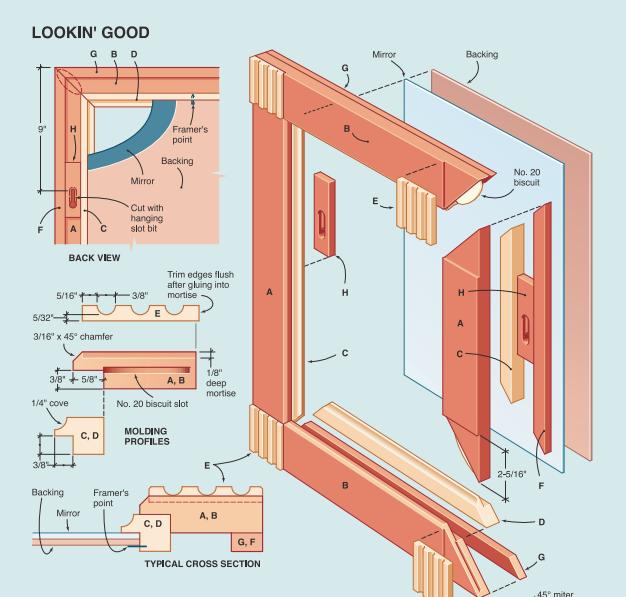
Apply Stepped Rabbet with Backer Board
For maximum support and a flush wall fit, use a two-stage rabbet system with a backing board. This design accommodates both the mirror and the backer in separate levels within the same frame.
Cut a Two-Stage Rabbet
Using a router, cut the first step to a depth equal to the mirror thickness. Cut the second step an additional 1/4 inch deeper to accept the backer board. This design allows the mirror to sit recessed while the backer fills the deeper section, enabling the frame to sit flat against the wall.
Secure Hardboard or Plywood Backer
After inserting the mirror, place a 3/16 inch to 1/4 inch hardboard or plywood backer into the second rabbet stage. Attach it with screws or nails every 8 to 12 inches. Optional thin wood strips over the mirror edges with screws through them into the frame add extra retention.
Attach Mirror with Metal or Wood Clips
Clips offer adjustable, removable mounting, perfect when you plan to replace the mirror later or need to access it for maintenance.
Install Commercial Metal Clips
Products like OOK 1-1/4 inch Mirror Clips screw into the rabbet every 6 to 8 inches. A flexible metal tab presses against the mirror edge, holding it firmly. Some models include rubber bumpers to prevent scratching. For a lower profile, gently flatten the clip with a hammer before installation.
Build Custom Wood Clips
Create your own clips from hardwood or 1/4 inch plywood. Size them at 1/4 inch thick by 1-1/4 inch wide by 2 inches long. Drill two holes, 1/2 inch from each end and 1/2 inch from one side in an offset pattern. Countersink for 3/4 inch number 6 screws. Attach clips to the backer board or frame interior. Never glue the screw threads so they can be removed later.
Bond Mirror to Backer with Adhesive When Permanent
If mirror replacement is not a concern, adhesive bonding to a backer board offers full surface support and eliminates any movement.
Choose the Right Adhesive
Silicone works best in bathrooms and humid areas because it remains flexible, dampens vibration, and lasts 20 years or more. Mirror mastic provides strong permanent bonds but becomes very difficult to remove. Construction adhesive offers gap-filling strength for heavy mirrors. Always avoid hot glue because it is too weak for long-term use.
Apply adhesive evenly to the backer board, not the mirror. Press the mirror firmly into place and let it cure for 12 to 24 hours. Never let adhesive contact the silvered edge or back of the mirror because it can cause coating degradation and permanent damage.
Ensure Backer Overhangs Mirror Edge
Cut the backer board to overhang the mirror by approximately 1/8 inch on all sides. This ensures screws pass through frame mounting holes without touching the glass. Use spacers or shims between the mirror and backer near screw points to prevent pressure cracks that could break the mirror over time.
Select and Install Proper Backing Board
A backing board is not optional. It protects the mirror’s silvered coating, adds rigidity, and provides a solid surface for fasteners.
Choose the Right Material
Hardboard, also known as Masonite, is the most common choice because it is affordable and rigid. Plywood works better for heavy-duty applications. MDF provides a smooth finish but must be sealed against moisture. Foam core works only for lightweight, small mirrors. Cardboard serves for temporary or low-budget use only.
Cut to Correct Size
Backer should typically match the mirror size unless overhang is intentional for screw clearance. Use 1/8 inch to 1/4 inch thickness depending on mirror size and weight. Label the backer with date and mirror thickness for future reference during repair or replacement.
Adapt Method by Mirror Size and Weight
The attachment strategy must scale with the mirror. Using insufficient hardware for a heavy mirror creates a safety hazard, while over-engineering a small mirror wastes money and effort.
Small to Medium Mirrors Under 24 Inches
Use glazing points every 6 to 7 inches. No backer is needed if the frame is solid, but adding one improves longevity.
Large Mirrors Between 24 and 60 Inches
Combine glazing points with a 1/8 inch hardboard backer. Add optional retaining strips or clips for extra security. Reinforce miter joints with biscuits or splines to prevent racking.
Oversized or Heavy Mirrors Over 60 Inches
Use retaining strips with screws or brads. Add French cleat wall mounting to distribute weight safely. Use wall anchors or screws into studs. Never rely on frame fasteners alone for oversized mirrors.
Bathroom Mirrors
Use silicone adhesive combined with glazing points. Seal the entire frame with paint or lacquer to resist moisture. Consider resting the bottom on a backsplash for added support. One user reported no degradation after 20 years using silicone in a bathroom environment.
Finish Frame for Professional Results
A great attachment deserves a great finish. The visible portions of your frame determine the final look.
Prepare Surface Properly
Sand progressively from 220 to 320 grit. For water-based finishes, pre-raise the grain by misting with water, letting it dry, then lightly sanding again.
Stain and Seal with Lacquer
Apply General Finishes Pecan water-based stain with a cotton rag. Wipe off excess and let dry. Seal with Sherwin-Williams CAB Acrylic Lacquer sprayed with an HVLP system. Sand lightly between coats with 320 grit if needed.
Final Coating and Leveling
Spray one thick coat on the back and two heavy coats on the front. Wet-sand with 500-grit paper to level the surface. Apply an 80/20 mix of lacquer thinner and finish for fast, dust-free leveling.
Mount Frame Securely to Wall
Even the best mirror attachment fails if the wall mounting is weak. The hanging system must support the full weight of the assembled mirror and frame.
Choose Right Hanging Hardware
French cleats work best for heavy mirrors and provide easy alignment. D-rings or keyholes suit light to medium frames. Screws into studs handle oversized mirrors when properly anchored.
Integrate Spacers for Flush Mounting
If built-in clips prevent flush wall contact, glue a wood spacer block behind the clip using CA glue. Upgrade to number 8 one-inch screws for strength. Mount the cleat so the wall bracket engages at the top of the spacer, lifting it just enough to clear obstructions while maintaining strength.
Key Takeaways for Attaching Mirror to Frame
Attaching a mirror to a frame successfully requires planning before execution. Cut a rabbet sized for your mirror plus backer plus clearance. Reinforce miter joints with glue and mechanical fasteners for frames over 24 inches. Use glazing points for reversible installations or retaining strips with brads for heavier mirrors. Always include a backing board to protect the mirror coating and provide fastener surfaces. Match your attachment method to mirror size and weight, scaling up hardware for larger pieces. Seal bathroom frames completely against moisture. Mount the finished piece to wall studs using appropriate hardware like French cleats. A well-attached mirror should last decades and remain replaceable without destruction. Design for durability, safety, and serviceability rather than just speed.
Frequently Asked Questions About Attaching Mirror to Frame
What is the best way to attach a mirror to a frame?
The best method combines mechanical fasteners like glazing points or retaining strips with a backing board. This approach provides strength, allows for future removal, and protects the mirror coating. Avoid permanent adhesives unless you never expect to replace the mirror.
Can I use glue to attach a mirror to a frame?
You can use silicone or mirror mastic for permanent installations, especially in bathrooms. However, glue makes future replacement difficult and can damage the mirror coating if it contacts the silvered edges. Mechanical fasteners offer better serviceability.
How do I attach a large heavy mirror to a frame?
For mirrors over 60 inches, use retaining strips fastened with screws or brads, add a hardboard backer, reinforce frame joints with biscuits or splines, and mount the finished piece using a French cleat secured into wall studs.
Do I need a backing board for a mirror frame?
Yes, a backing board protects the mirror’s silvered coating from abrasion and moisture, adds structural rigidity, and provides a solid surface for fasteners. Use 1/8 inch to 1/4 inch hardboard, plywood, or sealed MDF.
How do I prevent my mirror from cracking in the frame?
Leave a 1/8 inch expansion gap between the glass and frame to accommodate temperature and humidity changes. Pre-drill all fastener holes. Use spacers between the mirror and backer near screw points to prevent direct pressure on the glass.