Milk glass is a beloved vintage material known for its soft, creamy glow and elegant opalescence. Often discovered at thrift stores, estate sales, or tucked away in family cabinets, these pieces can appear dull, cloudy, or even grimy after years of dust and oil buildup. The good news? With the right approach, you can restore your milk glass to its original luster without scratching or damaging its delicate surface. This guide reveals the safest, most effective ways to clean milk glass using methods trusted by collectors and restorers.
Whether you’re dealing with a hobnail cake pedestal, a bud vase, or a simple creamer, you’ll learn how to bring back that signature shine quickly and safely. The techniques below work for everything from thrift store finds to cherished family heirlooms.
Choose the Right Cleaning Method
Assess Your Milk Glass Condition
Before cleaning, examine your piece closely under good lighting. Is it lightly dusty or heavily soiled? This determines your best approach. For items with surface dust or light fingerprints, a gentle soap-and-water wash works perfectly. If the glass looks cloudy, grimy, or has intricate detailing like hobnail patterns or narrow necks, the denture cleaner soak is your best bet. Using the wrong method can mean missed grime or unnecessary scrubbing.
Why Denture Cleaner Works So Well
Milk glass shares a chemical similarity with dentures, and both respond well to effervescent cleaning agents. That’s why denture cleaner crystals like Efferdent Power Clean Crystals are a game-changer. They dissolve grime effortlessly, especially in hard-to-reach areas. Unlike scrubbing, which risks micro-scratches, this method uses gentle chemical action to lift residue without touching the surface. One-minute soaks have been shown to remove years of buildup, making it ideal for thrift store finds.
Use Denture Cleaner for Deep Cleaning

Prepare the Soak Solution
Fill a clean tub or bowl with warm (not hot) water. Add denture cleaner crystals according to the package instructions, usually one tablet or scoop per cup of water. Stir gently to help dissolve the crystals. The solution will begin to fizz, activating the cleaning agents. Choose a container large enough to fully submerge your piece, ensuring all surfaces are exposed.
Soak for One Minute
Submerge the milk glass completely and let it sit for just one minute, often all it takes. You’ll notice bubbles working into crevices, especially inside bud vases or between hobnail bumps. There’s no need to leave it for hours or follow longer manufacturer soak times. In most cases, the grime lifts within seconds. Avoid extended soaking, as it offers no extra benefit.
Inspect and Lightly Agitate
After one minute, lift the piece out carefully and check for any remaining residue. If spots persist, use a soft toothbrush or makeup brush to gently brush the area. No hard scrubbing is needed. Flip the piece over to ensure the base was cleaned, especially if it was resting on the tub bottom. Many users report seeing a dramatic transformation even on the underside after repositioning during the soak.
Rinse and Dry Immediately
Rinse the milk glass thoroughly under clean, warm water to remove any leftover cleaner residue. Then dry it immediately with a lint-free microfiber cloth. This prevents water spots and streaks. Buff lightly with a dry section of the cloth to enhance shine. The result is a sparkling, creamy finish that looks like it just left the factory floor.
Clean Lightly Soiled Pieces with Soap

Dry Dust First
For vintage milk glass that’s not heavily soiled, start by removing loose debris. Use a dry microfiber cloth or soft makeup brush to gently wipe the surface. Work in a well-lit area to spot hidden fingerprints or dust pockets. This step is crucial because cleaning over dust can scratch the surface when wet. Always use a light touch since milk glass scratches easily.
Apply Mild Soap Solution
Mix a few drops of mild dish soap with warm water in a bowl. Dip a microfiber cloth into the solution and wring it out well. It should be damp, not wet. Excess water can seep into bases or seams, leading to spotting or long-term damage. Gently wipe the glass in circular motions, focusing on high-touch areas like handles or rims.
Treat Stubborn Marks Gently
If a spot won’t budge, don’t scrub. Instead, place the damp, soapy cloth directly on the mark and let it sit for 10–15 seconds. This allows the soap to penetrate and loosen the residue. Then wipe gently. Repeat if needed, but never use abrasive tools. For delicate pieces, this passive approach protects the finish while still delivering results.
Rinse and Buff to Shine
Wipe the piece with a clean, water-rinsed cloth to remove all soap. Then dry immediately with a dry microfiber towel. To maximize shine, buff the surface with a clean, dry section of the cloth. This step restores the soft glow and prevents film buildup from air-drying.
Avoid Damaging Materials and Tools

Never Use Abrasives
Stay away from steel wool, scrub sponges, and paper towels. These materials are too rough for milk glass and will leave visible scratches over time. Even microfiber cloths used too aggressively can cause damage. Always use soft tools and minimal pressure.
Skip Harsh Chemicals
Ammonia, vinegar, and bleach-based cleaners may seem like powerful degreasers, but they can strip the surface finish of milk glass, leaving it dull or etched. Despite popular DIY hacks, these chemicals are not safe for long-term preservation. Stick to denture cleaner or mild soap, both proven safe and effective.
Avoid Heat and Sudden Temperature Changes
Never place milk glass near a radiator, oven, or dishwasher. Sudden temperature shifts can cause cracking. Also avoid drying with hair dryers or placing pieces in direct sunlight to dry. Heat accelerates aging and can fade the opalescent finish over time.
Store and Handle to Preserve Shine
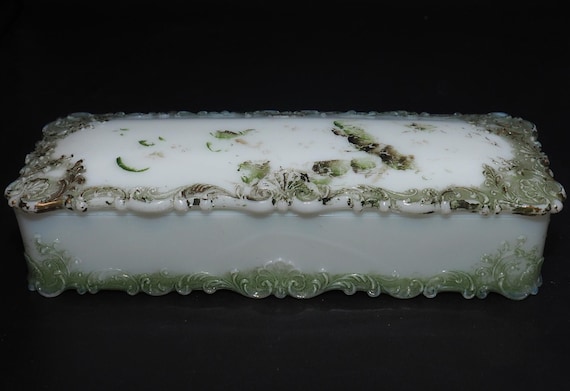
Keep in Low Light and Dry Air
After cleaning, store milk glass in a cool, dry, low-light area. Prolonged exposure to sunlight or bright indoor lighting can cause fading, especially in older pieces. A closed cabinet or shaded shelf is ideal. Humidity control also prevents moisture absorption, which can lead to cloudiness over time.
Handle with Clean Hands or Gloves
Oils from your skin transfer easily to glass and attract dust. Always wash your hands before handling or wear cotton gloves. This is especially important for display pieces that are touched frequently. A clean touch keeps the surface clear and reduces the need for repeated cleaning.
Display with Care
When showing off your restored milk glass, choose a spot away from direct sun, heat sources, and high-traffic areas. Group pieces together on a soft cloth or felt liner to prevent vibration and accidental knocks. Proper display protects the glass while enhancing its nostalgic charm.
Troubleshoot Common Cleaning Issues
Fix Cloudy or Dull Appearance
Cloudiness is usually caused by layered dust, skin oils, or old polish residue. For mild cases, use the soap-and-water method. For deep cloudiness, especially in textured or enclosed areas, the denture soak is the most effective fix. It penetrates where cloths can’t reach and lifts the film without abrasion.
Remove Stubborn Spots Without Scratching
If a spot remains after initial cleaning, don’t press harder. Instead, reapply a damp soapy cloth and let it sit for 10–15 seconds. This softens the grime naturally. For mineral deposits (rare but possible), repeat the denture soak. Never use vinegar. Aggressive rubbing is the top cause of visible scratches on vintage milk glass.
Eliminate Water Spots and Streaks
Water spots form when minerals in tap water dry on the surface. Prevent them by drying immediately with a microfiber cloth. If spots appear, re-wipe with a damp cloth and dry again with no extra cleaner needed. Using distilled water for rinsing can help in hard-water areas.
Clean Intricate Interiors Easily
Bud vases and deep hobnail patterns are nearly impossible to clean with brushes alone. The denture cleaner soak is the only non-destructive method that reaches inside. The effervescence carries the cleaning agent into every crevice, lifting grime without physical contact. One minute is all it takes, with no special tools required.
Frequently Asked Questions About Milk Glass Cleaning
Can I Put Milk Glass in the Dishwasher?
No. Dishwashers expose milk glass to harsh detergents, high heat, and rapid temperature changes, all of which can cause cracking, fading, or surface damage. Always hand-wash milk glass using mild soap or denture cleaner.
Why Does My Milk Glass Look Cloudy After Cleaning?
Cloudiness after cleaning usually means residue remains or water spots have formed. Rinse thoroughly with clean water and dry immediately with a lint-free microfiber cloth. If cloudiness persists, try the denture cleaner soak to lift embedded grime.
Is It Safe to Use Vinegar on Milk Glass?
No. Vinegar is too acidic for milk glass and can etch or dull the surface over time. Stick to denture cleaner crystals or mild dish soap for safe, effective results.
How Often Should I Clean My Milk Glass?
Clean milk glass only when it appears dusty or soiled. Over-cleaning increases the risk of accidental damage. For display pieces, a light dry dusting every few weeks is usually sufficient.
Can I Remove Scratches from Milk Glass?
Unfortunately, scratches on milk glass are generally permanent. Prevention is key: always use soft tools, avoid abrasives, and handle pieces with care to protect the delicate surface.
What’s the Best Way to Clean a Milk Glass Bud Vase?
The denture cleaner soak is the best method for bud vases. The fizzing action reaches deep into narrow interiors where brushes cannot fit. Submerge for one minute, rinse, and dry thoroughly.
Key Takeaways for Restoring Your Milk Glass

Cleaning milk glass doesn’t require expensive products or hours of effort. The key is using the right method for the job: denture cleaner for deep grime and intricate designs, mild soap for light dusting. Avoid abrasives, harsh chemicals, and heat at all costs.
With proper cleaning and storage, your milk glass will retain its creamy glow for years, perfect for display, gifting, or passing down as heirloom treasure. Always assess the piece first, clean gently, dry thoroughly, and handle with care. Start by examining your collection today and choose the method that best matches each piece’s condition.