Scoring and snapping glass sounds like a job for professionals, but the truth is, anyone can learn how to cut glass with a glass cutter using the right technique and a little patience. The secret lies in creating a controlled micro-fracture, a precise “score,” that guides the glass to break cleanly along your intended line. No brute force required.
In this guide, you’ll discover how to choose the right cutter, prepare your workspace, score glass like a pro, and troubleshoot common mistakes. Whether you’re trimming a picture frame, crafting stained glass, or resizing a window pane, these proven methods will help you achieve clean, accurate results every time.
Choose the Right Glass Cutter

Your cutter is the most important investment for clean, accurate cuts. Different wheels and handle designs suit different projects and skill levels.
Match Wheel Type to Your Glass
The cutting wheel determines how well your tool performs on various glass types and thicknesses.
- Carbide (Tungsten Carbide): Ideal for standard annealed glass, mirrors, and float glass up to 6 mm. Durable and reliable for most home projects.
- Diamond Wheels: Best for thick, hard, or specialty glass. Last significantly longer but cost more. Use only when standard wheels won’t cut it.
- Steel Blades: Limited to thin, soft annealed glass. Dull quickly and aren’t recommended for repeated use.
Select the Right Handle Style
Handle design affects control, comfort, and lubrication delivery.
- Oil-Feed Cutters: Feature a built-in reservoir that automatically dispenses oil as you score. Best for beginners and precision work.
- Pencil-Style Cutters: Lightweight and ergonomic, perfect for stained glass or intricate scoring.
- Standard Handheld Cutters: Affordable and widely available, but require manual oil application.
Gather Supporting Tools
Complete your kit with accessories for breaking and shaping.
- Glass Pliers: Apply even pressure to snap scored lines on small or curved pieces.
- Wheeled Nippers: Trim edges and shape stained glass or mosaic tiles without chipping.
- Diamond Grinder: Smooth sharp edges or create custom shapes. Always pair with dust extraction.
Prepare Your Workspace Safely
A stable, clean, and protected environment prevents accidents and ensures accurate cuts.
Set Up a Safe Surface
Your work surface must be flat, stable, and cushioned.
- Use a sturdy table covered with a rubber mat, thick cloth, or foam pad to prevent scratches and cushion impacts.
- Never cut on carpet. It creates instability and traps dangerous glass fragments.
Wear Proper Safety Gear
Glass shards are razor-sharp and can cause serious injury.
- Safety goggles to protect your eyes from flying chips.
- Heavy-duty gloves when handling, breaking, or smoothing glass.
- Long sleeves and a dust mask if grinding to avoid inhaling particles.
- Hearing protection when using power tools like grinders.
Organize Your Tools and Lighting
Clear visibility and easy access keep you focused and accurate.
- Use natural light or a bright desk lamp to see the score line clearly.
- Lay out your ruler, cutter, oil, and pliers before you start.
Clean and Measure the Glass
A flawless cut starts with a spotless surface and exact measurements.
Wipe the Glass Thoroughly
Dust, oil, or residue can cause the cutter wheel to skip.
- Use a lint-free cloth or paper towel to remove debris.
- For greasy spots, clean with rubbing alcohol or glass cleaner, then dry completely.
Measure and Mark Your Cut Line
Precision prevents wasted material and rework.
- Measure from the edge using a tape measure or ruler.
- Mark the line with a pencil or glass marker.
- For straight cuts, clamp a steel ruler or framing square along the line to guide your cutter.
Lubricate the Cutting Line
Lubrication reduces friction, prevents overheating, and extends wheel life.
Apply Cutting Oil
Use mineral oil, kerosene, or dedicated glass-cutting oil.
- For manual cutters: Dab a small amount of oil along the marked line.
- For oil-feed cutters: Fill the reservoir and let the tool dispense oil automatically.
Pro Tip: A well-lubricated cut produces a smooth “hiss.” That sound is your signal that the score is clean.
Score the Glass in One Pass
Scoring creates the fracture line that guides the break. This is the most critical step in the entire process.
Hold the Cutter Correctly
- Grip the tool like a pen for maximum control.
- Keep the cutter perpendicular (90°) to the glass surface at all times.
Start and Finish with Confidence
- Begin just outside the glass edge to ensure full contact from the start.
- Draw the cutter in a single, smooth, continuous motion from one end to the other.
- Apply steady, moderate pressure. Too light won’t score deep enough; too hard can crack the glass.
Listen for the Right Sound
A successful score produces a consistent “sizzling” or “hissing” sound.
- No sound? Your pressure is too light or the wheel is dull.
- Scratching or skipping? The surface is dirty or the cutter isn’t perpendicular.
- Visible white line? You’ve applied too much pressure or the wheel is worn.
Never go back over the line. One pass only. If the score is flawed, wipe the glass clean and start over on a fresh section.
Break the Glass Along the Score

Once you’ve scored the glass, it’s time to separate it cleanly using controlled force.
Use the Table Edge Method
This technique works best for large, straight cuts.
- Align the scored line with the edge of the table.
- Hold both sides of the glass firmly.
- Apply downward pressure on the overhanging piece.
- The glass should snap cleanly along the score line.
Pro Tip: Support the main piece with one hand to prevent unintended breaks.
Use Glass Pliers for Small Pieces
Ideal for tight spaces or intricate shapes.
- Place the plier jaws on both sides of the score line.
- Squeeze gently and evenly to initiate the break.
- Work slowly to control the fracture path.
Avoid shaking or twisting. This causes jagged edges and potential shattering.
Tap for Stubborn Breaks
If the glass refuses to snap:
- Turn the glass over.
- Use tapping pliers or a ball-peen hammer to gently tap along the back of the score line.
- Apply light, consistent taps until the break propagates.
Finish and Smooth the Edges
Freshly cut edges are extremely sharp and must be smoothed before handling.
Sand the Edges
Use progressively finer grits for a safe, polished finish.
- Start with 150-grit sandpaper to remove major sharpness.
- Finish with 400-grit or higher for a smooth edge.
- Wet-sanding reduces dust and provides better control.
Use a File or Grinder
- A hand file works well for quick edge smoothing.
- A diamond grinder offers precision and speed but requires dust management.
Always wear gloves and eye protection during this step.
Cut Different Glass Types Correctly

Each glass type has unique properties that affect how you should approach the cut.
Standard Float Glass
The most common type for windows and picture frames.
- Use a carbide wheel and standard scoring technique.
- Predictable break and easy to handle, making it ideal for beginners.
Tempered Glass
Tempered glass cannot be cut at home.
- It’s heat-treated for strength and shatters completely if scored.
- Never attempt to cut shower doors, car windows, or tempered panels.
- All cuts must be made before the tempering process.
Laminated Glass
This glass contains a plastic interlayer (PVB) that resists breaking.
- Standard scoring may cut the glass but won’t separate due to the film.
- Requires specialized tools and isn’t recommended for DIY projects.
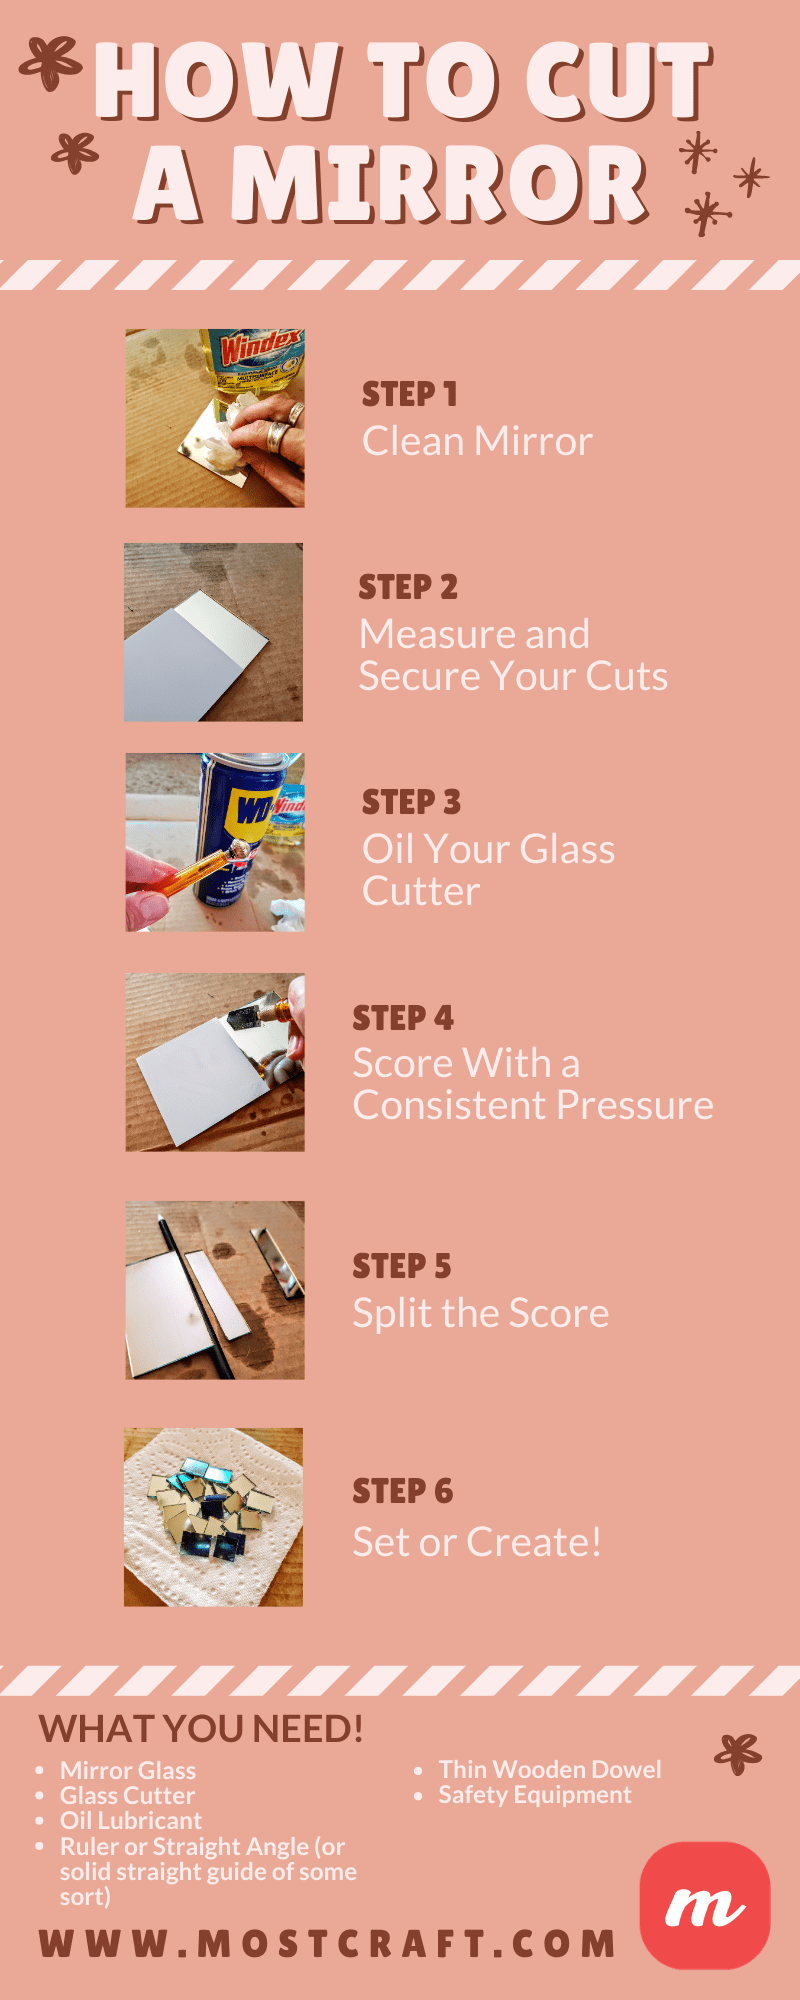
Mirrors
Always cut the glass side, not the reflective back.
- Scoring the coating damages the mirror and causes chipping.
- For intricate cuts, submerge the mirror in water to reduce dust and improve control.
Frosted Glass
The textured side can deflect the cutting wheel.
- Score the untreated, smooth surface for better traction.
- Apply even pressure to prevent edge cracks.
Stained Glass
Precision is critical for decorative projects.
- Use a pencil-style cutter for fine control.
- Score lightly and use wheeled nippers to trim curves.
- Work slowly and double-check measurements before scoring.
Mosaic Tiles
Score from the back to protect the decorative surface.
- Score the back side of the tile.
- Use C-clamps or a cutting mat to stabilize small pieces.
Glass Bottles
Bottles require thermal shock, not pressure.
- Score a continuous line around the bottle with light pressure.
- Heat the line with a candle flame for 10–15 seconds.
- Dip into cold water immediately.
- Repeat the heating and cooling cycle 3–5 times until it splits.
- Sand the edges smooth.
Never use standard breaking methods. Bottles are curved and resist snapping.
Troubleshoot Common Problems

Even experienced users encounter issues. Here’s how to fix them quickly.
Jagged Breaks
Cause: Uneven scoring or inconsistent pressure.
- Solution: Re-score with a steady hand and sharp wheel. Use a guide rail for straight lines.
Glass Won’t Break
Cause: Shallow or incomplete score.
- Solution: Re-score in one pass. If still stuck, tap the back of the line gently.
Chipping
Cause: Scoring the wrong side or using a dull wheel.
- Solution: Always score the back of mosaic tiles and the smooth side of frosted glass. Replace worn wheels.
Uneven Edges
Cause: Cutter not held at 90 degrees.
- Solution: Keep your wrist steady. Clamp a ruler for straight-line guidance.
Shattering
Cause: Excessive pressure or attempting to cut tempered glass.
- Solution: Use moderate pressure. Confirm the glass type before you begin.
Maintain Your Glass Cutter
A well-maintained tool lasts longer and performs better.
Clean After Each Use
- Wipe off glass dust and oil residue.
- Store in a dry, protective case to prevent damage.
Replace Dull Wheels
- If the cutter skips or makes no sound, the wheel is worn.
- Replace carbide or steel wheels as needed. Diamond wheels last years with proper care.
Oil Regularly
- For non-oil-feed cutters, apply a drop of oil before each use.
- Oil-feed models need reservoir refills periodically.
Follow Critical Safety Rules
These non-negotiable rules protect you from injury and project failure.
- Never cut tempered glass. It will explode into small pieces.
- Avoid carpeted surfaces. They cause instability and trap glass shards.
- Don’t use sawing motions. Back-and-forth movement ruins the score.
- Always wear eye protection. Glass fragments can permanently damage your eyes.
- Work in a clean, organized area. Keep children and pets away from your workspace.
Frequently Asked Questions About Cutting Glass
Can you cut glass without a glass cutter?
Yes, but with limitations. You can use a steel file, a diamond-tipped tool, or thermal shock methods (alternating hot and cold water). These alternatives work best on thin glass and carry higher risks. A dedicated glass cutter always produces cleaner, safer results.
Why does my glass shatter when I try to cut it?
Shattering usually results from excessive pressure, a dull cutting wheel, or attempting to cut tempered glass. Reduce your pressure, replace the wheel if worn, and verify the glass type before cutting. Tempered glass cannot be cut at home.
How thick of glass can a standard cutter handle?
Most carbide wheel cutters handle glass up to 6 mm thick. For thicker or specialty glass, you’ll need a diamond wheel cutter. Always check your tool’s specifications before starting a project.
Do I need to oil the cutter every time?
Yes, lubrication is essential. Oil reduces friction, prevents overheating, and extends wheel life. Oil-feed cutters handle this automatically. For manual cutters, apply a small amount of cutting oil along the score line before each cut.
What is the white line after scoring glass?
A visible white line typically indicates excessive pressure or a worn wheel. A successful score is often barely visible but produces a consistent hissing sound. If you see a white line, adjust your pressure and inspect your cutter.
Can you cut a mirror with a glass cutter?
Yes, but always score the glass side, not the reflective backing. Scoring the coating damages the mirror and causes chipping. For intricate shapes, submerge the mirror in water for better control and reduced dust.
Key Takeaways for Cutting Glass with Confidence
Mastering how to cut glass with a glass cutter comes down to precision, not power. Use the right tool for your glass type, score once with confidence, and break cleanly along the fracture line. Always prioritize safety by wearing proper gear and working on a stable, cushioned surface.
Your next step: Practice on scrap glass before tackling your final project. This helps you develop a feel for the right pressure and the satisfying “hiss” of a perfect score. With patience and the techniques outlined here, you’ll cut glass accurately for windows, crafts, and home projects every single time.