Have you ever stood in front of a mirror and noticed your reflection looks slightly stretched, tinted, or blurry? That frustrating experience is a telltale sign of poor mirror quality, and it can completely undermine both the function and aesthetics of your space. Whether you’re shopping for a bathroom mirror, a full-length wall piece, or a decorative vanity model, understanding how to check mirror quality is essential for getting a clear, accurate, and long-lasting reflection.
This guide breaks down exactly what to look for, from glass purity and flatness to edge finishing and LED features. You’ll learn simple at-home tests, what specifications to ask for, and how to spot red flags before making your purchase. By the end, you’ll know exactly how to distinguish between a fleeting bargain and a lasting investment.
Check Glass Purity and Transparency
The foundation of any quality mirror lies in the glass itself. Poor-quality glass contains impurities that distort reflections and cause color shifts, making your reflection appear less accurate than it should.
Look for Green Tint at Mirror Edges
Hold the mirror at an angle and examine the edges carefully. A green or blue tint indicates standard soda-lime glass, which contains iron impurities that distort color and reduce brightness. While acceptable for basic use, this tint becomes especially noticeable in larger mirrors or frameless designs where edges are visible.
Premium mirrors use low-iron glass, which appears crystal clear at the edges and delivers truer reflections. This type is often marketed as “optical clarity glass” and is the gold standard for modern installations where aesthetics matter.
Scan for Bubbles and Streaks
Examine the mirror surface under bright, even lighting by running your eyes across it at different angles. Look for tiny air bubbles trapped inside the glass, cloudy patches or wavy streaks, and inconsistent reflectivity with darker or lighter zones. These flaws suggest poor manufacturing quality and will degrade image accuracy over time. A high-quality mirror should look uniformly transparent, like a window with light behind it.
Pro Tip: Always test mirrors under natural or broad-spectrum light rather than dim showrooms to see true clarity.
Test for Distortion and Flatness
Even minor deviations from flatness cause image warping, making reflections appear stretched, bent, or skewed. This is particularly problematic in full-length or large-format mirrors.
Use the Head Movement Test
Stand about 2 to 3 feet from the mirror and focus on a straight line in the reflection, such as a doorframe, ceiling edge, or tile grout. Slowly move your head side to side while keeping your eyes fixed on that line. If the line bends, ripples, or shifts, the glass isn’t flat. This distortion is common in large, thin mirrors or those that were improperly stored during shipping.
Apply the Straight Edge Check
For a more precise evaluation, press a ruler, level, or straight metal rod against the mirror surface and look for gaps between the edge and the glass. Shine a flashlight behind any gap you find. Any visible light means the glass is curved. Even slight bowing can magnify over large surfaces, making people appear wider or narrower than they actually are.
Observe Grid Patterns in Reflection
Position the mirror opposite tiled walls, window mullions, or bookshelves. Check if parallel lines remain straight and evenly spaced across the entire surface. Widening gaps, curved horizons, or skewed angles all indicate optical distortion. A high-quality mirror preserves geometry accurately.
Warning: Distortion may not be obvious head-on but becomes apparent from angles. Always test from multiple positions.
Verify Glass Thickness and Size Match
Glass thickness directly impacts rigidity, resistance to flexing, and long-term durability. Thicker glass maintains its shape better, especially on uneven walls or in humid environments.
Match Thickness to Mirror Dimensions
Follow this thickness guideline for optimal performance. For mirrors up to 24 inches wide, 3 mm thickness is acceptable. For mirrors 24 to 48 inches wide, use 4 to 5 mm glass. For mirrors over 48 inches wide, choose 6 mm thickness for stability. Thicker glass resists sagging and maintains flatness over time, especially in humid areas like bathrooms.
Avoid Ultra-Thin Mirrors for Large Installations
Mirrors under 3 mm are often used in lightweight decorative pieces or cheap ready-to-hang models. They may look fine initially but are prone to flexing when touched, conforming to wall imperfections, and developing stress cracks over time.
Expert Note: If you press gently on the center of a large mirror and feel movement, it’s likely too thin for its size.
Inspect the Reflective Coating Type

The reflective layer is the heart of mirror performance, determining brightness, color fidelity, and longevity.
Confirm It Is Silver-Backed, Not Aluminum
The reflective coating is applied to the back of the glass and comes in two main types. Silver nitrate coating reflects 95 to 98 percent of light, delivers bright and color-accurate images, and lasts longer when sealed properly. This is used in premium mirrors. Aluminum backing reflects only 85 to 90 percent, often appears slightly dull or hazy, and oxidizes faster. This is common in budget models.
Ask the seller directly: “Is this mirror silver-backed?” If they hesitate or say “standard backing,” it’s likely aluminum.
Check for Coating Uniformity
Look at the mirror from an oblique angle, almost parallel to the surface. A high-quality silver coating appears smooth and consistent. Patchy, mottled, or streaky reflections suggest uneven application. Move across the mirror’s surface and notice if brightness remains constant. Dark spots or fading toward the edges mean thin or degraded coating.
Red Flag: If the mirror looks brighter in the center and dim at the sides, it may have been coated improperly or is starting to degrade.
Evaluate Protective Coating and Edge Sealing
The reflective coating must be shielded from moisture, especially in bathrooms and kitchens. Without proper protection, mirrors deteriorate rapidly.
Look for Multi-Layer Backing Protection
Premium mirrors use a layered defense system. The silver layer serves as the primary reflector. A copper coating (optional) boosts durability and reflectivity. A protective paint layer blocks moisture and chemicals. Edge sealant prevents water from creeping in from the sides. Without all four layers, the mirror is vulnerable to corrosion.
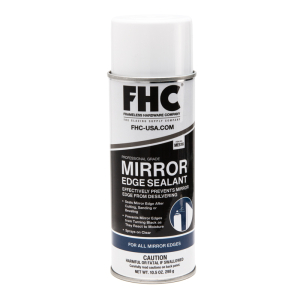
Identify Signs of Poor Edge Sealing
Examine the back edges of the mirror carefully. Are they fully painted or sealed? Do you see bare metal or chipped coating near the border? Black edges or rust spots are telltale signs of moisture ingress, a common failure in low-cost mirrors. Once corrosion starts, it spreads and ruins the reflection.
Ask About CASS Test Certification
For bathrooms, spas, or coastal homes, demand proof of durability. The CASS test (Copper-Accelerated Acetic Acid Salt Spray) simulates years of humid, salty exposure. Mirrors that pass this test resist fogging, peeling, and black edge corrosion.
Eco Note: Modern lead-free, copper-free coatings now meet RoHS and GREENGUARD standards, making them safer for homes and the environment.
Examine Backing and Mounting Structure
The backing supports the mirror and protects the coating from damage. A quality backing ensures long-term structural integrity.
Check for Solid, Moisture-Resistant Backing
Lift the mirror (if possible) and inspect the rear. High-quality backings use plywood, aluminum, or reinforced composite with uniform adhesive. Low-quality backings use thin cardboard, flimsy plastic, or uneven glue spots. In humid areas, the backing must resist swelling and delamination. Warped or bubbled backing indicates poor construction.
Assess Mounting System for Large Mirrors
For wall-mounted or frameless mirrors over 24 inches, look for Z-clips, keyhole hangers, or rail systems that distribute weight evenly. Ensure mounting points are reinforced and aligned with the glass thickness. Avoid adhesive-only mounts for larger mirrors. Mechanical fasteners are safer and more durable.
Safety Tip: Large, heavy mirrors (especially 6 mm glass) require professional installation to prevent falls or stress cracks.
Analyze Edge Finishing and Safety
Edge treatment affects both safety and visual appeal. The right edge type depends on your installation style and safety requirements.
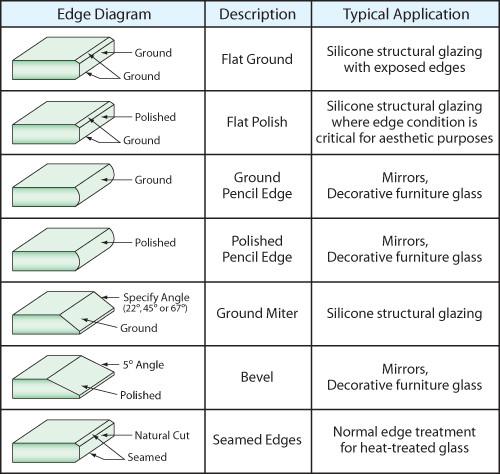
Choose the Right Edge Type
Polished edges feature a smooth, glossy finish that is chip-resistant and ideal for frameless mirrors. Beveled edges have an angled cut that adds elegance and strengthens the perimeter. Seamed edges are rounded and safe, best for framed mirrors where edges are hidden.
Verify Safety Glass Compliance
In high-traffic areas like gyms, schools, or hotels, mirrors must meet safety standards. The ANSI Z97.1 standard (USA) requires impact resistance. The EN 12600 standard (Europe) rates glass on pendulum impact tests.
For safety-critical installations, opt for tempered glass, which breaks into small, blunt pieces, or laminated glass, which holds together when cracked due to a PVB interlayer. These are heavier and need stronger mounting, but they prevent injury.
Note: Safety-rated mirrors often have a permanent etched label on the corner.
Evaluate LED Mirror Features
For illuminated mirrors, additional quality factors come into play beyond basic mirror performance.
Test Lighting Quality and Uniformity
Turn on the LEDs and observe the light on your face. High-quality lighting provides even, shadow-free illumination with no dark zones. Low-quality lighting shows patchy light, visible hotspots, or flickering.
Check color temperature options. 2700K to 3000K delivers warm, relaxing light best for bedrooms. 4000K to 6500K provides cool daylight ideal for makeup application and shaving. Premium models offer adjustable color settings via touch controls.
Confirm Anti-Fog Functionality
In bathrooms, fogging is a major issue. Look for an integrated heating mat behind the glass and automatic activation via humidity sensor or manual button. Test it by running a hot shower and observing whether the mirror clears within 2 to 5 minutes. If it stays foggy, the system is underpowered or missing.
Assess Touch Controls and Build
Touch switches should be flush-mounted and responsive, waterproof and easy to clean, and located away from direct water spray. Avoid mirrors with exposed buttons or seams that trap moisture.
Consider Installation Environment
Where you install the mirror matters significantly for performance and longevity.
Match Mirror to Humidity Level
Bathrooms and kitchens require moisture-resistant coatings, edge sealing, and anti-fog features for LED models. Living rooms and bedrooms are less demanding, and standard silver-backed mirrors suffice. Never install a non-sealed or aluminum-backed mirror in a steamy bathroom. It will corrode within months.
Ensure Wall Flatness Before Mounting
Even the best mirror distorts if the wall is uneven. Before hanging, use a level to check wall flatness. Install shims or adjustable brackets to correct minor imperfections. For large mirrors, hire a professional to ensure safe, flush mounting.
Pro Tip: Mounting on drywall without studs increases the risk of sagging. Use toggle bolts or wall anchors rated for the mirror’s weight.
Compare Cheap vs. High-End Mirrors
Understanding the differences between budget and premium mirrors helps you make informed purchasing decisions.
| Feature | Budget Mirror | Premium Mirror |
|---|---|---|
| Glass Thickness | Under 3 mm | 4 to 6 mm |
| Glass Type | Standard soda-lime (green tint) | Low-iron or float glass |
| Reflective Layer | Aluminum | Silver nitrate |
| Coating Protection | Single-layer paint, no edge seal | Multi-layer with full edge sealing |
| Edges | Unsealed, prone to peeling | Polished, beveled, or fully sealed |
| Durability in Humidity | Prone to black edge corrosion | CASS-tested for resistance |
| Warranty | None or 1 year | 5 to 10 years or lifetime |
Bottom Line: A $200 high-quality mirror often outperforms three $60 cheap ones over time.
Final Quality Checklist Before Buying
Use this checklist before making your purchase decision.
Perform the reflection test by moving side to side with no warping and viewing straight lines that remain straight. Check glass specs, ensuring 6 mm thickness for large mirrors and low-iron glass for best clarity. Inspect the edges for no black spots or peeling, and confirm they are sealed, polished, or beveled. Verify coating details, confirming silver-backed (not aluminum), edge-sealed, and moisture-resistant construction. Evaluate backing and frame, ensuring solid wood, aluminum, or reinforced composite with no bubbles or warping. For LED mirrors, confirm anti-fog heating is included, touch controls are responsive, and lighting is uniform and adjustable. Look for certifications including ANSI Z97.1 or EN 12600 for safety, RoHS and GREENGUARD for eco-compliance, and CASS test passed for humidity resistance.
Frequently Asked Questions About Checking Mirror Quality
How can I tell if a mirror is silver-backed or aluminum-backed?
Look at the reflection from an oblique angle. Silver-backed mirrors appear brighter and more color-accurate. Aluminum-backed mirrors often look slightly dull or hazy. You can also ask the seller directly about the reflective coating type.
What thickness mirror do I need for a large wall mirror?
For mirrors over 48 inches wide, use 6 mm (1/4 inch) glass. For mirrors between 24 and 48 inches wide, 4 to 5 mm is appropriate. Anything under 3 mm is too thin for large mirrors and prone to warping.
How do I test a mirror for distortion at home?
Use the head movement test. Stand 2 to 3 feet away, focus on a straight line in the reflection, and slowly move your head side to side. If the line bends or ripples, the mirror has distortion. The straight edge test (placing a ruler against the glass) also reveals curvature.
What causes black edges on a mirror?
Black edges indicate corrosion from moisture ingress, usually due to poor or missing edge sealing. This is common in low-cost mirrors installed in bathrooms. The reflective coating degrades where water penetrates the edges.
Are LED mirrors worth the extra cost?
LED mirrors are worth it if you need consistent lighting for grooming tasks or anti-fog functionality in bathrooms. Quality LED mirrors provide shadow-free illumination, adjustable color temperature, and built-in heating elements that prevent condensation.
What is the CASS test and why does it matter?
The CASS test (Copper-Accelerated Acetic Acid Salt Spray) simulates years of exposure to humid, salty air. Mirrors that pass this test are proven resistant to fogging, peeling, and black edge corrosion, making them ideal for bathrooms, spas, and coastal homes.
Key Takeaways for Checking Mirror Quality
A truly high-quality mirror delivers optical accuracy through thick, flat, low-iron glass, long-term durability with silver backing and full edge sealing, and humidity resistance for bathrooms and spas. Superior craftsmanship shows in the edges, backing, and finish, while advanced features like anti-fog, touch control, and tunable lighting elevate LED models. Safety compliance matters in high-traffic areas.
Final Tip: Do not be fooled by stylish frames or low prices. The real quality lies in the glass, coating, and construction. These elements ensure clarity and reliability for years to come. Use the tests and criteria in this guide to confidently distinguish between a fleeting bargain and a lasting investment in mirror excellence.