Have you ever admired the rich glow of stained glass in a church window or vintage lamp and wished you could recreate that beauty at home? You can, without the cost or risk of cutting real glass. Faux stained glass delivers the same luminous charm using affordable supplies like glue, paint, and clear plastic or glass sheets. From decorative suncatchers to personalized memorial pieces, this craft welcomes every skill level.
The magic happens by mimicking two core elements of real stained glass: black leading lines that define the design and translucent colored sections that glow when backlit. With a printable pattern and basic household supplies, you can transform a plain sheet into radiant art. This guide walks you through three proven methods so you can pick the best fit for your project, experience, and materials on hand.
Choose Your Faux Stained Glass Method

Each technique offers a different balance of texture, precision, and ease. Pick based on your goals and comfort level.
Glue-Paint Hybrid for Realistic Texture
Best for crafts that mimic the raised, dimensional look of authentic stained glass. This method uses white glue mixed with black paint for the leading and clear glue tinted with acrylic paint for the colored fills. The result is a slightly raised black outline with smooth, translucent sections that diffuse light beautifully.
- Ideal for: Home decor, heirloom gifts, or large window panels
- Skill Level: Intermediate
- Drying Time: 24 hours total
Marker-First Method for Easy Corrections
Perfect for beginners or detailed designs. Draw outlines with a permanent marker on the front of the glass, then apply colored glue to the back. This keeps your brush from smudging lines and lets you fix mistakes with rubbing alcohol.
- Ideal for: Intricate patterns, kids’ crafts with adult help, or trial runs
- Skill Level: Beginner to intermediate
- Drying Time: 12–18 hours
Cellophane Collage for No-Mess Projects
A paint-free option using colored cellophane or transparency paper cut to fit behind a clear plastic sheet. Secure with tape, with no drying time or mixing required.
- Ideal for: Young children, classroom activities, or quick holiday decor
- Skill Level: Beginner (all ages)
- Drying Time: None
Prepare Your Materials and Workspace
Gathering everything before starting prevents mid-project interruptions.
Gather Essential Supplies
Use this checklist to build your toolkit:
- Clear substrate: Glass from an 8×10 frame, acrylic sheet, or old window pane
- Frame (optional): Wood or metal picture frame
- White school glue (e.g., Elmer’s Washable No-Run)
- Clear school glue (e.g., Elmer’s Washable Clear)
- Black acrylic paint plus assorted colors for fills
- Permanent markers (black, medium tip)
- Mixing containers: Muffin tin, small bowls, or bottle caps
- Tools: Blunt paintbrushes, toothpicks, skewers, cotton swabs
- Tape: Masking or washi tape to secure patterns
- Clear acrylic spray sealant for durability
- Rubbing alcohol for cleaning and error correction
- Crinkled tin foil for reflective backing
Pro Tip: Paint your frame a dark color like deep blue using mineral paint to blend with the black leading and enhance the stained glass illusion.
Set Up a Clean, Organized Space
Work on a flat, protected surface in good lighting. Cover your table with newspaper or a silicone mat. Keep rubbing alcohol and cotton swabs nearby for quick cleanups. Ensure ventilation, especially when using spray sealant.
Create the Design and Transfer the Pattern
A clear, accurate pattern is the foundation of a great result.
Find or Draw a Suitable Pattern
Choose simple, bold designs if you’re new. Flowers, geometric shapes, animals, or mandalas work well. Coloring book pages offer excellent free patterns. For personalized art, draw symbols meaningful to you, such as state flowers or family emblems.
Scale it right: Resize the pattern to match your glass using a photocopier or printer settings.
Secure the Pattern Under the Glass
Tape the printed pattern to your work surface. Place the glass or plastic sheet directly on top to trace accurately. If using a frame, tape the pattern to the back of the glass so it remains visible from the front.
Visual cue: Confirm all lines are clearly visible through the substrate before starting.
Apply the Leading: Create the Black Outlines
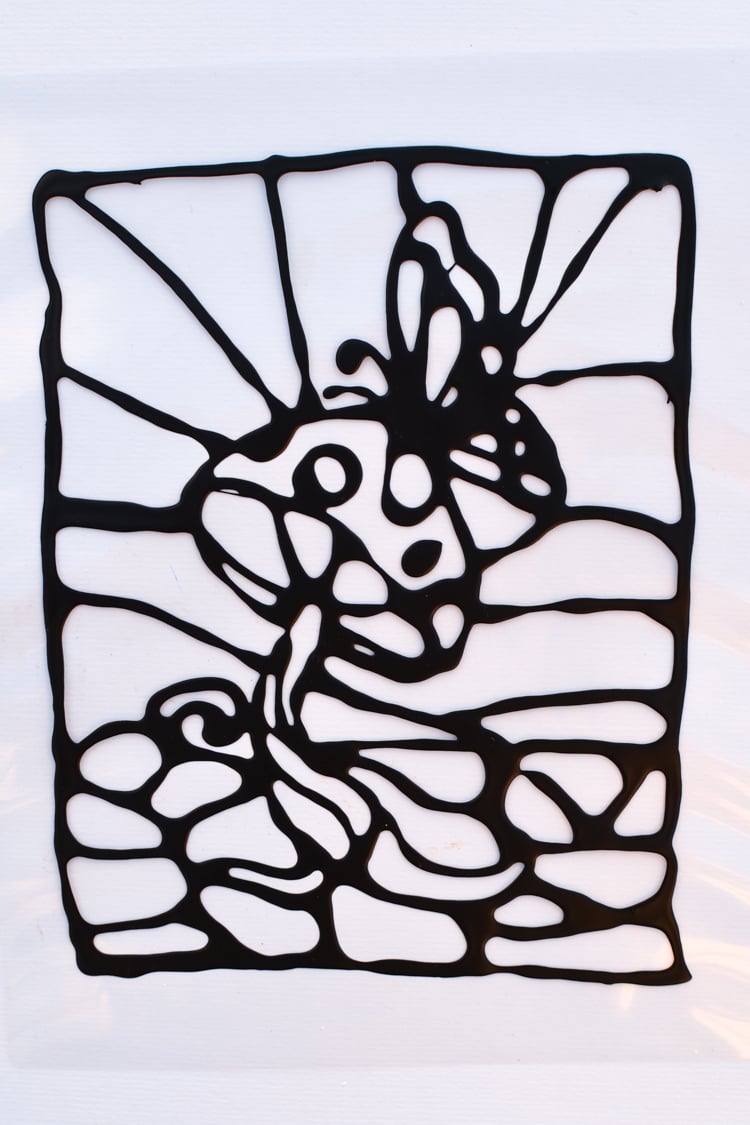
The leading defines your design. Choose the right approach for your method.
Mix Black Glue for Raised Lines
For the Glue-Paint Hybrid Method, create the leading by mixing:
- 1 tablespoon white school glue
- 1 teaspoon black acrylic paint
Stir thoroughly with a skewer until the color is solid black and uniform. Only a small amount of paint is needed, since too much can make the glue clumpy.
Pro Tip: Pour the mixture into a glue bottle with a fine tip for better control.
Trace the Pattern with Steady Hands
Squeeze the black glue mixture along the pattern lines. Move slowly and steadily. Let the glue form a slightly raised bead to mimic real lead came.
Avoid gaps: Ensure all lines connect to form closed sections. Overlapping slightly at corners prevents weak points.
If you shake: Don’t panic. Let the glue dry, then use a craft blade to scrape off bumps or uneven spots.
Drying time: Let leading dry overnight before adding color.
Use Markers for Clean, Correctable Lines
For the Marker-First Method, skip the glue leading. Instead:
- Clean glass with rubbing alcohol to remove oils.
- Place glass over the pattern.
- Trace lines with a black permanent marker on the front side.
Error fix: Wipe mistakes immediately with a cotton swab dipped in rubbing alcohol.
Mix and Apply the Colored Fills
Now bring your design to life with glowing color.
Mix Transparent Color with Clear Glue
Use clear school glue as the base. For each color:
- 1 tablespoon clear glue
- 1–2 drops acrylic paint (or food coloring)
Stir gently. The mix should be fluid and richly tinted but still transparent. Start with less paint; you can always add more.
Variation note: Some prefer 3 tablespoons glue to a few drops for a lighter wash effect.
Pro Tip: Use a muffin tin to mix and hold multiple colors without spills.
Fill Sections Without Gaps or Bubbles
Use a blunt paintbrush to apply the colored glue inside each outlined area. Push the mixture all the way to the edges of the black lines. A little overlap is acceptable and prevents clear gaps.
Watch for bubbles: Inspect each filled section. Pop any air bubbles immediately with a toothpick.
Marbling effect: For antique glass realism, apply two different colors to opposite sides of a section. Gently push them together with your brush to blend naturally in the center.
Apply to the Back for Smudge-Free Results
In the Marker-First Method, flip the glass so the back faces up. The marker lines are now visible underneath. Apply the colored glue to this side.
Why it works: Painting on the back keeps your brush from touching and smudging the front marker lines.
Enhance Depth and Light Reflection

Make your piece glow like real stained glass.
Add Crinkled Tin Foil Backing
After the colored glue dries, place crinkled tin foil inside the frame behind the glass. The textured surface reflects light unevenly, creating shimmer and depth.
Alternative: Use white paper or cardstock for softer reflection.
Pro Tip: For window hangings, skip the frame and tape foil directly to the back of the glass before hanging.
Layer Clear Glue for Texture
In the Glue-Paint Hybrid Method, apply 1–2 layers of pure clear glue to background areas. Let each layer dry before adding the next.
Result: A slightly blurred, textured effect that mimics old glass.
Final Touches and Sealing
Protect your art and perfect the finish.
Touch Up the Leading After Drying
Once colored sections dry, inspect the black outlines. If paint bled over, use a black permanent marker to retrace lines and restore sharp contrast. This step hides imperfections and unifies the look.
Seal for Long-Lasting Durability
Spray the entire piece with clear acrylic sealant. This protects against humidity, dust, and yellowing, especially for window installations.
Apply in a well-ventilated area: Hold the can 8–12 inches away. Use light, even coats. Let dry completely between coats.
UV protection: Choose a sealant with UV resistance to prevent fading in direct sunlight.
Display and Maintain Your Faux Stained Glass
Make your creation shine in its final setting.
Frame or Hang in a Sunny Spot
Place your piece in a window, on a shelf with backlighting, or against a light wall. For dramatic effect, use an LED light strip behind the frame.
Child-safe option: Use acrylic sheets instead of glass for suncatchers in kids’ rooms.
Clean and Store with Care
Dust gently with a soft, dry cloth. Avoid wet cleaning unless sealed, since water can damage unsealed glue.
For storage, keep flat in a cool, dry place to prevent warping.
Prevent Yellowing and Brittleness
Unsealed glue may yellow or crack over time, especially in direct sun. Always seal pieces intended for long-term display.
Avoid placing near heat sources or in high-humidity areas like bathrooms.
Troubleshoot Common Problems
Fix issues quickly with these proven solutions.
Glue Is Peeling Off the Glass
Cause: Smooth glass doesn’t hold glue well.
Fix: Always spray the glass with clear acrylic primer before applying glue. Clean with rubbing alcohol first.
Lines Are Shaky or Uneven
Cause: Unsteady hand during application.
Fix (Glue Method): Let dry, then scrape with a craft blade to smooth.
Fix (Marker Method): Wipe with rubbing alcohol before sealing.
Colors Look Dull or Lifeless
Cause: Not enough pigment in the glue.
Fix: Mix in 1–2 extra drops of acrylic paint per tablespoon of clear glue. Test on scrap first.
Air Bubbles in the Fill
Cause: Trapped air during application.
Fix: Pop bubbles immediately with a toothpick while the glue is still wet.
Piece Looks Flat, Not Glowing
Cause: Lack of light reflection.
Fix: Add crinkled tin foil to the back of the frame, or use multiple layers of clear glue for texture.
Creative Ideas and Real-World Uses
Inspire your next project with these applications.
Make a Personalized Memorial Art Piece
Honor a loved one with symbolic elements like their state flower, favorite animal, or meaningful date. One creator made a tribute featuring bluebonnets, orange blossoms, and a ladybug to represent family members.
Display: Frame and hang in a sunlit room for a warm, glowing memory.
Turn Thrifted Frames into Wall Art
Visit a thrift store and find ornate wood frames. Pair them with your faux stained glass for instant vintage charm.
Pro Tip: Paint the frame a deep color like Elderberry blue to blend with the black leading.
Craft Seasonal Holiday Decor
Make pumpkin designs for Halloween, snowflakes for winter, or roses for Valentine’s Day. Because materials are cheap, you can create and replace them each season.
Scale Up to Old Windows
Transform an old window into a statement piece for a porch, patio, or garden shed. Use larger patterns and allow extra drying time.
Note: More surface area means more glue, so mix in batches.
Frequently Asked Questions About Faux Stained Glass
What is the easiest method for beginners?
The Marker-First Method is most beginner-friendly because permanent marker mistakes can be wiped away with rubbing alcohol before they set. The cellophane collage method is even simpler and ideal for children since it requires no mixing or drying time.
Do I need to seal faux stained glass?
Sealing is highly recommended, especially for window installations. A clear acrylic spray sealant protects against humidity, dust, and yellowing. Unsealed glue may become brittle or discolored over time, particularly in direct sunlight.
Can I use regular glue instead of school glue?
White and clear school glues (like Elmer’s) work best because they dry clear and adhere well to glass. Super glue or hot glue is not recommended, since these can dry cloudy, become brittle, or damage the substrate.
How do I prevent the glue from peeling off the glass?
Always spray the glass with clear acrylic primer before applying any glue mixture. Clean the glass with rubbing alcohol first to remove oils. This priming step is critical for long-term adhesion.
What can I use instead of glass?
Clear acrylic sheets or clear plastic sheets work well as alternatives. Acrylic is especially good for children’s projects since it won’t shatter. The same techniques apply, though you may not need to prime plastic surfaces.
How long does faux stained glass last?
Sealed pieces can last for years, even in sunny windows, when protected with UV-resistant sealant. Unsealed pieces may yellow or crack within months, especially in direct sunlight or humid environments.
Final Thoughts on Creating Faux Stained Glass
Creating faux stained glass is an affordable, rewarding craft that brings timeless beauty into your home. Whether you choose the textured glue-paint method, the forgiving marker-first technique, or the mess-free cellophane collage, you can achieve stunning results with minimal tools. The key to success lies in proper surface prep, accurate color mixing, and enhancing light reflection with foil or layered glue. Once sealed, your piece can last for years as a glowing tribute, decorative accent, or heartfelt gift.
Now that you know the secrets, all that’s left is to pick a pattern, gather your supplies, and let the light shine through your creation. Start with a simple design for your first project, and you’ll be amazed at how quickly you can produce professional-looking art that captures the magic of real stained glass.