
A perfectly sugared rim transforms an ordinary cocktail into something memorable. The sparkle catches the light, the sweetness greets your lips before the first sip, and the whole drink feels intentional. Yet most home bartenders get it wrong: sugar ends up inside the glass, dissolves too fast, or clumps unevenly. The result is a drink that turns syrupy by the second sip.
This guide walks you through how to rim a glass with sugar using bartender-approved methods. You’ll discover which adhesives work best, how to avoid the most common mistakes, and how to customize rims for any occasion. From weeknight margaritas to holiday parties, these techniques deliver consistent, professional results every time.
Choose the Right Equipment

Gather Essential Tools
You don’t need a professional bar setup to achieve a flawless sugar rim. A few basic items ensure clean, repeatable results. Start with clean, completely dry glassware; any style works, from martini coupes to highballs or even plastic cups for outdoor events. Residual moisture or grease prevents sugar from adhering properly.
You’ll also need two shallow plates or saucers: one for your adhesive liquid and one for the sugar. The sugar plate should be wide enough to fit the rim of your glass. Keep a bar napkin or paper towel nearby to wipe away stray granules from the interior.
Select the Best Adhesive
The liquid you choose determines how well the sugar sticks and subtly shapes the flavor. Your best options include:
- Citrus juice (lime, lemon, orange): Bright and tart; ideal when the juice matches the cocktail
- Simple syrup: Creates the strongest bond, perfect for thick candied rims
- Honey or agave nectar: Offers rich, floral sweetness for spiced or winter drinks
- Water: Neutral but weaker; best for delicate sugar coatings
- Condensation: From a chilled glass; no added flavor, just natural moisture
Apply a thin, even layer. Too much liquid causes sugar to slide off or drip down the glass.
Pick Your Sugar Type
Standard vs. Specialty Sugars
Granulated white sugar is the versatile default for most cocktails. It dissolves slowly and delivers clean sparkle. For more visual impact, consider these alternatives:
- Colored sugar: Adds festive pop for holidays or themed parties
- Coarse sugar: Larger crystals create a crunchier texture and bolder look
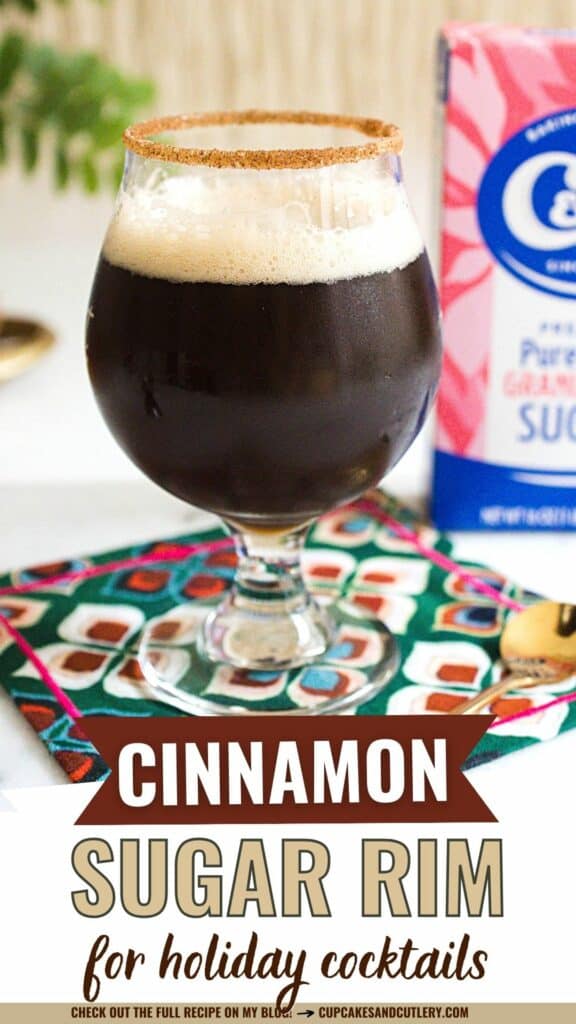
- Cinnamon sugar: Classic pairing for spiced cocktails and dessert martinis
- DIY flavored sugar: Combine white sugar, a drop of food coloring, and flavoring oil in a ziplock bag, then shake to blend
Blend Sugar with Spices
For complex flavor, mix sugar with spices, but keep proportions balanced. A reliable starting ratio is 1 part spice, 2 parts salt, 2 parts sugar. This prevents potent spices like cayenne or cinnamon from overpowering the drink. Apply the blend to the outer rim only, so guests get an aromatic hint before sipping.
Store custom blends in airtight containers away from humidity. Never dip a wet glass directly into your main sugar supply; moisture will ruin the entire batch.
Wet the Rim Correctly
Use the Citrus Wedge Method
This technique offers maximum control and is ideal for home bartenders.
- Cut a lime, lemon, or orange wedge.
- Hold the glass by the base or stem.
- Rub the fleshy part of the wedge along the outer edge of the rim.
- Rotate the glass slowly for even coverage.
The rim should glisten, not drip. Over-wetting causes sugar to slide off or pool at the bottom.
Try the Dip Technique
For faster, broader coverage, use the dip method.
- Pour 1–2 tablespoons of adhesive into a shallow dish.
- Hold the glass at a 45-degree angle.
- Dip only the outer rim into the liquid, rotating to coat the full edge.
- Target about ¼ inch of moistened surface.
This approach is efficient but risks over-wetting if you dip too deep.
Leverage Condensation (Pro Trick)
For the most even, flavor-neutral moisture, try the condensation method.
- Chill the glass in the freezer for at least 10 minutes.
- Remove and let it sit for 30 seconds.
- As it warms, condensation forms naturally on the exterior.
This creates a perfectly thin moisture layer with no extra flavor or mess. It’s the bartender’s secret for consistent results.
Apply Sugar with Control

Create a Full Sugar Rim
For a classic, even coating, follow these steps:
- Spread sugar on a wide plate.
- Invert the glass and press the moistened rim straight down.
- Twist gently to coat all around.
- Lift and shake off excess.
Watch for sugar falling inside. Wipe the interior edge with a slightly damp napkin if needed.
Build a Thick, Crusted Rim
Want a bold, dramatic look? Use the dabbing method:
- Pour sugar into a bowl.
- Dab the moistened rim into the sugar in small sections.
- Rotate and repeat, building layers gradually.
- Stop when the rim is ½ inch wide or reaches your desired thickness.
This approach gives you total control and keeps sugar strictly on the outside.
Apply a Half Rim (Guest Choice)
For elegance and flexibility, rim only half the glass:
- Moisten half the rim with a citrus wedge or angled dip.
- Dip just that section into the sugar.
- Let guests rotate the glass to sip with or without sugar.
This is perfect for parties where palates vary.
Finish and Set the Rim
Inspect and Clean
After sugaring, check for stray granules inside the glass. Even a few dissolve and sweeten the drink unevenly. Use a slightly damp napkin to wipe the inner edge without scrubbing.
Let It Set
Allow the rimmed glass to sit for 2–3 minutes. This drying period lets the adhesive harden slightly, locking the sugar in place. A set rim won’t shed when you pour or handle the glass.
Pour Without Smudging
To preserve your work:
- Pour slowly into the center of the glass
- Use a funnel or spout for precision
- Add ice after pouring if the recipe requires it
Customize for Flavor and Theme
Match Sugar to the Cocktail
Pair your rim with the drink for a cohesive flavor experience:
- Sidecar? Orange juice and coarse sugar
- Mimosa cocktail? Lemon juice and colored sugar
- Spiced rum drink? Honey and cinnamon sugar
- Winter martini? Simple syrup and vanilla-infused sugar
Design Themed Rims
For parties, let the rim set the mood:
- Holiday gathering? Red and green sugar
- Frozen-themed event? Blue or white sparkle sugar
- Fall celebration? Cinnamon-pumpkin spice blend
- Romantic evening? Edible gold sugar
Fix Common Problems

Sugar Clumping
Cause: Humidity or a wet sugar batch.
Fix: Store sugar in airtight containers. Always pour a fresh, dry portion onto a plate for rimming rather than dipping directly from storage.
Sugar Falling Into the Drink
Cause: Over-wetting or aggressive dipping.
Fix: Use the dabbing method for better control. Shake gently after coating and wipe the interior before pouring.
Uneven Coating
Cause: Spotty moisture application.
Fix: Rotate the glass slowly when wetting. The condensation method delivers the most uniform layer.
Rim Dissolving Too Fast
Cause: Weak adhesive or sugar inside the rim.
Fix: Use simple syrup for durability. Always apply only to the outer edge.
Prep Ahead for Parties
Batch-Rim Glasses in Advance
Hosting a cocktail party? Rim glasses 1–2 hours ahead to save time and improve adhesion.
- Prepare all glasses using your chosen method.
- Let them dry completely on a tray.
- Store in a cool, dry place, not the fridge, since condensation causes clumping.
Use Plastic for Outdoor Events
When glass isn’t allowed, plastic works just as well. Follow the same steps, but rim right before use. Plastic doesn’t hold condensation as long, so wet and sugar immediately.
Offer Choice with Half Rims
Not everyone loves extra sweetness. Use half-rimmed glasses so guests can choose. This small detail shows thoughtfulness and often gets noticed.
Store Rimming Mixes Properly
Keep Sugar Dry and Fresh
Even sugar degrades when exposed to moisture. To preserve your blends:
- Use airtight containers like Tupperware or mason jars
- Store in a dark, dry cupboard, never under the sink
- Label mixes with the date and flavor
Prevent Cross-Contamination
Never dip a wet glass into your main sugar jar. Moisture clumps the entire batch. Always pour a small amount onto a plate, then discard leftovers after use.
Shelf Life Tips
- Plain sugar blends: Last indefinitely
- Spice-sugar mixes: Use within 3–6 months; spices lose aroma over time
- Check before use: If it smells stale or won’t pour freely, make a fresh batch
Frequently Asked Questions About Rimming Glasses with Sugar
What is the best liquid to use for rimming a glass with sugar?
The best liquid depends on your cocktail. Simple syrup creates the strongest bond and works well for sweet drinks. Citrus juice (lime, lemon, or orange) adds brightness and pairs naturally with the cocktail’s flavors. For a neutral option without added taste, use condensation from a chilled glass.
How do you keep sugar from falling into the drink?
Apply moisture and sugar only to the outer edge of the rim, never the interior. Use the dabbing method for thick rims, shake gently after coating, and wipe the inside edge with a slightly damp napkin before pouring. This keeps stray granules from dissolving into the liquid.
Can you rim a glass with sugar ahead of time?
Yes. Rim glasses 1–2 hours in advance and let them dry completely on a tray. Store in a cool, dry place away from humidity. Avoid the fridge, since condensation can cause clumping. Pre-rimmed glasses actually hold sugar better because the adhesive hardens fully.
What type of sugar is best for cocktail rims?
Granulated white sugar is the versatile standard for most drinks. For more flair, use coarse sugar for crunch, colored sugar for themed parties, or cinnamon sugar for spiced cocktails. DIY flavored sugar made with food coloring and flavoring oils adds custom character.
Why does my sugar rim dissolve so quickly?
Sugar dissolves fast when applied to the inside of the rim or when a weak adhesive like water is used. Always coat only the outer edge and choose simple syrup or citrus juice for stronger adhesion. Letting the rim set for 2–3 minutes before pouring also improves durability.
Can you rim plastic cups with sugar?
Absolutely. Plastic cups work well for pool parties, weddings, and outdoor events. The process is identical, though plastic doesn’t hold condensation as long as glass. Wet and sugar the rim immediately after chilling for the best results.
Final Thoughts on Rimming a Glass with Sugar
Learning how to rim a glass with sugar comes down to three essential principles. First, target only the outer edge to keep sugar from dissolving into the drink and throwing off the flavor balance. Second, control your moisture: a thin, even layer of adhesive sticks far better than a soaked rim. Third, match the rim to the cocktail by choosing complementary sugars and adhesives.
Start with the basics: clean glassware, granulated sugar, and a citrus wedge. Practice the dip and dabbing techniques until you find your rhythm. Once you’ve nailed the fundamentals, experiment with flavored blends, themed colors, and half rims for parties. A well-executed sugar rim takes only seconds but elevates every cocktail from ordinary to memorable. Grab a glass, pour your adhesive, and start rimming.