You’re at a picnic, the cooler is full of cold drinks, but there’s one problem: no bottle opener in sight. That sealed glass bottle might as well be locked. Don’t panic. You don’t need specialized tools to crack the cap. With everyday items and a little leverage, you can open a glass bottle safely and efficiently.
The key lies in mechanical advantage: using rigid objects to pry up the metal crown cap that’s crimped onto the bottle’s neck. This airtight seal keeps your drink fizzy, but with the right technique, it can be broken using household items, body accessories, or even environmental features. In this guide, you’ll learn proven methods, from the lighter trick to using a countertop edge, ranked by speed, safety, and availability.
Leverage-Based Methods: Using Common Tools
Leverage is the universal principle behind opening a bottle without a proper opener. By placing a rigid edge under the cap’s lip and applying upward force, you break the crimp seal. These methods use tools commonly found in homes, pockets, or bags.
Use a Lighter to Pop the Cap

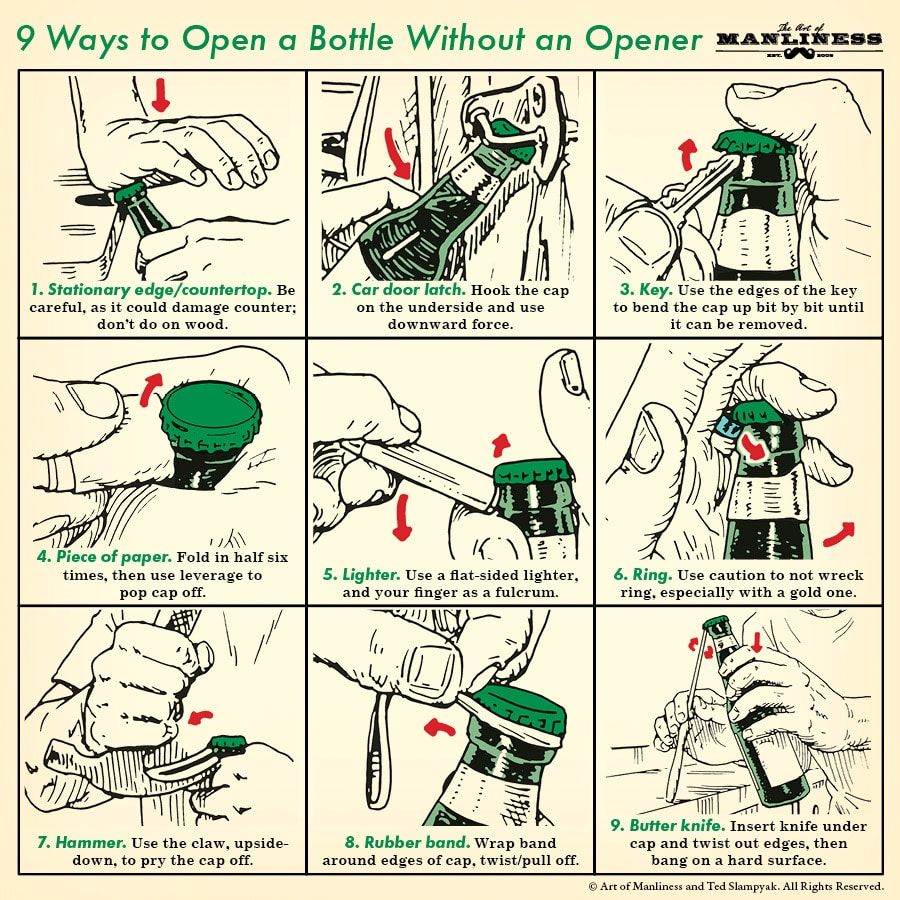
A standard pocket lighter isn’t just for flames. It’s a compact lever. Its solid base provides the fulcrum needed to lift the cap edge.
- Grip the bottle firmly near the neck with your non-dominant hand.
- Hold the lighter vertically in your dominant hand, bottom edge up.
- Slide the lighter’s base under the cap’s lip at the 6 o’clock position.
- Flick your wrist downward sharply. This pivots the lighter up, prying the cap.
- Rotate the bottle 90 degrees and repeat at 3 to 4 points until the cap releases.
Pro Tip: Rigid metal lighters work better than flimsy plastic ones. This method is ideal at bonfires or barbecues where lighters are already in hand.
Warning: Avoid pressing too hard. Focus on a quick flick, not brute force. Excessive pressure can crack the glass neck.
Open With a Spoon or Butter Knife

Spoons and butter knives are safe, accessible options, especially in kitchens or dining areas.
- Hold the bottle securely, fingers close to the cap.
- Insert the rounded edge of a spoon or the tip of a butter knife under the cap’s rim.
- Press down on the handle end to lift the cap edge.
- Rotate the bottle and repeat every quarter turn.
Why It Works: The spoon’s curvature fits naturally under the cap, giving smooth lift without slipping.
Best For: Indoor use where control matters more than speed. Minimizes risk of flying caps or spills.
Avoid: Thin, flimsy utensils. They may bend or snap under pressure.
Pry With Keys or a Flathead Screwdriver
Keys are one of the most portable and reliable alternatives. A flathead screwdriver works even better due to its broad, sturdy tip.
Using Keys:
1. Position the thicker edge of a key under the cap lip.
2. Twist the key upward, using the bottle neck as a pivot.
3. Work around the cap in small rotations until it loosens.
Using a Screwdriver:
1. Slide the flat tip under the cap’s edge.
2. Apply steady upward pressure while twisting slightly.
3. Move around the cap to release each crimp point.
Caution: Keep your guiding hand clear of the tool’s path. A slipping screwdriver can cause cuts.
Ideal When: You’re in a garage, workshop, or carrying a keychain with a solid key.
Impact and Surface Methods: Using Fixed Objects
When tools aren’t available, fixed surfaces like countertops or door frames become your best allies. These rely on impact or controlled leverage against a hard edge.
Pop It on a Countertop Edge
This fast method uses downward force to break the seal. It’s perfect when no tools are on hand.
- Place the bottle cap’s edge on a sturdy countertop or table corner.
- Hold the bottle at a slight backward angle (about 10 to 15 degrees).
- Strike the top of the cap firmly with your palm.
- The impact forces the cap upward, breaking the seal.
Refined Version (Safer):
– Instead of striking, press down gradually on the bottle neck until the cap pops.
– Place a folded cloth between the bottle and surface to protect both glass and furniture.
Best Surfaces: Stone, concrete, or thick wood. Avoid fragile or valuable furniture.
Risk Note: High force increases the chance of glass breakage. Always inspect the bottle for cracks first.
Tap Against a Hard Surface
This low-force method gradually loosens the cap through repeated friction.
- Hold the bottle horizontally.
- Tap the cap’s edge against a concrete wall, stone, or metal surface.
- Rotate the bottle slightly after each tap.
- Continue until the cap spins freely or pops off.
Time Estimate: 10 to 20 taps. Slower but safer than impact methods.
Use Case: When you need a quiet, controlled open, like at an office or late-night snack.
Use a Door Latch or Strike Plate

Metal door hardware can act as a built-in bottle opener.
- Open the door and locate the metal strike plate on the frame.
- Tilt the bottle so the cap hooks over the top edge of the plate.
- Push the bottle downward firmly to lever the cap off.
Works Best With: Standard interior doors with exposed metal plates.
Ideal For: Indoor emergencies where no tools, mess, or noise are acceptable.
Body and Wearable Methods: Using What You’re Wearing
Sometimes, the solution is on your body. Rings, belt buckles, and even shoes can double as openers in a pinch.
Open With a Sturdy Ring

A metal ring, especially titanium, steel, or tungsten, can hook under the cap and provide lift.
- Slide the edge of your ring under the cap lip.
- Hold the bottle close to the neck.
- Curl your finger upward, using the ring as a hook to pry the cap.
- Repeat at 3 to 5 points around the cap.
Critical Safety Note: This method puts stress on your finger. If the cap resists, the ring can dig into your skin or slip, causing injury.
Do Not Use: Gold, silver, or thin fashion rings. They may bend or break.
Best When: You’re dressed up and don’t want to hunt for tools.
Use a Belt Buckle or Carabiner
Metal belt buckles or carabiners (common on backpacks or keys) offer strong leverage points.
Belt Buckle Method:
1. Hook the cap under a sturdy corner or loop of your buckle.
2. Pull the bottle upward or twist to pop the cap.
Carabiner Method:
1. Hook the carabiner’s gate or loop under the cap.
2. Rock the bottle downward to release the seal.
Perfect For: Hikers, campers, or anyone wearing tactical or outdoor gear.
Pro Tip: Some carabiners have built-in bottle openers. Check yours before improvising.
Try the Shoe Sole Trick
Your shoe isn’t just for walking. It’s a mobile fulcrum.
- Place the bottle cap against the edge of your shoe sole.
- Hold the bottle at a slight backward tilt.
- Press down on the neck with your hand or foot to lever the cap up.
Best With: Sturdy hiking boots or shoes with thick rubber soles.
Use Case: Outdoor adventures where nothing else is available.
Multi-Item and Niche Techniques
Some methods require two objects or are specific to certain environments. These are less common but highly effective when conditions allow.
Use Another Bottle as a Lever
If you already have one open, use it to open the next.
- Hold a second bottle upside down.
- Hook its cap under the lip of the closed bottle’s cap.
- Apply upward pressure with the open bottle to pry loose the seal.
Risk: High chance of spillage if not stabilized. Practice over a sink or trash can.
Bonus: Works even better with a loose cap from a previously opened bottle. Use it as a makeshift lever tool.
Use Scissors or a Claw Hammer
These tools are precise but require caution.
Scissors Method:
1. Close the scissors tightly.
2. Insert one blade tip under the cap edge.
3. Twist upward gently.
Claw Hammer Method:
1. Turn the hammer upside down.
2. Hook one claw tine under the cap.
3. Lift the handle to pop the cap.
Warning: Both involve sharp metal near hands. Use slow, controlled motion.
Best In: Workshops, garages, or DIY settings where these tools are already out.
Safety First: Avoiding Injury and Breakage
Opening a bottle without a proper tool increases risk. Follow these rules to stay safe.
Protect Your Hands and Fingers
- Wear gloves or wrap a cloth around the bottle when using metal tools.
- Never use your teeth. This can chip enamel, cut gums, or cause jaw injury.
- Keep fingers clear of blade paths when using knives, screwdrivers, or scissors.
Inspect the Bottle Before Opening
- Check the neck and rim for cracks or chips.
- Avoid bottles with cloudy or weakened glass. They’re more likely to shatter.
- After opening, examine the mouth for glass fragments before drinking.
Prevent Surface and Tool Damage
- Use a cloth barrier on countertops to avoid scratches.
- Avoid using delicate jewelry or thin keys. They may bend or break.
- Do not attempt on antique or fragile furniture.
Best Method by Situation
Choosing the right technique depends on where you are and what you have.
| Scenario | Best Method | Why |
|---|---|---|
| Picnic or BBQ | Lighter or Table Edge | Lighters are common; tables provide leverage. |
| Camping or Hiking | Carabiner or Rock Edge | Gear is limited. Use what’s on your pack. |
| Office or Home | Spoon or Key | Kitchenware and keys are always nearby. |
| No Tools, No Furniture | Door Latch or Shoe | Use architecture or clothing as last resort. |
| Quiet or Formal Setting | Spoon or Controlled Countertop | Minimizes noise and spill risk. |
Frequently Asked Questions About Opening Glass Bottles Without an Opener
What is the easiest way to open a glass bottle without an opener?
The lighter method is one of the fastest and most widely used techniques. Slide the bottom edge of a rigid lighter under the cap lip and flick your wrist downward to pop the seal. It works well outdoors and requires no special skill.
Is it safe to open a bottle with a spoon?
Yes, using a spoon is one of the safest methods available. The rounded edge fits naturally under the cap, giving you controlled leverage without slipping. It may take a few rotations around the cap, but the risk of injury or glass breakage is low.
Can I use a dollar bill to open a bottle?
Yes, though it requires a specific folding technique. Roll a dollar bill tightly, fold it in half to create a stiff edge, and wedge it under the cap lip. The concentrated force of the tight roll can pop the cap, but this method works best on caps with looser seals.
Why shouldn’t I use my teeth to open a bottle?
Using your teeth can chip or crack enamel, cut your gums, or cause serious jaw injury. It also puts your mouth in the path of a flying cap or broken glass. Always use a tool or surface instead of your teeth.
How do I avoid breaking the glass when opening a bottle?
Apply force gradually rather than using sudden, excessive pressure. Inspect the bottle for micro-cracks before opening, and avoid impact methods on weakened or cloudy glass. Using a cloth barrier can also reduce stress on the bottle neck.
What should I do if the cap won’t budge?
Rotate the bottle and try prying at multiple points around the cap circumference. Most methods require lifting 3 to 5 points to fully break the crimp seal. If the cap still resists, switch to a more rigid tool like a flathead screwdriver or claw hammer.
Key Takeaways for Opening Glass Bottles Without an Opener
- Leverage is everything. Every method relies on using a rigid object to break the crimped seal through upward force or controlled impact.
- Match the method to your environment. A lighter works great at a BBQ, while a spoon or key is better indoors. Choose based on what’s available and how much risk you’re willing to take.
- Safety comes first. Always inspect the bottle for cracks, protect your hands, and avoid using your teeth. Gradual pressure beats brute force every time.
You’ll rarely find yourself truly stuck. From a dollar bill to a belt buckle, something around you can open that bottle. The secret isn’t strength. It’s leverage, control, and knowing which method fits your moment. Next time you’re without an opener, stay calm, assess your surroundings, and choose the safest, most available tool.