A glass thermometer sits in many home medicine cabinets, often passed down through generations. While digital models dominate the market today, knowing how to use a glass thermometer correctly still matters for households that rely on these traditional instruments. Accuracy depends on proper technique, and safety depends on understanding the risks of mercury exposure and glass breakage.
This guide covers everything you need: identifying your thermometer type, preparing it for use, measuring temperature through rectal, oral, and axillary methods, reading the scale precisely, and handling emergencies like breakage or disposal. Follow these steps to get reliable readings while keeping your family safe.
Identify Your Glass Thermometer Type
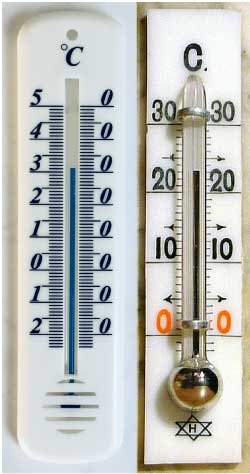
Before taking any measurement, confirm which kind of glass thermometer you own. The filling liquid determines both safety protocols and handling requirements.
Check the Liquid Inside
Mercury thermometers contain a shiny silver line and are highly toxic if the glass breaks. Mercury-free models use colored alcohol, often blue or red, making them safer but slightly less precise. Look closely at the liquid column to determine which type you have.
Warning: Never use a mercury thermometer that shows any sign of cracking or leaking.
Match the Tip to the Body Site
Tip design prevents injury and improves accuracy for each measurement method:
- Rectal thermometers have short, blunt tips that minimize tissue damage
- Oral and axillary thermometers feature long, narrow tips for sublingual or underarm placement
Color coding helps identify intended use, though brands vary:
- Red end typically signals rectal use
- Green end typically signals oral or axillary use
Always verify by reading the original packaging before use.
Prepare the Thermometer for Accurate Readings
Proper preparation eliminates contamination, prevents damage, and establishes a reliable baseline.
Inspect for Damage
Examine the glass before every single use. Look for cracks, chips, or cloudiness along the shaft. Ensure the liquid column appears continuous and unbroken. Discard the thermometer immediately if you spot any damage, especially if it contains mercury.
Clean Before and After Each Use
Hygiene prevents cross-contamination between users or body sites:
- Wash the entire length with cool water and mild soap
- Rinse thoroughly under cool running water
- Wipe down with rubbing alcohol for full disinfection
Never use hot water, bleach, or a dishwasher. Thermal shock can shatter the glass instantly.
Reset the Liquid Column
Glass thermometers retain the previous reading until manually reset. Follow these steps:
- Grasp the stem end firmly (opposite the bulb)
- Stand away from hard surfaces and other people
- Flick your wrist downward sharply, similar to shaking water off your finger
- Ensure the liquid drops below 96.8°F (36.0°C)
- Rotate at eye level to confirm the reset
Take a Rectal Temperature for Maximum Accuracy
The rectal method delivers the most reliable readings, making it the preferred choice for infants and young children.
When to Use the Rectal Method
This approach works best for:
- Babies under 3 months
- Children up to 4 years when precision matters most
Always use a thermometer specifically designed for rectal use, identified by its stubby tip and often red color coding.
Insert the Thermometer Safely
Follow this sequence carefully:
- Lay the baby on their back with legs lifted, or place them face-down on your lap
- Apply a small amount of petroleum jelly to the tip
- Gently insert the thermometer:
- ½ inch (1.3 cm) for infants under 3 months
- 1 inch (2.5 cm) for older babies
- Hold the thermometer in place continuously, never letting go
Stop immediately if you feel resistance. Forcing insertion can cause injury.
Wait and Remove Carefully
Hold the thermometer steady for 2 to 3 minutes, then withdraw gently and read the result immediately. Rectal temperatures can sometimes trigger a bowel movement, so keeping the baby still is critical to avoid breakage.
Measure Oral Temperature for Cooperative Patients
The oral method suits older children and adults who can follow simple instructions.
Confirm the Patient Is Ready
Before proceeding, verify these conditions:
- No eating, drinking, or smoking within the last 15 to 20 minutes
- The patient can breathe comfortably through their nose
- No uncontrollable shivering or coughing
Use only a long-tipped oral thermometer, typically green-coded.
Position Under the Tongue
Place the bulb in the posterior sublingual pocket, toward the back of the mouth under the tongue. Instruct the patient to close their lips tightly and hold the thermometer with both their tongue and fingers. They must not bite down. If the patient cannot hold it securely, assist by gripping the stem yourself.
Time the Reading
Maintain position for 3 to 4 minutes, then remove and read immediately. Drinking hot beverages shortly before measurement can produce falsely elevated results.
Use the Axillary Method for Quick Screening
The armpit method offers a fast, non-invasive estimate suitable for all ages, though it sacrifices accuracy.
Understand the Limitations
Axillary readings are the least accurate option, typically running 0.5°F to 1°F lower than core body temperature. Use this method only for initial screening, then confirm any fever with a rectal or oral reading. Any glass thermometer works for this technique.
Follow Proper Placement
- Dry the armpit completely
- Place the tip in the center, ensuring skin-to-glass contact only
- Press the arm tightly against the chest to trap body heat
- Hold for 7 to 10 minutes
Shorter times produce unreliable results.
Read the Scale Correctly
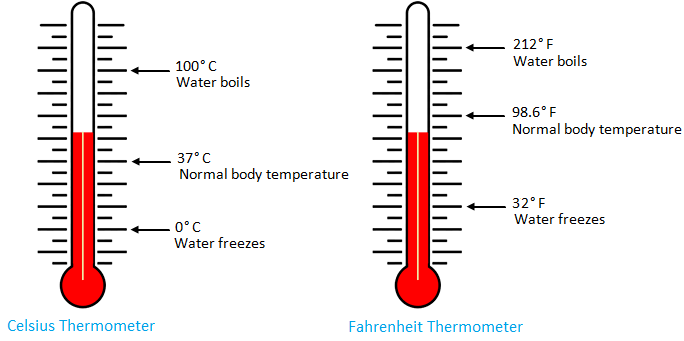
Even with perfect technique, misreading the markings leads to errors. Take time to interpret the scale accurately.
Hold at Eye Level
Grasp the stem end, never the bulb, since finger heat can alter the reading. Hold the thermometer horizontally at eye level and rotate slowly between your fingers. The flattened sides of the stem magnify the liquid column for easier viewing.
Interpret Fine Markings
On the Fahrenheit scale:
* Long lines represent 1°F
* Four short lines between each long line equal 0.2°F each
* Example: Two marks past 99°F equals 99.4°F
On the Celsius scale:
* Long lines represent 1°C
* Nine short lines between each long line equal 0.1°C each
* Example: Six marks past 37°C equals 37.6°C
Many thermometers include an arrow or marker indicating normal body temperature at 98.6°F (37.0°C).
Understand Fever Thresholds by Age and Method
What counts as a fever varies depending on measurement method and patient age.
General Fever Guidelines
| Method | Fever Threshold |
|---|---|
| Rectal | ≥ 100.4°F (38.0°C) |
| Oral | ≥ 100.0°F (37.8°C) |
| Axillary | ≥ 99.0°F (37.2°C) |
Axillary readings should always prompt confirmation through a more accurate method.
Act Based on Age and Symptoms
For babies under 3 months:
* Call the doctor if rectal temperature exceeds 100.4°F
* Seek emergency care if the reading exceeds 100.4°F and the baby appears ill
For children 3 to 24 months:
* Call the doctor if fever lasts more than 3 days or exceeds 102°F with symptoms
* Seek emergency care for 105°F that does not respond to medication
For ages 4 and older (oral method):
* Normal range extends up to 99.4°F
* Call the doctor if temperature exceeds 102°F for 3 or more days, or reaches 104°F at any point
Also seek medical help for lethargy, breathing difficulties, refusal to drink, or any fever lasting beyond 3 days.
Store and Maintain Your Thermometer
Proper storage extends the life of your instrument and reduces breakage risks.
Clean and Dry After Each Use
Wash with cool soapy water or wipe with alcohol, dry thoroughly, and return the thermometer to its protective case. Store it out of reach of children and pets.
Prevent Breakage
Never leave the thermometer on countertops or near edges. Avoid carrying it loose in bags, and keep it away from heat sources that could cause thermal damage.
Handle Breakage Immediately and Safely

A broken thermometer demands urgent action, especially if mercury is involved.
If a Mercury-Free Thermometer Breaks
The colored alcohol liquid poses minimal hazard. Wipe up the liquid with paper towels, wash the area with soap and water, and dispose of glass shards in a puncture-proof container. Watch for cuts during cleanup.
If a Mercury Thermometer Breaks
Do not vacuum or sweep, since these actions spread toxic mercury vapor through the air. Follow these critical steps:
- Evacuate people and pets from the room
- Open windows to ventilate the space
- Call Poison Control at 1-800-222-1222 in the United States
- Follow professional guidance for cleanup procedures
- Seal all debris in a glass jar with a tight-fitting lid
Never dispose of mercury in household trash. Contact your local health department or hazardous waste facility for approved drop-off locations.
Frequently Asked Questions About Glass Thermometers
How do I know if my glass thermometer contains mercury?
Look at the liquid column. Mercury appears as a shiny, silver-colored line, while mercury-free models contain colored alcohol, often blue, red, or another tint. The packaging or manufacturer documentation also identifies the filling agent.
Can I use a rectal thermometer orally?
No. Rectal thermometers have short, blunt tips designed for that specific body site. Using one orally risks inaccurate readings and potential injury. Always match the thermometer tip to the intended measurement location.
What should I do if my child bites down on a glass thermometer?
Stay calm and carefully remove any broken pieces from the mouth without causing further injury. Check for cuts or bleeding. Contact Poison Control immediately if the thermometer contained mercury, and seek medical attention for any glass-related injuries.
How long does it take to get an accurate reading with a glass thermometer?
Reading time varies by method: rectal takes 2 to 3 minutes, oral takes 3 to 4 minutes, and axillary takes 7 to 10 minutes. Rushing any of these methods produces unreliable results.
Are mercury thermometers still legal to purchase?
Regulations vary by location. Many regions have restricted or banned mercury thermometer sales due to environmental and health concerns. Mercury-free alternatives are widely available and recommended for most households.
How should I dispose of an old mercury thermometer?
Never throw mercury thermometers in regular household trash. Contact your local health department, poison control center, or hazardous waste facility to find approved drop-off locations in your area.
Key Takeaways for Using a Glass Thermometer Safely

Mastering how to use a glass thermometer comes down to three priorities: accuracy, safety, and proper handling. Always identify your thermometer type before use, reset the liquid column to below 96.8°F, and match the tip design to the measurement site. Clean with cool water and alcohol only, and never expose the glass to thermal shock.
If your thermometer contains mercury, treat breakage as a serious hazard requiring professional cleanup. For most households, transitioning to a digital thermometer eliminates these risks while delivering faster results. If you continue using glass, follow every step in this guide rigorously to protect your family and the environment from unnecessary harm.