A sliding glass door that sticks, leaks air, or refuses to lock often traces back to one overlooked step: the initial measurement. Even a 1/8 inch error can cause binding, drafts, or a door that simply won’t fit. Because most patio doors are custom-built, your measurements directly determine whether the unit works or fails.
Learning how to measure sliding glass door openings correctly saves you from costly reorders and installation headaches. This guide covers every scenario, from full door replacement to retractable screen installation, using only the tools and techniques professionals rely on.
Gather the Right Tools and Prepare the Workspace
Accuracy starts before the tape measure ever comes out. The right setup prevents errors that ruin an otherwise perfect project.
Use a Steel Tape Measure Only
A steel tape measure is non-negotiable. Fabric and plastic tapes stretch and bend, producing readings that drift by fractions of an inch. A 25-foot steel tape handles nearly every residential patio door opening with ease.
Clear the Area and Inspect the Frame
Move rugs, furniture, and decor away from the door. You need full access to the frame, track, and sill. While clearing the space, inspect the existing frame for cracks, warping, rot, or uneven spots. These flaws affect the true opening size and may need repair before installation.
Label and Record Every Measurement Immediately
Write down each number as you take it. Label readings clearly, such as “Top Width” or “Left Height,” and note any irregularities like dips in the sill or bowed jambs. Memory is unreliable; a written record is your safeguard.
Measure for a Full Door Replacement

When replacing the entire sliding door unit, including frame and panels, measure from inside the jamb. This gives you the “unit size” manufacturers need to build your door.
Width: Three Points Across the Opening
- Place the tape measure horizontally inside the door frame.
- Measure from the inside edge of the left jamb to the inside edge of the right jamb.
- Take three readings: at the top, the middle, and the bottom of the opening.
- Use the smallest number. Foundations settle over time, so frames are rarely perfectly square.
⚠️ Pro Tip: Avoid measuring at handle height. Wear and misalignment can skew that spot.
Height: Three Points from Header to Sill
- Measure vertically from the top of the header down to the top of the sill.
- Take three readings: on the left side, the center, and the right side.
- Use the smallest value to ensure the new door fits without binding.
✅ Visual Cue: Look for daylight or gaps between the frame and wall. These signal uneven settling.
Depth: Confirm Frame Thickness
- Measure from the inside face of the frame to the outside face.
- Standard depth ranges from 4 to 5 inches (10–12.5 cm), matching typical wall stud thickness.
- Confirm this matches your wall construction so the new frame sits flush and seals properly.
🔍 Why It Matters: Wrong depth causes poor insulation, water intrusion, or visible gaps on one side of the wall.
Measure Brick-to-Brick for Exterior Estimates
If you’re getting a rough quote or installing an exterior-mounted system, measure from outside the home.
Exterior Width and Height
- Stand outside and extend the tape across the middle of the door.
- Measure from brick edge to brick edge, or siding to siding, depending on your home’s finish.
- For height, measure from the top of the header casing down to the bottom of the exterior sill.
⚠️ Key Difference: Interior jamb-to-jamb equals door unit size. Exterior brick-to-brick equals rough opening. Never confuse the two when ordering.
Measure for Retractable Screens

Installing a retractable or plisse screen requires different reference points than replacing the door itself.
Screen Width: Fixed Panel to Channel Edge
- Measure from the outer edge of the fixed glass panel to the inner edge of the top or bottom track channel on the opposite side.
- Do not measure into the channel; stop at the front edge.
- This ensures the screen housing fits without interference.
❌ Common Mistake: Measuring glass-to-glass underestimates width and causes fit issues.
Screen Height: Track to Header Channel
- Measure from the top of the bottom track (where the roller rides) to the bottom of the top channel.
- Again, do not measure into the channel; stop at the lowest visible edge.
- Take this measurement on both sides and use the shorter of the two.
Handle Clearance: Avoid Interference
- Measure how far the door handle protrudes from the frame surface.
- Compare this to the screen housing depth. Most retractable screens need 1.5 to 2 inches of clearance.
- If the handle sticks out too far, consider a low-profile handle or an offset screen mount.
✅ Expert Note: Some screens mount above the door; others fit within the existing frame. Confirm the type before measuring.
Understand Standard Sizes and Rough Openings
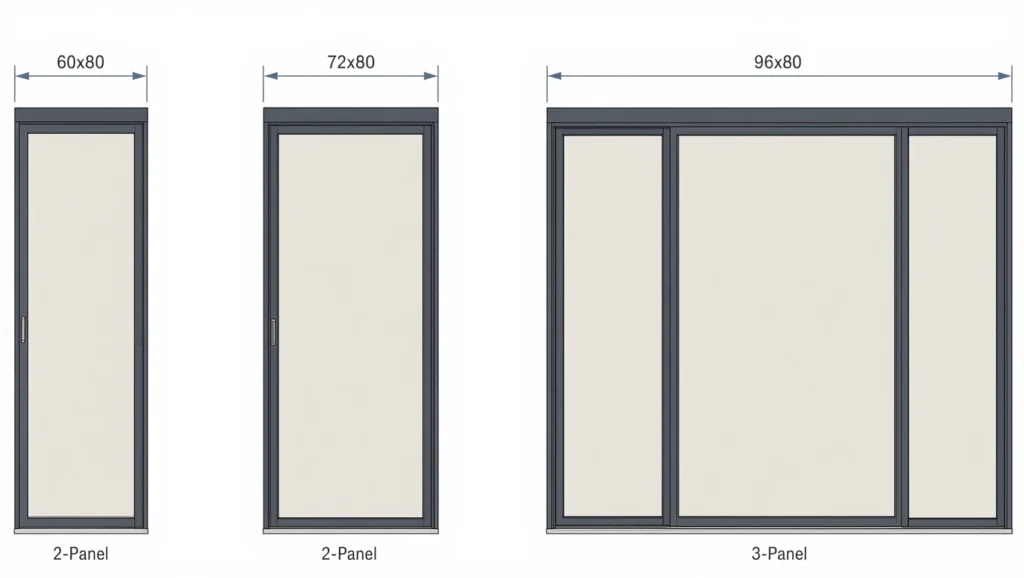
While custom doors are common, knowing standard dimensions helps you plan and budget.
Common Sliding Door Dimensions
- 60 inches: Compact balcony access
- 72 inches: Most popular, typically a two-panel setup
- 96 inches: Spacious entry
- Up to 192 inches: Multi-panel luxury designs
Standard heights range from 80 inches (typical residential) to 96–98 inches (tall doors in modern builds).
Rough Opening vs. Unit Size
| Door Unit Size | Required Rough Opening |
|---|---|
| 72″ x 80″ | ~74″ x 81″ |
| 96″ x 80″ | ~98″ x 81″ |
The rough opening should be:
– 2 inches wider than the unit (1 inch per side for shims and insulation)
– 1 inch taller (for leveling and sealing)
⚠️ Never order a door based on rough opening size. That leaves massive gaps.
Avoid These Common Measurement Mistakes

Even experienced DIYers slip up. Here’s how to sidestep the most frequent errors.
Measuring Only One Point
A single reading ignores frame distortion. Always measure three points and use the smallest.
Guessing Instead of Measuring
“Looks about 72 inches” is never accurate enough. Always use a steel tape, no exceptions.
Ignoring Frame Damage
Cracks, rot, or warped jambs affect fit. Note these issues and discuss them with your installer before ordering.
Confusing Glass with Frame
For screens or side panels, measure the frame, not the glass. Glass is recessed and smaller.
Measuring Into the Channel
When installing screens, measuring into the top or bottom track results in a unit that’s too short or narrow. Measure to the edge, not in the groove.
When to Call a Professional
DIY measurement works for standard, undamaged openings. But consider professional help if:
- The frame feels uneven, wobbly, or out of square
- The door sticks or doesn’t slide smoothly
- You’re installing a multi-panel or oversized system
- Your manufacturer requires certified measurement for warranty coverage
Many window and door companies offer free on-site assessments. A technician will verify your measurements, check squareness and plumb, inspect the rough opening, and confirm compatibility with your wall type. This final check prevents costly mistakes.
Final Tips for a Flawless Installation
Double-Check Before Ordering
Review all numbers with a second person. Confirm you’ve used the smallest width and height, selected the correct reference points, and verified depth compatibility with wall thickness.
Share Notes with Your Installer
Include photos and notes about warped areas, handle position, and existing track condition. This helps the installer anticipate challenges before they arrive.
Prepare the Space
Clear a path for removing the old door and bringing in the new one. Protect floors with drop cloths and turn off nearby HVAC vents to prevent dust spread.
Maintain Your New Door
Once installed, clean the tracks monthly, lubricate the rollers annually, and inspect weatherstripping for wear. Proper care extends the door’s lifespan and keeps operation smooth.
Frequently Asked Questions About Measuring Sliding Glass Doors
How accurate do sliding glass door measurements need to be?
Measurements should be accurate to 1/8 of an inch. Most patio doors are custom-manufactured, and even small errors cause binding, gaps, or fit failures. Always measure three points and use the smallest reading.
Should I measure from the inside or outside of the frame?
For ordering the actual door unit, measure from the inside jamb to inside jamb. For rough opening estimates or exterior-mounted products, measure brick-to-brick or siding-to-siding from outside. Confirm which measurement your manufacturer requires before ordering.
What if my measurements differ at the top, middle, and bottom?
Use the smallest measurement. Buildings settle and shift over time, so frames are rarely perfectly square. Ordering based on the smallest dimension ensures the new door fits without forcing or binding.
Can I install a sliding glass door myself after measuring?
DIY installation is possible for straightforward replacements in square, undamaged openings. However, professional installation is recommended for multi-panel systems, oversized doors, or situations where warranty coverage matters. Many manufacturers void warranties without certified installation.
How do I measure for a sliding screen door?
Measure from the outer edge of the fixed glass panel to the edge of the channel on the opposite side for width. For height, measure from the top of the bottom track to the bottom of the top channel. Do not measure into the channels. Also measure handle protrusion to ensure clearance for the screen housing.
What is a rough opening for a sliding glass door?
The rough opening is the structural gap in the wall where the door is installed. It should be approximately 2 inches wider and 1 inch taller than the door unit itself. This extra space accommodates shims, insulation, and leveling adjustments during installation.
Key Takeaways for Measuring Your Sliding Glass Door
Knowing how to measure sliding glass door openings correctly comes down to three core principles: always use a steel tape measure, take three readings at different points, and use the smallest number. These rules apply whether you’re replacing the entire unit, installing a retractable screen, or preparing for a professional quote.
Before placing any order, double-check your measurements with a second person and document the condition of the existing frame. If anything feels uneven or unclear, schedule a professional verification. The few minutes spent measuring accurately now prevent weeks of delays and hundreds of dollars in rework later.