
A warped mirror frame doesn’t just ruin your decor. It can also make the mirror unsafe to hang, creating gaps between the glass and edges that cause wobbling or rattling. The good news? Most warping issues can be fixed at home with simple tools and smart reinforcement techniques. Whether you’re dealing with an antique wooden vanity mirror or a modern resin-framed bathroom piece, this guide shows you how to fix a warped mirror frame permanently without replacing it. You’ll learn to diagnose the cause, apply targeted repairs by material type, and reinforce the structure to prevent future warping.
Diagnose the Warp Before Repairing
Before you begin fixing the frame, confirm that the frame is warped and not the mirror. Glass and acrylic rarely warp under normal conditions. What looks like a bent reflective surface is usually a distorted frame pulling away from the glass.
Check for Visible Signs of Warping
Look for these indicators when the mirror is hung or lying flat.
• Gaps appearing at one or more corners
• One side lifting away from the wall when hung
• Shadow lines visible along the edge of the mirror
• Mirror rattling or sitting unevenly in the frame
Perform a Flat-Surface Test
Remove the mirror from the wall and take out the mirror panel carefully. Lay the frame and mirror separately on a known flat surface like a countertop or table. Run your hand across the back of the frame to feel for bends or uneven areas. If the mirror lies flat but the frame doesn’t, warping is confirmed and you can address only the frame without unnecessary glass replacement.
Repair Warped Wooden Mirror Frames
Wood expands and contracts with humidity changes. Over time, especially in dry or damp rooms, this leads to bowing. Antique and solid wood frames need gentle but firm correction to restore their shape.
Use a Steel Cross Brace for Maximum Flatness
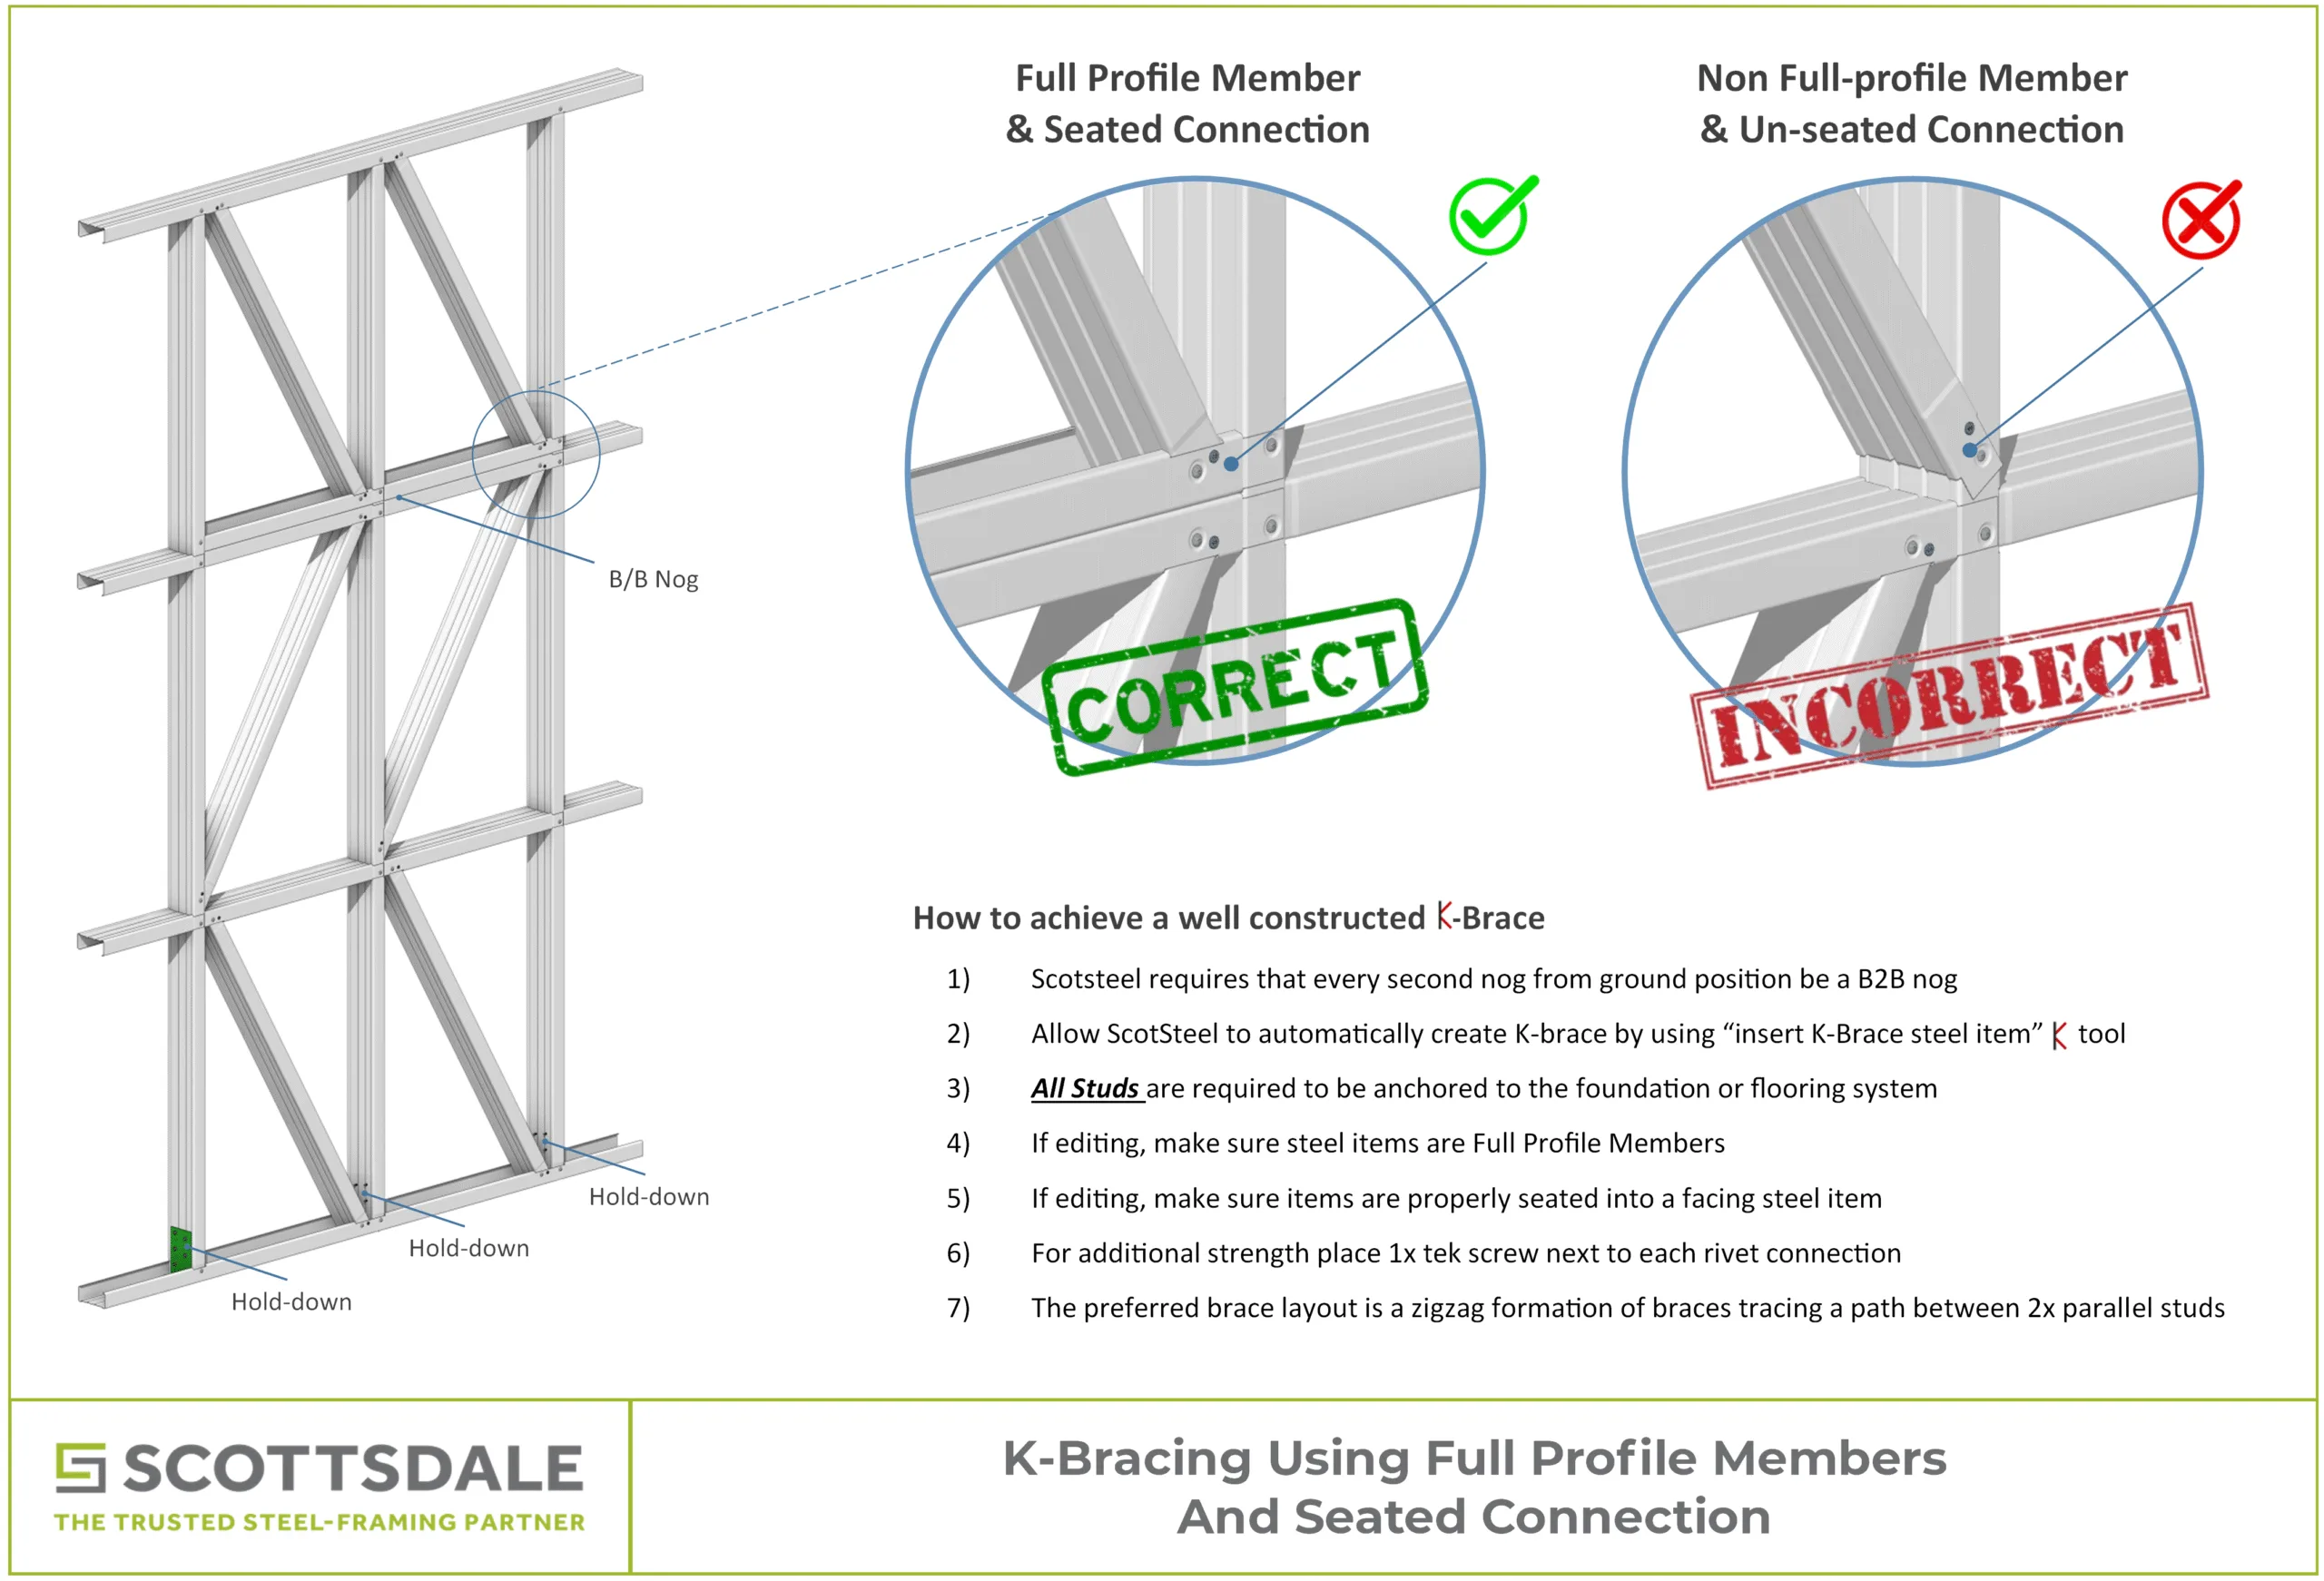
For large or valuable wooden frames, a steel cross brace is the most effective fix. This method works especially well for heirloom pieces where long-term stability matters more than easy access to the back.
Steps to install the brace:
- Remove the mirror first to avoid putting stress on the glass.
- Cut a 20 × 5 mm steel bar to fit diagonally or in an X pattern across the back of the frame.
- Pre-drill holes at each corner of the frame.
- Screw the brace securely into the frame’s rear surface.
- Paint the steel to match or conceal it inside a wooden backing box.
The steel pulls the frame into a perfectly flat plane and resists future warping forces. According to experts, this approach protects the mirror against any possible future warping because the steel is strong enough to withstand the force of the frame.
Apply Acid-Free Paper as a Vapor Barrier
For lightweight wood frames in bedrooms or hallways with moderate humidity, adding rigidity can prevent future warping without major construction.
How to apply the backing:
- Cut acid-free paper to cover the entire back surface of the frame.
- Use permanent double-sided scrapbooking tape to attach the paper firmly.
- Smooth out any air bubbles during application.
This backing acts like a spine to stiffen the frame, blocks moisture transfer, reduces seasonal movement, and keeps dust out of the frame cavity.
Fix Modern Resin or Plastic Mirror Frames
Resin and plastic frames mimic ornate wood but are held together with weak staples. These joints loosen easily, causing corner separation and visible gaps that make the mirror appear warped.
Gather Essential Tools
You will need specific tools to disassemble and repair these frames without causing additional damage.
• Fine-tip screwdriver or small pry bar
• Side-cutting pliers or nail pinchers
• 120-220 grit sandpaper or fine file
• Exterior-grade wood glue
• Small steel angle brackets
• 8-12 mm wood screws
• Drill with pilot bit
• Miter clamp or DIY string-and-stick clamping system
• Masking tape for temporary backing attachment
Avoid using hammers directly on plastic. Use a scrap wood block to protect surfaces from dents or cracks.
Disassemble the Frame Carefully
Many resin frames crack if forced. Work slowly and methodically to avoid causing additional damage.
Disassembly steps:
- Gently pry staples holding the backing card using a screwdriver.
- Remove the backing to expose internal joints.
- Lift out the mirror and set it aside in a safe location.
- Inspect all four corners for gaps, loose joints, or broken fragments.
Handle the molding with care because low-density plastic fractures easily when stressed improperly.
Repair and Reinforce Corner Joints
Weak corners are the root cause of most resin frame warps. Strengthening these joints prevents the problem from returning.
Reglue and clamp each corner:
- File down bent staple ends so pieces fit flush together.
- Clean joint surfaces thoroughly to remove debris.
- Apply a thin bead of exterior-grade wood glue to the mating surfaces.
- Wipe excess glue immediately before it dries.
- Clamp each corner tightly with a miter clamp.
- Let the glue dry overnight before moving the frame.
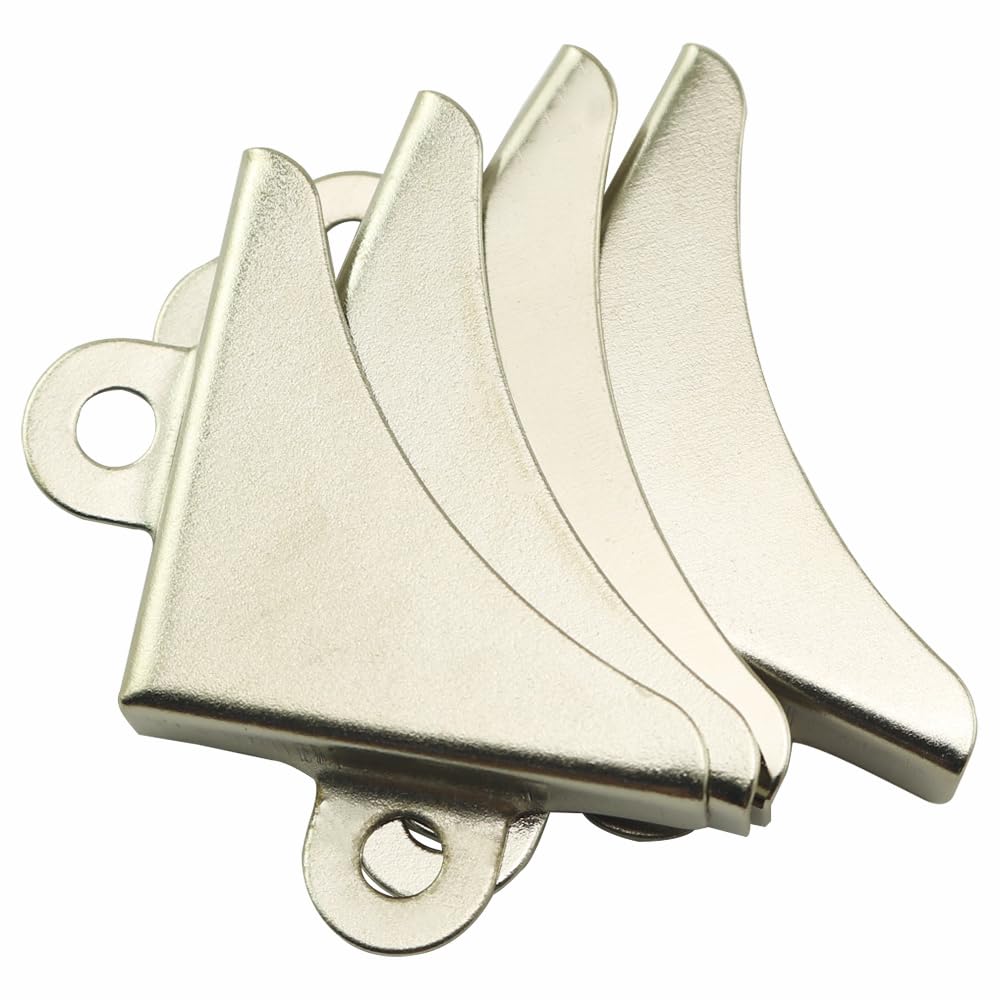
Add steel angle brackets for reinforcement:
- Pre-drill pilot holes to prevent cracking the plastic.
- Position an L-shaped bracket inside each internal corner.
- Secure with two short wood screws per bracket.
These brackets turn fragile joints into rigid connections that are often stronger than the original build.
Reassemble with Precision
Putting the mirror back together correctly ensures the repairs hold over time.
Insert the mirror with spacers:
- Place cardboard spacers around the mirror’s edge to center it properly.
- Lower the mirror into the frame smoothly without forcing it.
- Secure with fine nails using channel-lock pliers and a wood block to tap nails without marring the surface.
Reattach backing with removable tape:
- Replace the backing card.
- Fasten with masking tape instead of permanent glue.
- Reinsert any decorative plastic trim by tapping nails back into original holes.
Using tape allows future access for cleaning or adjustments when needed.
Touch Up and Seal the Repairs
Fill minor gaps with glue rather than caulk. Let it dry completely, then sand smooth. Apply gold-tone paint to match ornate finishes and restore the frame’s appearance.
Prevent Future Warping
Fixing a warp once isn’t enough. You must stop it from coming back by controlling the environment and choosing proper mounting locations.
Control Indoor Humidity for Wood Frames
Wood frames demand stable air moisture to stay flat. The ideal range is 35-50% relative humidity.
Below 30%: Wood dries out, shrinks, cracks, and becomes prone to warping.
Above 50%: Risk of mold growth, insect damage, and accelerated degradation.
Use a hygrometer to monitor levels in rooms where mirrors are hung. In winter, run a humidifier. In summer, use a dehumidifier in basements or bathrooms.
Avoid Problem Locations
Never hang wooden frames in these problematic spots.
• Above radiators or heating vents
• Near uninsulated exterior walls
• In bathrooms with poor ventilation
• Outdoors where rain, wind, and UV rays accelerate degradation
Sunlight and heat accelerate warping. UV rays degrade finishes and weaken the adhesives holding frames together.
Skip Cement Walls
Concrete walls can wick moisture, especially in garages or basements. This dampness transfers to the frame’s back, fueling warping over time. Use a wood furring strip or floating shelf as a barrier between concrete and the mirror frame.
Strengthen Metal Mirror Frames
Aluminum and steel frames rarely warp, but large ones can bow without proper support.
Install Support Wire for Large Frames
For mirrors over 24 inches wide, add a second wire vertically across the back. Connect it to the main hanging wire to form a T or X shape. Use rust-resistant wire or coated cable to prevent corrosion.
Add Center or Cross Bracing
Large metal frames benefit from a central vertical brace or an X-shaped crossbar. These stop flexing under their own weight, especially when mounted over time.
Reinforcement Methods Compared

| Method | Best For | Installation Time | Longevity |
|---|---|---|---|
| Steel Cross Brace | Large wooden frames | 30-45 minutes | Permanent |
| Angle Brackets | Resin or plastic frames | 20-30 minutes | 5+ years |
| Acid-Free Paper Backing | All frame types | 10-15 minutes | 3-5 years |
| Support Wire | Large metal frames | 15-20 minutes | Permanent |
Choose based on frame size, material, and usage environment.
Save Money and Reduce Waste
Repairing a warped mirror frame costs far less than replacing it. A new mirror costs $100 or more at retail, while secondhand value is around $30-$40. Repair costs typically stay under $10 for brackets, glue, and tape.
By fixing instead of trashing, you cut landfill waste, extend product life, and preserve sentimental or vintage value. One repair can prevent dozens of mirrors from ending up in landfills each year. And because reinforced frames are often sturdier than new ones, you gain better performance at a fraction of the price.
Key Takeaways for Lasting Results
- Always remove the mirror first. Never force a warped frame with glass inside.
- Match repair method to material. Use steel braces for wood, brackets for resin, and support wires for metal.
- Reinforce every fix. Glue alone fails over time.
- Maintain 35-50% humidity to stabilize wood frames.
- Use removable fasteners like masking tape for backing cards. Future you will thank you.
- Inspect annually. Catch small shifts before they become big problems.
- Avoid extreme environments. Heat, cold, and moisture are the enemies of flat frames.
With these steps, you’re not just fixing a warped mirror frame. You’re upgrading it. Most repaired frames end up stronger and flatter than when they were new. And with proper care, they’ll stay that way for decades.
Don’t replace. Restore.
Frequently Asked Questions About Fixing Warped Mirror Frames
Can I fix a warped mirror frame without removing the mirror?
No. You must remove the mirror first to avoid cracking the glass or acrylic. Working on a warped frame with the mirror inside puts pressure on the glass and increases breakage risk. Always remove the mirror panel before attempting any repair.
Does humidity really cause wooden mirror frames to warp?
Yes. Wood absorbs and releases moisture based on environmental conditions. When humidity drops below 30%, wood dries out and contracts unevenly, causing warping. Levels above 50% can lead to mold and structural weakness. Maintaining 35-50% relative humidity keeps wood stable.
Are resin mirror frames worth repairing?
Yes. Modern resin frames are inexpensive to repair and often respond well to reinforcement with corner brackets. The repair costs under $10 and yields a frame stronger than its original construction. Replacement would cost $100 or more.
How long do the repairs last?
Steel cross braces and support wires provide permanent solutions. Angle brackets last 5+ years with normal use. Acid-free paper backing typically lasts 3-5 years before needing replacement. All methods significantly extend the frame’s functional life compared to leaving it unrepaired.
Can I use regular glue for resin frame repairs?
No. Use exterior-grade wood glue for resin and plastic frames. Regular craft glue lacks the water resistance needed for bathroom or high-humidity environments. Exterior-grade options like Sallie’s Equity bond strongly and withstand moisture exposure.


