
A cracked or shattered side mirror glass turns your vehicle into a safety hazard and an eyesore. Whether it popped out during a car wash, shattered in a parking lot collision, or failed from age, you do not need a mechanic to fix it. Most repairs can be completed at home in under an hour using basic tools and the right replacement parts. This guide covers every repair method, from reattaching loose glass to replacing shattered panels or reinforcing broken housings with durable, cost-effective solutions.
The key to a successful repair lies in identifying your mirror type and matching the fix to the specific damage. You will learn how to choose the correct replacement glass, select weather-resistant adhesives, avoid common mistakes, and restore full functionality without paying dealership prices.
Identify Your Mirror Type Before Starting
Before grabbing tools, determine your mirror’s design. Using the wrong repair method leads to poor fit, annoying wobbles, or electrical failure.
Snap-On vs. Stick-On Glass
Snap-on mirrors use plastic clips to hold the glass in place. These are common in Toyota, Honda, and Ford models. The glass clicks into a backing plate, making removal and replacement often tool-free. Stick-on mirrors rely on adhesive bonding the glass directly to the backing plate. These are typical in GM, Chrysler, and some European vehicles. If the glass came off cleanly with residue on the back, it is stick-on.
Check for Heated or Power Features
Look at the back of the mirror housing. If you see a two-wire connector, it is a heated mirror. Power-adjustable mirrors contain small motors inside. Never use conductive adhesives like metal-filled epoxy on heated mirrors. Stick to dielectric bonds like silicone or VHB tape. For power mirrors, ensure the backing plate is not damaged before installing new glass.
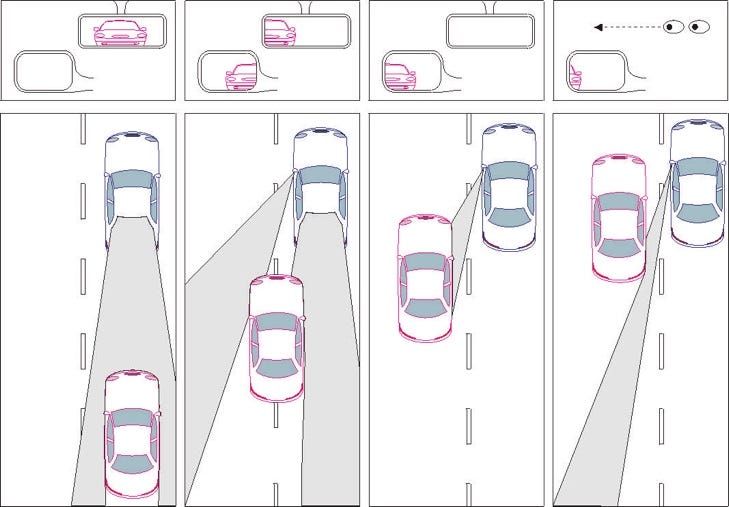
Match the Curvature
Passenger-side mirrors are convex, curving outward to expand your field of view. Driver-side mirrors are flatter. Installing flat glass on a passenger side is unsafe and may violate vehicle inspection laws. Always confirm the replacement glass matches the original curvature.
Assess Damage Before Repair
:max_bytes(150000):strip_icc()/Balance_How_Is_Side_Mirror_Damage_Handled-a4662a48119246cd894b0c256aa6bde4.png)
A quick inspection saves time and money. Not every broken mirror needs a full replacement.
Is the Glass Intact but Detached?
If the mirror glass popped out but is not cracked, it is designed to do so. Many modern vehicles use impact-release mechanisms to prevent door damage. Clean the surfaces and snap it back in using a rolling motion. No tools needed.
Is the Glass Cracked or Shattered?
If the glass is broken but the housing is undamaged, replace just the glass. This costs fifteen to forty dollars and takes twenty minutes. Avoid universal flat kits. They are cheaper but illegal for passenger-side use in many states due to reduced visibility.
Is the Housing or Mechanism Damaged?
Cracks in the plastic housing, broken adjustment motors, or bent mounting arms mean the entire assembly must be replaced. Attempting to glue a split housing often fails under vibration. Replacement assemblies cost fifty to one hundred fifty dollars, but used units from eBay or salvage yards can be as low as twenty-eight dollars.
Reinstall Popped-Out Mirror Glass
When the glass detaches but remains whole, reattaching it is fast and free.
Clean the Mounting Surfaces
Wipe the back of the glass and inside the housing with isopropyl alcohol and a lint-free cloth. Remove all dirt, grease, or old adhesive. This ensures a secure, wobble-free fit.
Inspect and Align Retaining Clips
Look for small plastic fingers inside the housing. If bent, gently straighten them with tweezers. Missing clips mean the glass will not stay put. Switch to adhesive repair in that case.
Snap Glass Back In Place
Hold the glass at the correct angle. Start at the top or side, engaging one edge into the clips. Use a rolling motion to press the opposite edge in. Never push from the center, which can crack the glass. When fully seated, you should hear a faint click and feel no movement when wiggled.
Pro Tip: Some Toyota and Honda models pop out during car washes. They are meant to be reinstalled with no parts needed.
Replace Shattered Mirror Glass
This is the most common repair. The glass is broken, but the housing remains intact.
Remove Old Glass Safely
Wear cut-resistant gloves and safety glasses. For snap-on mirrors, slide a padded flat-head screwdriver behind the edge and gently pry around the perimeter. Lift out the glass. Do not force it. For stick-on mirrors, chip away fragments carefully. Clean the backing plate with alcohol and remove all adhesive residue.
Disconnect Heated Mirror Wiring
If your mirror has defrost, unplug the two-pin electrical connector before handling. Press the release tabs and pull straight out. Label wires if multiple connections exist.
Install New Glass
For snap-on types, align the new glass and press firmly until it clicks into place. Check for even seating with no gaps. For stick-on mirrors, apply three M VHB tape or outdoor silicone adhesive to the backing plate. Center the glass, press hard, and use painter’s tape to hold it for twenty-four hours.
Reconnect and Test
Plug the wiring back in. Test the defrost function by turning on the rear defroster. If the mirror heats up, the connection is good. Adjust the mirror angle to confirm full range of motion.
User Success: A 2003 Subaru Forester owner used silicone adhesive on a convex passenger mirror. It remained intact after years of harsh weather.
Reattach Glass With Adhesive When Clips Fail
When clips are broken or missing, adhesives provide a strong, lasting bond.
Choose the Right Adhesive
Not all glues work for mirror repairs. Contact adhesive like Gorilla Clear bonds well under pressure and flexes with vibration. Two-part epoxy is strong but brittle. Avoid it on moving parts. Three M VHB tape is OEM-grade with no cure time, ideal for flat surfaces. Silicone sealant is flexible and waterproof, perfect for humid climates.
Apply Contact Adhesive Properly
Clean both surfaces with alcohol. Apply a thin, even layer to the glass back and backing plate. Wait ten to fifteen minutes until tacky. Align carefully. Once joined, it will not reposition. Press firmly for thirty seconds. Let cure twenty-four hours before driving at speed.
Real-World Result: A DIY repair with generic contact adhesive lasted over a year in Midwest weather extremes.
Reinforce With Screws and Washers

For a permanent, low-cost fix when adhesives fail.
Drill and Mount Securely
If the housing stripped out, drill pilot holes through the plastic frame near the glass base. Use outdoor-grade screws and wide washers on both sides to spread pressure. Tighten until snug. Over-tightening cracks plastic.
Seal Against Water
Apply black silicone caulk around the entire perimeter and over screw heads. Smooth with a finger. This prevents rust, fogging, and water ingress. Let cure twenty-four hours.
Paint for Appearance
Once dry, paint exposed caulk black to blend with the housing. This repair has indefinite longevity if not hit again.
Expert Note: This method turns a fragile plastic clip into a rugged mechanical bond. It is ideal for work trucks or high-vibration environments.
Build a DIY Temporary Mirror
When the housing is gone, restore visibility fast with household items.
Reinforce With Epoxy and Coat Hanger
Mix two-part epoxy and apply to cracked joints. Insert plastic scraps for strength. Cure six to twenty-four hours. Bend a steel coat hanger into an H-frame and anchor it to the mirror edges with doubled zip ties to distribute stress.
Dampen Vibration
Place foam pipe insulation behind the glass to reduce shaking. Wrap joints in duct tape, then cover with black electrical tape for UV protection.
Add a Weatherproof Shroud
Cut the top off a two-liter soda bottle. Shape it into a dome and tape it over the assembly. Paint black for a cleaner look.
Outcome: One user called it functional, durable, and surprisingly presentable. A lifesaver until a permanent fix.
Replace the Entire Mirror Assembly
When the housing, motor, or mount is damaged, full replacement is the only reliable option.
Remove the Door Panel
Use a trim tool to pry off the interior door panel. Unplug window, lock, and mirror wiring. Set aside.
Unbolt the Old Mirror
Locate the three or four bolts behind the mounting plate. Remove with a socket wrench. Pull the mirror off and disconnect the wiring harness.
Install the New Unit
Position the new mirror, reconnect the harness, and secure with bolts. Reinstall the door panel. Test power, heating, and folding functions.
Time Saver: Experienced users complete this in ten to twenty minutes. eBay listings show assemblies for as low as twenty-eight dollars.
Use Universal Mirror Kits Wisely
These eight dollar kits from AutoZone or Walmart are tempting but flawed.
Limitations You Must Know
Universal kits contain flat glass, which is unsafe and often illegal for passenger-side mirrors. Optical quality is poor, and UV exposure causes yellowing and delamination. Use these only for driver-side, short-term fixes.
User Feedback: One Subaru owner avoided this due to lack of convex replacement. Do not risk it on the passenger side.
Source Parts Smartly
Avoid buying the wrong glass. Use your VIN to search on RockAuto, eBay, or benepits.com. Check compatibility tools for exact fit.
Compare Sources
OEM parts cost more but guarantee fit and finish. Aftermarket is cheaper. Read reviews first. Salvage yards like Pull-A-Part offer used assemblies at deep discounts. eBay users report success with twenty-eight dollar Subaru mirrors.
Pro Tip: If local yards lack inventory, check online salvage networks with shipping.
Avoid Common Repair Mistakes
Even small errors lead to wobbly mirrors or early failure.
Do Not Use Super Glue or Hot Glue
These degrade in sun and heat. Within weeks, the mirror detaches. Use only UV-resistant, outdoor-rated adhesives.
Never Skip the Curvature Check
Flat glass on a convex housing creates blind spots. It is a safety risk and may fail inspection.
Do Not Over-Tighten Screws
Plastic housings crack easily. Snug is enough. No torque required.
Always Test Electrical Functions
After reconnecting, verify heating and adjustment. A loose wire causes intermittent failure.
Troubleshoot Installation Issues
Fix problems before they become hazards.
Mirror Wobbles
Re-seat the glass or add adhesive. If clips are weak, reinforce with VHB tape or screws.
Heated Mirror Not Working
Check the connector. Use a multimeter to test for continuity. A loose pin or shorted wire is common.
Water Inside Housing
Seal gaps with silicone caulk. Inspect rubber gaskets for tears.
Mirror Detaches at Speed
The bond failed. Reapply with contact adhesive or switch to mechanical fasteners.
Choose the Right Repair for Your Situation
Match the fix to the damage.
Glass Popped Out, Clips Intact
Clean and snap back in. Done in minutes.
Shattered Glass, Good Housing
Replace glass with OEM-matched convex unit using VHB tape or silicone.
Broken Clips or Housing
Use contact adhesive or screw-and-caulk reinforcement.
Full Assembly Failure
Replace the mirror. Fifty to one hundred fifty dollars, twenty minutes.
Need a Quick Fix
DIY with zip ties, foam, and a soda bottle. Safe until permanent repair.
Cost and Durability Compared
Know what you are getting.
• Glass replacement (snap-on): fifteen to forty dollars, high durability
• Adhesive reattach: five to fifteen dollars, lasts years with proper bond
• Screw reinforcement: under ten dollars, indefinite lifespan if not hit
• Full assembly: fifty to one hundred fifty dollars, highest reliability
• DIY temporary: under ten dollars, low to medium durability
Best Value: Mechanical reinforcement with screws and caulk is free, permanent, and strong.
Follow Safety and Legal Rules
A poorly repaired mirror can fail legally and dangerously.
Legal Requirements
Most states require at least one working side mirror. A missing or obstructed mirror can result in a ticket or failed inspection.
Safety Risks
A loose mirror can fly off at highway speed. Exposed wires or sharp edges risk injury. DIY shrouds should not block vision or create wind noise.
Rule of Thumb: Use temporary fixes only until permanent repair. Do not drive long-term with duct-taped mirrors.
Ensure Long-Lasting Results
Maximize repair life with these final tips.
Use Weather-Resistant Materials
Silicone, VHB tape, and contact adhesive resist UV, rain, and temperature swings.
Test Before Driving
Adjust the mirror through full range. Confirm no binding or wobble.
Maintain the Seal
Check for gaps or moisture yearly. Re-caulk if needed.
Consider OEM Glass for Longevity
Aftermarket glass lasts three to seven years. OEM matches factory durability and finish.
Final Note: A properly repaired mirror restores safety, function, and appearance, often for less than forty dollars. With the right method, you will never need a dealership again.
Frequently Asked Questions About Fixing Broken Side Mirror Glass
Can I drive with a broken side mirror?
Most states require at least one working side mirror. Driving with a missing or severely damaged mirror can result in fines or a failed inspection. Repair it promptly or use a temporary fix until permanent repair is possible.
How much does it cost to replace side mirror glass?
Replacement glass costs fifteen to forty dollars for snap-on types. Adhesive and tape add five to fifteen dollars. Full mirror assembly replacement runs fifty to one hundred fifty dollars.
Can I replace just the glass on a heated mirror?
Yes. Disconnect the two-pin electrical connector before removing the old glass. Apply non-conductive adhesive like silicone or VHB tape when installing the new glass. Test the heating function after reconnection.
What is the best adhesive for side mirror glass?
Three M VHB tape provides OEM-grade hold with no cure time. Outdoor silicone adhesive offers flexibility and waterproofing. Contact adhesive like Gorilla Clear bonds strongly and flexes with vibration. Avoid super glue or hot glue.
How do I know if I need a new mirror assembly?
Replace the entire assembly if the housing is cracked, the adjustment motor is broken, the mounting arm is bent, or wiring is damaged. Glass replacement alone will not fix these issues.
Are universal mirror kits safe to use?
Universal mirror kits contain flat glass, which is unsafe and often illegal for passenger-side mirrors. They are acceptable only for short-term driver-side fixes. For permanent repairs, use vehicle-specific convex glass.
Key Takeaways for Fixing Broken Side Mirror Glass
Successful mirror repair starts with identifying your mirror type and assessing the damage. Snap-on mirrors reattach with a rolling motion. Stick-on mirrors need adhesive or VHB tape. Shattered glass costs fifteen to forty dollars to replace. Broken housings require full assembly replacement at fifty to one hundred fifty dollars.
Use weather-resistant materials like silicone, VHB tape, or contact adhesive. Avoid super glue and universal flat glass. Test all electrical functions after repair. For permanent results, choose OEM or vehicle-specific convex glass. Temporary fixes using zip ties and household items work until permanent repair is possible, but do not rely on them long-term.


