If you’re staring at your sliding mirror closet doors wondering how to get them off without breaking the glass or your back, you’re not alone. Removing mirror closet doors, especially bypass sliding models, can feel like a puzzle with no instructions. But with the right knowledge, the right tools, and two sets of hands, it is a manageable DIY task. This guide cuts through the confusion and walks you step by step through how to safely remove mirror closet doors, avoid common mistakes, and prepare for reinstallation or closet transformation. You will learn how top-hung systems really work, why the bottom guide is not supporting the weight, and exactly what to do when the door will not budge.
We cover everything from identifying your hardware type to prying up stuck glides, handling 70-pound tempered glass panels, and maintaining your track system. Whether you are upgrading to barn doors, installing cabinets, or just deep-cleaning, this is the only guide you need.
Identify Your Mirror Door Type Before Starting
Before touching a screwdriver, determine your mirror door mounting system. Most are top-hung, but guessing wrong leads to frustration or damage.
Check for Top-Hung vs Bottom-Wheel Systems
Stand inside the closet and look up at the back of the top track. If you see rollers attached to the top edge of the door, it is top-hung, which covers over 90% of modern systems. The bottom has only a nylon glide that fits into a floor guide and prevents swaying. Bottom-wheel systems are rare. Here, the door sits on wheels at the base and uses a top guide pin. You will find adjustment screws near the bottom instead of the top.
Quick Test: Try lifting the door slightly. If it moves up, it is likely top-hung. If it does not lift but rolls, it may be bottom-wheel.
Locate the Adjustment Screws
These small screws control roller height and are key to removal.
• Top-hung: Screws on the top edge of the door, often recessed
• Bottom-wheel: Screws near the bottom or side
• Use a 3/32-inch or 1/8-inch Allen wrench or flathead screwdriver
Do not skip this step: Failing to loosen or adjust these screws is the number one reason doors will not come out.
Prepare Your Workspace for Safe Removal
Mirror doors are heavy, awkward, and made of tempered glass. Safety comes first.
Wear Protective Gear
• Cut-resistant gloves (like Mechanix or NoCry)
• Safety glasses
• Closed-toe shoes
Tempered glass shatters into sharp cubes under stress. Tape helps, but protection is essential.
Tape the Mirror Surface
Apply crisscross masking tape across the full surface. This holds fragments together if the glass cracks during handling.
Pro Tip: Use painter’s tape if you plan to reuse the door. Less residue.
Clear the Area and Gather Two People
• Remove clothing, shoes, or obstacles near the closet
• Protect flooring with cardboard or moving blankets
• Never attempt alone. These doors weigh 40 to 80 pounds and are hard to control.
User Experience: “I thought I could do it solo. Five minutes later, I called my neighbor. Do not be like me.”
Remove Top-Hung Mirror Doors Step by Step
This is the standard system. Follow these steps exactly.
Open Both Doors Fully
Slide both panels so they are side-by-side within the closet opening. This gives full access to each door hardware.
Order Matters: Remove the outer door first (the one closest to the closet entrance), then the inner door.
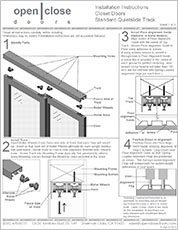
Loosen the Roller Adjustment Screws
Find the screws on the top edge of the door. Turn them counterclockwise to lower the rollers slightly, about 1/8 to 1/4 inch. This creates clearance so the rollers can clear the track lip when lifted.
Critical: If screws are tight or corroded, use a drop of penetrating oil and let it sit for 10 minutes.
Lift, Then Tilt the Door
With two people, follow these steps:
- Lift the door straight up about 1/2 inch
- Once the rollers clear the track, tilt the bottom outward
- Pull the entire door forward and down
Never tilt first: You will jam the rollers against the track and risk breaking the glass.
User Insight: “I kept trying to tilt it. Then I lifted first. Game changer.” (TheSilverHook)
Free Stuck Bottom Glides

If the door will not lift, the nylon glide is likely stuck in the floor track.
Pry Up the Floor Guide
Insert a wide flathead screwdriver just above the bottom track. Gently twist to lift the plastic glide. You may hear a loud pop. That is the glide releasing.
User Insight: “That spring is meant to push up so the wheel can come off the top track first.” (Nv_Spider)
Now try lifting again. The door should come free.
Tool Note: Use a 5-in-1 painter’s tool. Its wide, stiff blade works better than small screwdrivers.
Remove Bottom-Wheel Doors
These are rare but follow a different logic.
Lift the Door Vertically
The bottom wheels carry the weight. Lift the entire door up to disengage the wheels from the threshold track.
Tilt the Bottom Inward
Once wheels are free, tilt the bottom toward the closet interior and lower the top out of the upper guide.
Reinstallation Rule: “The top needs to go in first.” (CA Pro) Reverse the removal steps carefully.
Take Out the Second Door
Repeat the same process: adjust rollers, lift and tilt, and remove with two people.
Typical Dimensions:
• Height: 80, 90, or 96 inches
• Width: 24, 30, or 36 inches
• Weight: 40 to 80 pounds per door
• Glass: 1/8-inch tempered safety glass
Store both doors flat on a padded surface, mirror side up, or vertically in a corner with edge protection.
Inspect and Clean the Track
Now that the doors are out, check the hardware.
Examine the Top Track
Look for:
• Dents or bends
• Debris (dust, hair, carpet fibers)
• Loose mounting screws
Use a flashlight to see inside the roller grooves.
Clean the Bottom Guide
Remove dirt or obstructions from the floor track. Vacuum first, then wipe with a damp cloth.
Pro Tip: Wipe tracks every 3 months to prevent buildup.
Lubricate for Smooth Operation
Use silicone-based spray lubricant. Never WD-40 or oil, which attract dust. Spray lightly into the track and on rollers before reinstallation.
Maintenance Schedule: Lubricate every 6 to 12 months.
Reinstall Doors Correctly
Putting them back wrong causes dragging, noise, or misalignment.
Align Rollers with Track Grooves
With two people:
- Tilt the bottom inward
- Raise the door so rollers line up with the correct groove
- Lower straight down into the track
Sequence: For bottom-wheel systems, insert the top guide first, then lower the bottom.
Snap in the Bottom Guide
Ensure the nylon glide clicks into the floor track. This stabilizes the door.
Adjust Roller Height
Use the adjustment screws:
• Clockwise to raise (if door drags)
• Counterclockwise to lower (if door binds)
Adjust both sides evenly.
Misalignment Risk: Uneven rollers cause binding and premature wear.
Test the Sliding Motion
Open and close both doors several times. Movement should be smooth, quiet, and collision-free. Ensure 1 to 2 inches of overlap when closed.
Final Check: No scraping, wobbling, or sticking.
Replace Worn Rollers
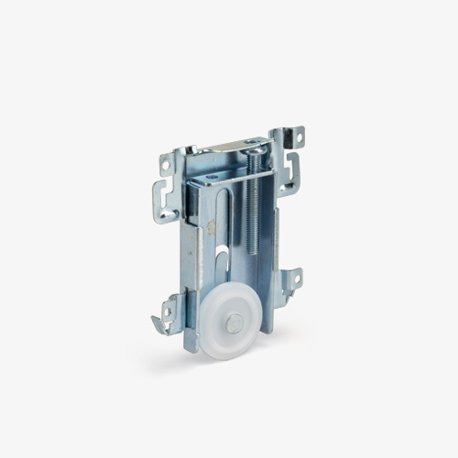
If doors sag or will not roll, replace the rollers.
Remove the Door First
Lay it flat on a padded surface, mirror side up.
Locate the Roller Assembly
Usually at the top edge. Common models include 23-041 and 23-225.
Remove Metal Hooks with Pliers
Rollers are held by metal hooks snapped into frame slots. Use pliers to grip and pull the hooks out. May require steady pressure.
Replacement Tip: Match model numbers. Most are standardized and sold at hardware stores or online (SWISCO, Home Depot).
Snap new roller into place and test.
Troubleshoot Common Problems
Door Will Not Lift Out
Cause: Bottom glide stuck in track
Fix: Pry up with flathead screwdriver
Rollers Will Not Disengage
Cause: Adjustment screws too tight
Fix: Loosen fully before lifting
Door Drags on Floor
Cause: Rollers too low or debris in track
Fix: Raise rollers, clean track
Noisy Operation
Cause: Dry rollers or dirty track
Fix: Clean and apply silicone spray
Door Wobbles
Cause: Worn rollers or misaligned track
Fix: Replace rollers, check track alignment
Lifespan Tip: Well-maintained systems last 15 to 25 years. Poor care cuts life in half.
Handle and Store Doors Safely
Always Use Two People
No exceptions. These doors are top-heavy and slippery.
Never Lean Against Walls
Unsecured doors can fall and shatter. Use a door storage rack or lay flat.
Transport with Care
Wrap edges with cardboard or foam. Carry vertically if possible.
Weight Warning: A 36-by-80-inch door can exceed 70 pounds.
Plan Your Next Steps
After removal, decide what is next.
Convert to Cabinet Storage
Remove shelf rails:
- Unscrew bottom rail screw
- Pull rail forward
- Swivel shelf up and out of top clips
Install a 24-inch wide by 71.75-inch high by 15.25-inch deep cabinet with inward-swinging door.
Design Tip: Flip the handle for right-side outward opening.
Upgrade Door Style
Options include:
• Barn doors (modern look)
• Bi-fold doors (space-saving)
• Curtains on tension rod (low-cost)
Reuse or Replace Mirrors
• Cover with fabric or paint for a new look
• Buy standard replacement doors ($150 to $400 per pair)
• Measure track width, door height, and roller spacing before ordering
Expert Advice: “Watch installation videos to see how guide clips fit into channels.” (Casey, SWISCO)
Maintain Your System for Longevity
Keep your system running smoothly.
Inspect Every 6 to 12 Months
Check:
• Roller wear
• Track alignment
• Screw tightness
Clean Tracks Quarterly
Use a dry cloth or vacuum nozzle.
Replace Worn Parts
• Nylon glides: Wear out over time
• Rollers: Replace if wobbly or noisy
Pro Tip: Label doors Left and Right with tape before removal to simplify reinstallation.
Final Thoughts on Removing Mirror Closet Doors
Removing mirror closet doors does not have to be stressful. With the right knowledge, especially that lifting comes before tilting and the bottom does not carry the weight, you can remove, maintain, or replace your doors safely and confidently. The key steps are identifying your hardware type, using two people, adjusting the roller screws before lifting, and prying up any stuck bottom glides. Whether you are upgrading your space or just doing a deep clean, this guide gives you everything you need to succeed. Take your time with each step, and do not force any component. If something feels stuck, look for the cause before applying pressure.
Frequently Asked Questions About Removing Mirror Closet Doors
Can I remove mirror closet doors by myself?
No. These doors weigh 40 to 80 pounds and are difficult to control. Always use two people to prevent injury or damage to the glass.
Why will my mirror door not lift out of the track?
The bottom nylon glide is likely stuck in the floor track. Use a wide flathead screwdriver to pry up the plastic glide until it releases.
Do I need to remove the track to take out the doors?
No. The doors lift out after adjusting the roller screws. The track stays mounted. You only need to remove the track if you are replacing it entirely.
How do I know if my doors are top-hung or bottom-wheel?
Look at where the adjustment screws are located. If they are on the top edge of the door, it is top-hung. If they are near the bottom or side, it is bottom-wheel.
Can I reuse my mirror closet doors after removing them?
Yes. Store them flat on a padded surface or vertically with edge protection. Apply crisscross tape to the mirror surface before moving to contain fragments if the glass cracks.
What tools do I need to remove mirror closet doors?
You need cut-resistant gloves, safety glasses, a wide flathead screwdriver, a 3/32-inch or 1/8-inch Allen wrench or Phillips screwdriver, and a flashlight. A 5-in-1 painter’s tool also helps pry up stuck glides.