
Cleaning a Dobsonian mirror might feel intimidating, but with the right approach, it is a straightforward process that can dramatically improve your telescope performance. The primary and secondary mirrors in a Dobsonian are first-surface optics, meaning the reflective coating is directly exposed to dust, moisture, and contaminants. Over time, grime like pollen, dew residue, or even cat footprints can dull image contrast and reduce brightness.
The key principle is to only clean when necessary. Most experts agree that light dust has minimal impact, and improper cleaning poses more risk than leaving it alone. When you do see haze, smudges, or organic buildup, a careful cleaning using distilled water and safe techniques will restore clarity without damaging the coating.
Assess If Your Mirror Actually Needs Cleaning
Before touching your optics, determine whether cleaning is actually required. Most Dobsonian mirrors can go years without needing a full wash.
Clean only if you observe visible haze or film under room lighting, fingerprints, grease, or insect residue, bird droppings or animal prints, mineral deposits from dew or coastal exposure, or a noticeable drop in contrast or brightness. Even quite a significant amount of dust has no discernible effect on image quality.
A cleaning mistake can cause microscopic scratches, coating damage, or fingerprints, which degrade images far more than dust. Skip cleaning if only light dust is present, no visible performance issues exist, or the mirror appears clean under casual inspection. Instead, use a silicone blower to remove loose particles.
Know Your Mirror Coating Type Before Cleaning
The type of coating determines how safely you can clean your mirror. Here is what you need to know.
| Coating Type | Safe to Clean? | Notes |
|---|---|---|
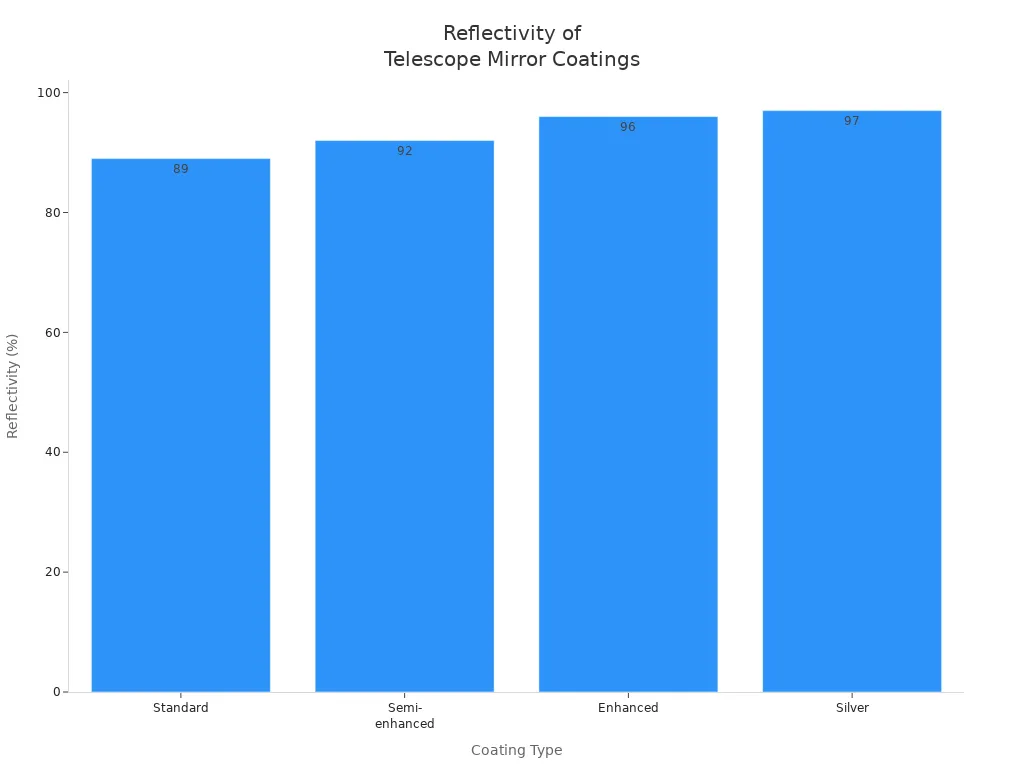
| Standard Aluminum | Yes | Most common; durable with quartz overcoat |
| Enhanced Aluminum | Yes | Higher reflectivity; multi-layer dielectric |
| Dielectric | Yes | Found on diagonals; extremely durable |
| Silver | Avoid | Tarnishes quickly; easily damaged |
Standard and enhanced aluminum coatings are safe to clean with mild soap and distilled water. Never use ammonia-based cleaners like Windex, as they eat aluminum. Avoid petroleum solvents like turpentine or mineral spirits, as they interfere with future recoating. Isopropyl alcohol and acetone are safe in small amounts for tough grime.
Gather the Right Cleaning Supplies
Using optics-safe items prevents scratches or chemical damage. Here is what you need.
Essential items include distilled or deionized water for the final rinse, warm tap water for the initial soak, mild dish soap like Dawn to break down oils, cotton balls as a soft wiping tool, soft microfiber towel for cushioning and drying, latex or nitrile gloves to prevent fingerprints, a silicone blower for dust removal, a hairdryer on cool setting to speed drying, and paper towels or toilet paper squares for blotting only.
Tools to avoid include paper towels and tissues that scratch or leave fibers, sponges and brushes that are too abrasive, Windex and ammonia-based window cleaners that damage coatings, and compressed air cans that may spray liquid propellant if tilted.
Remove the Primary Mirror Without Damage
Set up a clean, dust-free workspace and wash your hands thoroughly with a nail brush. Remove all rings and jewelry, and wear gloves to prevent oil transfer. Mark everything before disassembly, including mirror cell position on the tube, mirror orientation in the cell, and secondary mirror alignment.
To remove the mirror, unscrew all cell-to-tube screws using the correct screwdriver. Do not force them. Place the cell upright on a padded surface. Loosen L-shaped mirror clips gradually. Do not pry. Lift the mirror by the edges only. Never touch the surface. Set it face-up on a soft microfiber cloth.
Clean the Mirror Surface Properly
Fill a tray or sink with lukewarm water enough to submerge the mirror. Add one drop of mild dish soap per liter. Optionally, add about 10% isopropyl alcohol to reduce surface tension and speed drying. Stir gently without creating bubbles. Let the mirror soak for 1 to 10 minutes maximum.
For the cleaning method, dip a cotton ball in the solution and gently glide across the surface using curved or swirl strokes. This is preferred because straight scratches will show at the eyepiece while curved ones will not. Use light pressure and let the cotton ball float on the surface. Flip and reuse each ball once if still clean. Avoid the center marker dot if present.
Advanced users can use clean fingertips instead. This method requires perfect hand hygiene. Your skin detects grit before scratching occurs, making it safer than cotton balls when done correctly.
Rinse and Dry Without Leaving Spots
Lift the mirror at an angle over the tub. Pour distilled or deionized water slowly over the entire surface. Tilt and rotate to ensure full coverage. Repeat the rinse if necessary. No soap film should remain. Never use tap water for the final rinse because minerals cause permanent spots.
Place the mirror face-up on a clean, soft towel. Blot droplets with the corner of a paper towel or toilet paper square. Do not rub. Only blot. Optionally, use a hairdryer on cool or low heat to finish drying. Keep moving the dryer. Do not focus on one spot to avoid thermal stress.
Reinstall the Mirror Without Pinching Optics
Place the mirror back in the cell, aligning with your orientation marks. Loosely reattach L-brackets. Insert a business card or sheet of paper between the clip and mirror edge. Tighten clips until the paper slides with slight resistance, then stop. Do not over-tighten.
Over-tightened clips cause pinched optics, especially in cold weather. This induces astigmatism and results in distorted stars that appear elongated or comet-shaped. Reattach the mirror cell to the tube, aligning your marks. Insert screws and tighten evenly. Do not over-tighten. Snug is sufficient.
Recollimate After Cleaning
Any mirror removal requires re-collimation. Collimate the secondary first using a Cheshire eyepiece, laser collimator, or collimation cap. Center the reflection in the focuser. Then adjust the primary mirror using the three rear bolts to center the reflection of the secondary.
Fine-tune on a bright star like Vega or Sirius. Look for a symmetrical Airy disk and diffraction rings. Adjust until the star focus is round and sharp. Using orientation marks helps return the mirror to its original position and reduces collimation work.
Prevent Future Dirt Buildup
Keep your Dobsonian mirrors clean longer with simple habits. Use dust caps on both ends when stored. Cover truss tubes with a cloth or plastic bag. Store in a dry, clean place. Avoid garages or basements. Use desiccant caps in humid climates. Blow off dust regularly with a silicone blower.
A good first step is using a FLO Hurricane blower to simply blow the surface dust off. Prevention beats cleaning every time.
How Often Should You Clean a Dobsonian Mirror
Cleaning frequency depends on your observing conditions.
| Scenario | Cleaning Frequency |
|---|---|
| Average backyard use | Once every 1 to 2 years |
| Dusty or rural area | 2 to 4 times per year |
| Coastal or humid climate | Once per year plus inspection |
| Animal or insect contamination | Immediately |
| No visible grime | Do not clean |
The mirrors of truss Dobsonians typically get cleaned every 2 to 3 years. On average, clean once for every 20 to 30 observing nights.
Key Takeaways for Cleaning Your Dobsonian Mirror

Cleaning a Dobsonian mirror is safe when done correctly and only when necessary. Use distilled water for the final rinse, mild soap like Dawn, and gentle tools like cotton balls or clean fingertips. Avoid ammonia-based cleaners, never rub when drying, and blot only.
Mark your mirror orientation before removal to make reinstallation and collimation easier. Use the business card trick when reinstalling clips to prevent over-tightening and pinched optics. Store your telescope with dust caps in a clean, dry location.
When in doubt, blow first and clean later. Your mirror will serve you well for decades with minimal intervention.
Frequently Asked Questions About Cleaning Dobsonian Mirrors
Can I use tap water to clean my Dobsonian mirror?
No. Tap water contains minerals that leave permanent spots and residue on the mirror surface. Always use distilled or deionized water for the final rinse to prevent water spots.
How do I know if my mirror coating is aluminum or silver?
Most Dobsonian mirrors use standard or enhanced aluminum coatings. Silver coatings are rare and tarnish quickly. If your mirror is silver, avoid cleaning it unless you have specialized knowledge. Aluminum mirrors are durable and safe to clean with proper technique.
Will cleaning my mirror scratch the coating?
Scratches are a risk if you use abrasive materials or allow grit to get trapped under your cleaning tool. Use cotton balls or clean fingertips, and never rub the surface. Blot only when drying. Curved strokes are safer than straight lines because curved scratches are less visible at the eyepiece.
Do I need to recollimate after every cleaning?
Yes. Any time you remove the mirror, you should recollimate the telescope. Using orientation marks when reinstalling helps maintain alignment and reduces the adjustment needed. Check collimation on a bright star after cleaning.
What happens if I over-tighten the mirror clips?
Over-tightened clips pinch the glass and induce astigmatism, which distorts star images. Stars will appear elongated or comet-shaped instead of round. Use a business card or paper as a spacing gauge when tightening clips to prevent this problem.
Can I clean my secondary mirror the same way as the primary?
Yes. Use the same method of soaking, gentle wiping with cotton balls, distilled water rinse, and blot drying. The secondary mirror often needs cleaning less frequently. Often, a gentle air blow-off is all the secondary needs.


