A glass patio door might seem like the last place you’d put a dog door, but it’s actually one of the most common spots pet owners target. The catch? You can’t just saw a hole like you would in a wooden door. Most glass doors use tempered glass, which is designed to shatter into small pieces if altered. That single fact shapes every decision you’ll make about how to install a dog door in a glass door.
You have two realistic paths: a sliding panel insert that fits into your existing door track, or a custom in-glass unit built by a professional. The first is DIY-friendly and reversible. The second looks seamless but costs more and requires expert help. This guide walks you through both options, from measuring your dog to locking down weatherproofing, so you can pick the method that fits your door, budget, and skill level.
Choose Between a Sliding Panel Insert and In-Glass Fabrication

How Each Method Works
A sliding panel insert is a standalone frame with a pet door built in. You drop it into your sliding door’s track, and it sits next to your existing glass panel. You never touch the original glass, which makes this method safe, affordable, and removable when you move.
In-glass fabrication means replacing your current glass pane with a custom unit that has the pet door pre-cut and sealed inside. This must be done before the glass is tempered, so it requires a professional glazier. The result looks built-in, but it’s permanent and costs significantly more.
Which Option Matches Your Door?
For sliding glass doors, the panel insert is almost always the right call. It works with single or double-pane glass and doesn’t require modifying anything structural. Renters and homeowners who plan to move should default to this method.
For French doors with fixed glass panels, you have more to consider. You can replace the lower glass with a custom insulated unit, install a full sliding panel insert if the door allows it, or convert the entire door system. In-glass fabrication gives you the cleanest look but the highest price tag.
Measure Your Dog and Your Door Before Ordering

Sizing the Flap to Your Pet
A flap that’s too small forces your dog to crouch, which can cause back pain over time. One that’s too large lets in cold air and invites intruders. The key measurement is from your dog’s chest to the floor—that gives you the ideal flap height. Add 1 to 2 inches for clearance.
Quick breed reference:
– Small dogs (under 15 lbs): 6.5″ wide x 9.5″ tall
– Medium dogs (15–50 lbs): 8.5″ wide x 12.5″ to 16″ tall
– Large dogs (50–90 lbs): 11″ wide x 16″ to 19.5″ tall
– Giant breeds (over 90 lbs): 14″ to 15.5″ wide, up to 27.5″ tall
Tall, lean breeds like Greyhounds need extra-tall models so they don’t have to duck.
Checking Glass and Frame Compatibility
Standard pet doors work with single-pane glass up to 3/16″ thick. If your door has double-pane or insulated glass, you need a double-flap unit to maintain energy efficiency and prevent condensation between panes.
Before ordering, measure your sliding door’s track height and depth. Most panel inserts fit doors from 78″ to 84″ tall and use a spring-loaded adjuster for a snug fit. A wrong measurement here is the most common reason returns happen.
Assemble and Install a Sliding Panel Insert
Putting the Frame Together
Lay out all parts on a flat surface. Slide the connecting bars into the bottom panel with the holes facing outward. Secure each side with two short flat screws. Tighten until you feel resistance, then stop. Over-tightening warps the frame.
Next, attach the top panel to the connecting bars using two screws per side. Use a manual flathead screwdriver here. Power drills strip the soft aluminum frames. Remove the cardboard shipping inserts under the height adjuster before moving forward.
Dropping the Panel into the Track
Open your sliding glass door fully. Insert the top of the pet panel into the upper track first. Angle the bottom inward, then press upward to compress the spring-loaded height adjuster. Guide the bottom into the lower track and release.
The side with the flap screw heads should face inside your home. Push the panel flush against the sliding door frame. Close the sliding door against the panel. If there’s a gap, the adjuster isn’t fully extended or there’s debris in the track.
Secure the Panel with T-Brackets
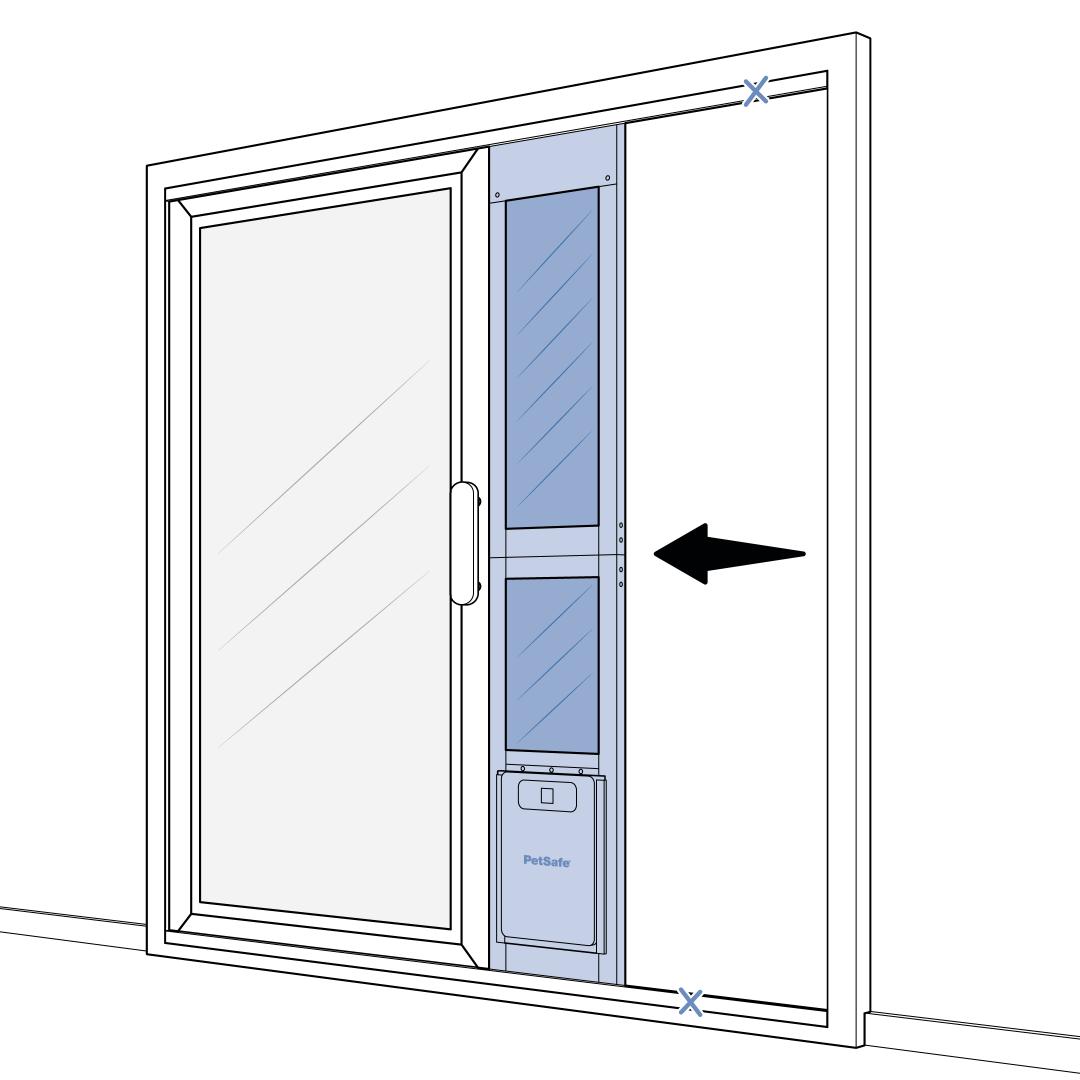
Screwed Installation for Maximum Security
With the sliding door closed against the pet panel, mark the top center of the panel on the doorframe. Mark the bottom edge where the sliding door meets the panel.
Place the top T-bracket in the track with the vertical leg facing you, aligned with your mark. Mark the screw holes. Repeat at the bottom, aligning the bracket edge with your mark.
Use a 7/64″ (2.5 mm) drill bit to make pilot holes in the track. Secure each bracket with four M4 x 10 mm sheet metal screws.
Now slide the pet panel over so the bracket holes align with the panel’s outer edge. Only drill into the outer rib-free zone—never into the glass area. Drill pilot holes and attach the panel to the brackets with two screws per bracket.
Adhesive Installation for Renters or Temporary Setups
If you can’t drill, adhesive T-brackets work as a temporary fix. Clean both the bracket backs and track surfaces with rubbing alcohol. Let everything dry completely.
Peel the adhesive backing and press the bottom bracket onto your mark. Hold for 30 to 60 seconds. Repeat for the top bracket. Slide the pet panel into the jamb and press it firmly against the brackets for another 30 to 60 seconds to set the bond.
This method is less secure. Skip it if you have a large dog or live in a high-theft area.
Weatherproof the Installation

Install the Glass Sweep
A glass sweep blocks drafts and insects along the edge where the sliding door meets the pet panel. Clean the edge of your sliding glass door with rubbing alcohol and let it dry.
Position the sweep so the brush side lightly touches the fixed door when closed. Peel the backing starting at the top, pressing down as you move toward the bottom. Trim excess with scissors. Open and close the door slowly to confirm the sweep glides without resistance.
Add Weather Stripping
Seal the gap between the pet door panel and the sliding door with foam or rubber weather stripping. Clean the sliding door’s edge again, then peel and press the stripping from top to bottom. Trim any excess. When closed, no light should pass through the seal.
Add a Locking Mechanism
Install a Rotary Lock
A pet door shouldn’t compromise your home’s security. A rotary lock prevents the sliding door from being lifted or forced open.
Use the template provided with your lock kit. Place the keeper side on the sliding door and the latch side on the fixed panel. Mark the drill holes and remove the template.
Drill four holes with a 7/64″ bit. Do not drill through the other side of the frame. Secure with 3/4″ flat-head screws, snug but not over-tightened. Test the lock to confirm smooth engagement.
Optional Security Bar
For extra protection, drop a steel security bar into the track when you’re home or asleep. Adjustable bars fit most track widths and stop the door from sliding open even if the lock fails.
In-Glass Fabrication: When Professional Help Is Required

Why You Can’t DIY This Method
Tempered glass cannot be cut, drilled, or modified after production. Any attempt will cause the pane to shatter into thousands of pieces. The only way to have a dog door in tempered glass is to order a new pane with the hole pre-cut before the tempering process.
This requires:
– Precise glass measurements
– Custom fabrication at a glass shop
– Professional installation with suction tools and sealants
This is not a DIY project. Attempting it risks serious injury and a destroyed door.
What the Professional Process Looks Like
A glazier will measure your existing pane, confirm the pet door size and placement, and order a custom insulated glass unit with the aperture built in. Once it arrives, they remove the old glass and install the new unit into your existing frame. Silicone sealant ensures an airtight, watertight fit.
The entire process typically takes 1 to 2 weeks, depending on fabrication time.
Cost Expectations
Professional in-glass installation runs higher than DIY panel inserts:
– Single-pane glass: $400 to $1,400
– Double-pane glass: $900 to $2,500
– Extra-large panes: add $500 to $1,000
– Small panes: subtract $200 to $400
The pet door unit itself (for example, SKU TG-SM-A-THN) costs around $158.25, but that doesn’t include the glass or labor.
Handle French Doors and Fixed Panels
Replace the Lower Glass with a Custom Unit
For French doors, the cleanest solution is replacing the lower glass panel with a custom insulated unit that includes a wooden frame housing the dog door. This preserves natural light and looks built-in. A glass shop cuts the hole, installs the pet door, and seals it within a wood or aluminum frame.
Use Thick Tempered Glass on a Budget
A cheaper alternative is 3/16″ or 1/4″ tempered glass with the pet door mounted directly. This is single-pane, so it offers poor insulation and may need extra weatherstripping. Best for mild climates or seasonal use.
Convert to a Sliding Door System
If your French door opens outward and you want a sliding pet panel, consider replacing the entire door system with a sliding glass door. This allows you to use a standard sliding pet door insert. It costs $2,000 to $5,000 but gives full functionality.
Maintain Your Dog Door for Long-Term Use
Prevent Frame Warping and Seal Failure
Overtightening screws is the leading cause of warped frames. Always hand-tighten and use a drill only for pilot holes. A warped frame causes the flap to stick or fail to close.
Inspect weather stripping and glass sweeps annually. Replace anything cracked, loose, or no longer sealing. Clean the sweep edge regularly—dirt buildup breaks the seal.
Keep the Setup Secure
Adhesive T-brackets can fail over time. If you live in a high-theft area or have a large dog, upgrade to screwed brackets and add a security bar. For in-glass units, keep the rotary lock and door latch engaged whenever you’re away.
Clean and Inspect Monthly
Wipe down the flap and frame with mild soap and water. Avoid harsh chemicals that degrade rubber seals. Hold a candle or incense stick near the seals. If smoke wavers, reseal or replace the weatherstripping.
Frequently Asked Questions About Installing a Dog Door in a Glass Door
Can you put a dog door in a glass door?
Yes, but you can’t cut the existing glass. You either install a sliding panel insert that fits into the door track or have a professional replace the glass with a custom unit that has the pet door pre-cut.
Can you cut a hole in tempered glass for a dog door?
No. Tempered glass shatters if cut, drilled, or altered after manufacturing. The hole must be cut before the tempering process, which means ordering a custom glass unit from a professional fabricator.
How much does it cost to install a dog door in a glass door?
A DIY sliding panel insert costs around $150 to $300 for the unit. Professional in-glass installation ranges from $400 to $2,500 depending on glass type, size, and labor rates in your area.
What size dog door do I need for my dog?
Measure from your dog’s chest to the floor for the ideal flap height, then add 1 to 2 inches. Small dogs need about 6.5″ x 9.5″, medium dogs need 8.5″ x 12.5″ to 16″, and large or giant breeds need 11″ x 19.5″ or larger.
Will a dog door in a glass door let cold air in?
It can if not sealed properly. Use a double-flap model for double-pane glass, install a glass sweep along the door edge, and add weather stripping between the panel and sliding door to block drafts.
Is a sliding panel insert secure?
When installed with screwed T-brackets and a rotary lock, yes. Adhesive brackets are less secure and better suited to temporary or low-risk situations. Adding a security bar provides extra protection.
Key Takeaways for Installing a Dog Door in a Glass Door
Your three biggest decisions are method, size, and security. Choose a sliding panel insert if you want a DIY-friendly, reversible install. Choose in-glass fabrication if you want a seamless look and don’t mind professional costs. Measure your dog carefully and match the flap to your glass type—double-pane glass requires a double-flap unit to prevent energy loss.
Once installed, maintain the seals annually and tighten hardware by hand to avoid warping the frame. Start by measuring your dog’s chest height and your door’s track dimensions today. With those two numbers in hand, you’ll know exactly which product to order and can complete the install in under an hour.