Hanging a mirror with D-rings is a smart, secure way to display large or heavy mirrors without relying on wire alone. Unlike flimsy picture hooks or single-point hangers, D-rings provide dual-point support, evenly distributing weight and reducing stress on both the frame and wall. Whether your mirror comes with factory-installed D-rings or you’re adding them yourself, this guide walks you through every step safely and accurately.
By the end, you’ll know how to choose the right anchors, align the hardware, and hang your mirror level and secure, even on drywall. You’ll also learn how to avoid common mistakes like crooked placement, stripped screws, or failed mounts that put heavy mirrors at risk.
Determine Mirror Weight Before Buying Hardware
Knowing your mirror’s weight is the critical first step that dictates every hardware choice you will make.
How to Weigh Your Mirror Accurately
Stand on a bathroom scale while holding the mirror, then step on the scale again without it. The difference between the two readings is your mirror’s approximate weight. This method works well for mirrors up to 50 lbs. For larger pieces, use a luggage scale or ask for help at a home improvement store.
Match Weight to the Right Hardware
Mirrors under 10 lbs are lightweight and work fine with standard anchors. Mirrors between 10 and 35 lbs require heavy-duty anchors or mounting into studs. Mirrors over 35 lbs must be mounted directly into studs or use toggle bolts rated for heavy loads. Never exceed the weight limit of any component in your mounting system.
Attach D-Rings to Your Mirror Frame

Most modern mirrors come with D-rings already mounted. If yours does not, follow these steps to attach them correctly.
Position D-Rings for Maximum Stability
Place one D-ring on each side of the frame, approximately 1/5 of the way down from the top corner. This places them within the upper third of the frame, which prevents forward tilt and keeps the mirror flush against the wall when hung.
Angle and Secure the Rings Properly
Tilt the top of each D-ring inward at a 45-degree angle so the screw heads fully engage the wood or frame material. Mark the screw hole positions with a pencil, then drill pilot holes using a 3/32-inch bit to prevent splitting. Screw each D-ring in tightly with a Phillips driver, ensuring no wobble.
Locate Wall Studs and Mark Your Mounting Points

Studs provide the strongest mounting surface. Finding them before you drill saves headaches later.
Use a Stud Finder for Secure Anchoring
Scan the wall where the mirror will hang using a stud finder. Mark each stud edge with a pencil, then outline the center. For mirrors over 20 lbs, aim to mount both D-rings directly into studs whenever possible.
Transfer Mirror Position to the Wall
Hold the mirror at your desired height and mark the top edge with a pencil. Use a level to draw a straight horizontal line across. Find the mirror’s center and measure half the distance between the two D-rings to each side. Draw two vertical reference lines at these points to guide anchor placement.
Install the Right Wall Anchors for Your Wall Type
Your anchor choice depends on your wall type and the mirror’s weight. Using the wrong anchor leads to failed mounts.
Choose Anchors Based on Wall Type
| Wall Type | Best Anchor | Max Load |
|---|---|---|
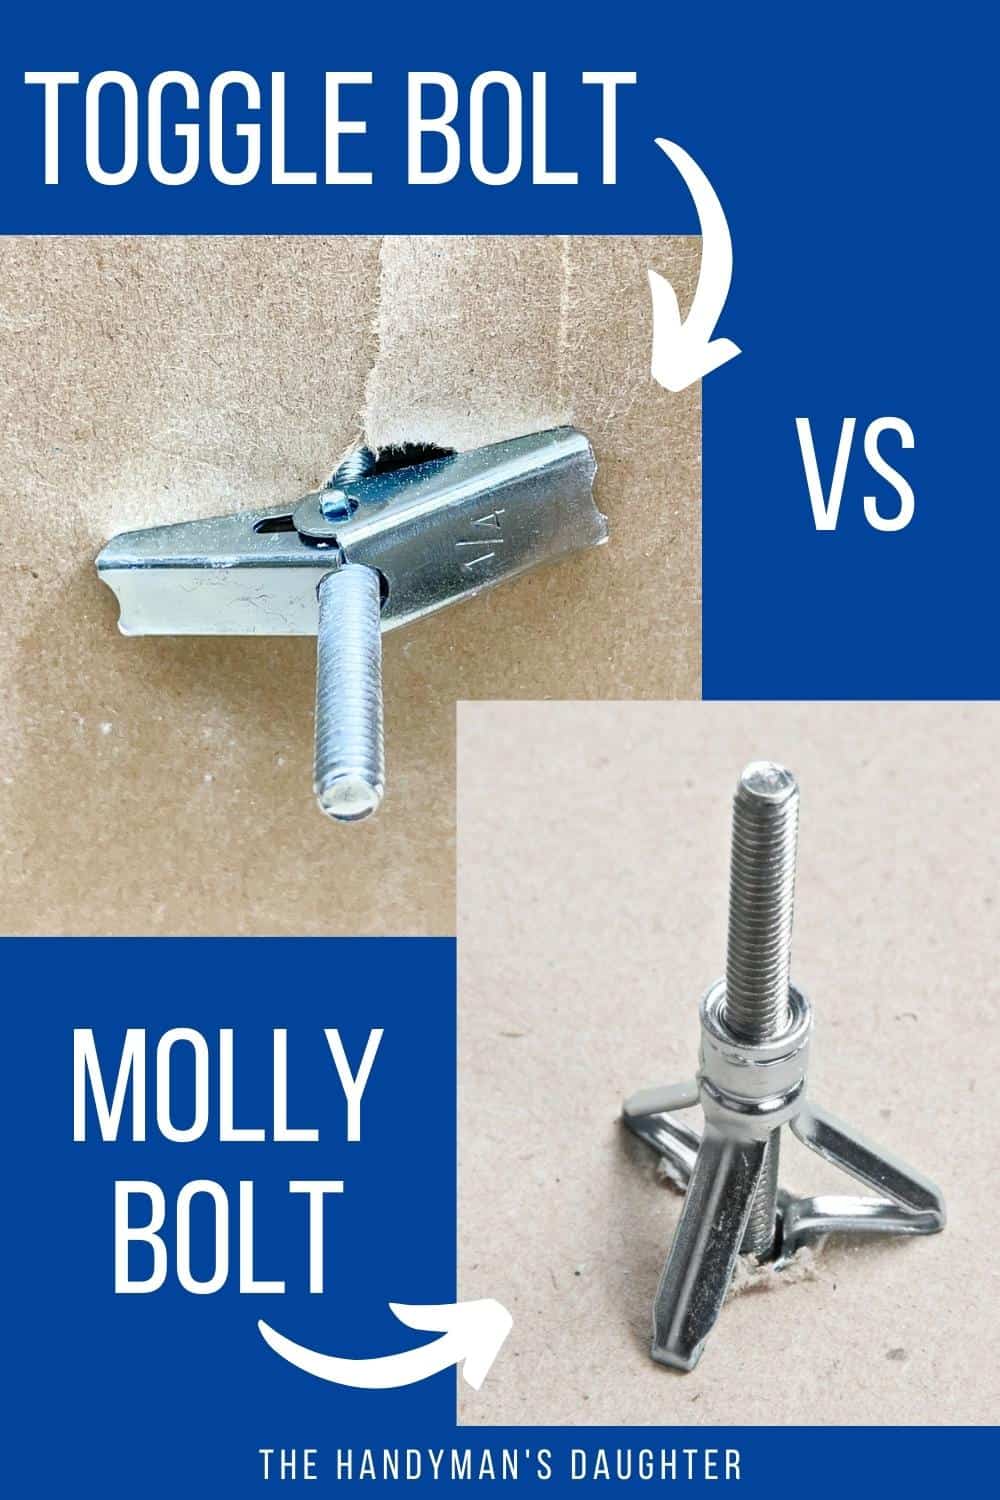
| Drywall (no stud) | Toggle bolt | 100+ lbs |
| Drywall (medium) | Molly bolt | 50-80 lbs |
| Drywall (light) | DecoScrews | 30 lbs |
| Plaster | Toggle bolt | 80+ lbs |
| Tile | Masonry screw | 50+ lbs |
| Concrete | Hammer drill + sleeve anchor | 150+ lbs |
Install Anchors Correctly
Toggle bolts require a hole slightly larger than the bolt. Insert the folded toggle, then tighten to expand behind the wall. Molly bolts need a pilot hole, light tapping with a hammer, then tightening to flare the wings. Screws should protrude 1/4 to 3/8 inch from the wall, giving the D-ring enough room to hook on securely.
Hang the Mirror Without Dropping It
Now comes the moment that requires patience and the right technique.
Use the Kneeling Technique for Better Control
Tilt the mirror’s bottom out about 2 inches while keeping the top touching the wall. Kneel down and slowly lower the mirror onto the screws. The D-rings naturally swing downward, making them more likely to catch the screw heads. This technique works best when D-rings are already folded downward before you lift.
Get Help for Heavy Mirrors
Always use a helper for mirrors over 20 lbs. Lift from the bottom edge or use a support wire, never pull on the D-rings alone. A falling mirror causes serious damage and injury.
Try the Hang and Level Tool for Perfect Alignment
This specialized tool hooks onto one D-ring while you hold the mirror in place. Level it, press the button to mark exact screw locations, then install the hardware. Repeat for the second side. This eliminates measuring mistakes and ensures a level hang on the first try.
When Hanging Wire Helps and When It Does Not
Some installers add wire between D-rings. Here is when it helps and when it creates danger.
Wire as Auxiliary Support Only
Cut braided steel picture wire approximately three times the mirror’s width. Thread through both D-rings, twist tightly with needle-nose pliers, and trim the excess. Leave just enough slack so the wire is invisible from the front but can drape over the screws.
Never Rely on Wire as Primary Support
D-rings are designed to carry the weight directly. Wire between D-rings can snap under load, especially cheap or thin wire. Use wire only for tensioning or temporary support during installation, never as the primary hanger.
Fix Common D-Ring Installation Mistakes
Even small errors cause big problems. Here is how to prevent and fix them.
D-Rings Flip Down Before Catching the Screw
Gravity pulls D-rings downward before they catch the screw head. Fold the rings downward before lifting, or use a Hang and Level tool to keep them in position.
Mirror Hangs Crooked
Uneven D-ring placement or misaligned anchors cause crooked hangs. Use a level at every stage of installation. Recheck after hanging and adjust by loosening and repositioning anchors slightly.
Screws Pull Out of the Wall
Overloaded anchors or weak drywall cause this failure. Use toggle bolts or mount directly into studs. Check anchor tightness after 24 hours, as drywall can compress slightly over time.
Final Touches and Long-Term Maintenance
Once your mirror is hung, finish strong to keep it secure for years.
Remove Protective Film and Clean the Surface
Peel off the plastic film covering the mirror surface. Wipe with a lint-free cloth and glass cleaner for maximum clarity.
Inspect Annually for Loose Hardware
Check for loose screws, wobbling, or wall damage every year. Retighten if needed. Avoid hanging mirrors near slamming doors or high-vibration areas that can loosen anchors over time.
Frequently Asked Questions About Hanging Mirrors with D-Rings
Can I hang a mirror with D-rings on drywall without hitting studs?
Yes, you can use toggle bolts or molly bolts rated for heavy loads. Toggle bolts support over 100 lbs in half-inch drywall, making them suitable for large mirrors. Just ensure the anchor capacity exceeds your mirror’s weight.
What size screws work best for D-ring mirror mounting?
Screws should protrude 1/4 to 3/8 inch from the wall. Use 3-inch screws when mounting directly into studs for heavy mirrors. The length gives the D-ring enough room to seat securely without bottoming out.
How do I fix a crooked mirror after hanging it?
Loosen the screws slightly, adjust the mirror position, then retighten. If anchors are misaligned, you may need to fill the old holes with spackle and redrill. Using a level during initial installation prevents this problem.
Can I use D-rings on a tile bathroom wall?
Yes, but you must pre-drill with a carbide-tipped bit to avoid cracking the tile. Use plastic anchors or masonry screws designed for tile. Drill slowly and steadily to prevent damage.
Do I need to remove the D-rings to attach hanging wire?
No, you can thread wire through the D-rings without removing them. Simply thread the wire through each ring, twist tightly with pliers, and secure. Remember that the D-rings themselves carry the primary load.
Key Takeaways for Hanging Mirrors with D-Rings
Hanging a mirror with D-rings is straightforward when you follow the right process. Weigh your mirror first to choose appropriate hardware. Locate studs whenever possible, or use heavy-duty toggle bolts for drywall. Mount D-rings in the upper third of the frame, angled inward at 45 degrees. Use a level throughout the installation and get help for mirrors over 20 lbs.
Avoid the temptation to skip tools or use weak hardware. A falling mirror is dangerous and costly to replace. With D-rings properly mounted and anchored, your mirror stays secure for years, providing a clean, modern look in any room.
Now go hang your mirror with confidence using these proven techniques.