A sliding glass door that drags, scrapes, or refuses to budge is more than a daily annoyance. It usually means the rollers underneath have worn out, seized, or rusted. If you’re searching for how to replace rollers on sliding glass door, you’re probably dealing with a door that needs real mechanical attention, not just a quick spray of lubricant. The good news is that this repair is well within reach for most homeowners. With the right tools, a helper, and a few hours, you can restore smooth operation and add 15–25 years of life to your door, all for a fraction of the cost of a professional service call.
Spot the Warning Signs of Failing Rollers
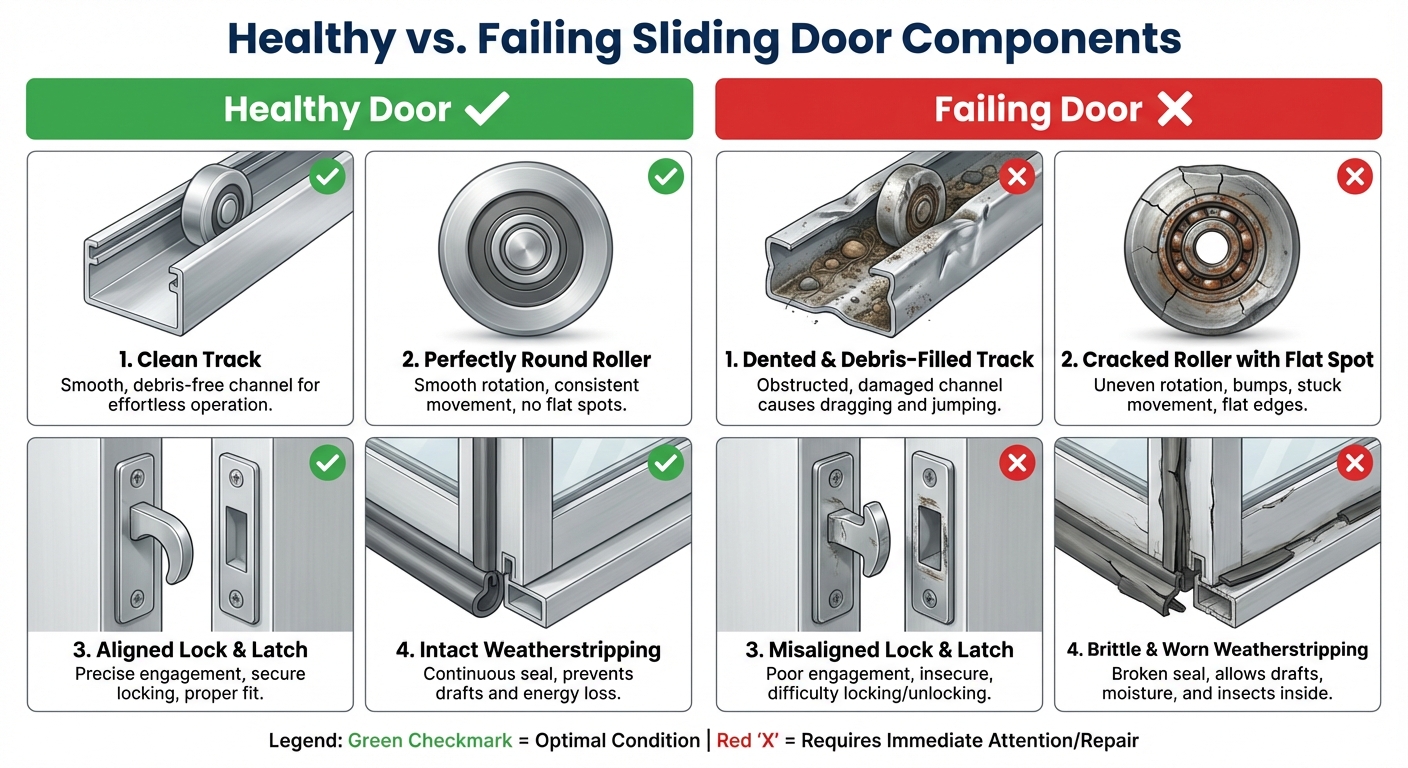
Feel for Excessive Drag
A healthy sliding door should glide open with less than 5 lbs of force. If you’re bracing yourself or using both hands just to get it moving, the rollers are likely past their prime. This drag often persists even after cleaning the track, which is a strong clue that the internal bearings have worn down rather than the track being the culprit.
Listen for Grinding and Clicking
Strange sounds during operation are early warning signals. A grinding noise suggests metal-on-metal contact from degraded bearings. Clicking or popping usually points to a cracked wheel or a misaligned roller assembly. Either sound means the mechanism is failing and will only get worse if ignored.
Look for Sagging or Misalignment
Stand back and look at the door when it’s closed. If one corner sits lower than the other, or if the door rubs against the top or side of the frame, one roller has likely failed while the other still works. This imbalance creates uneven stress and can damage the track over time.
Understand Why Rollers Fail
Lifespan Depends on Quality and Care
High-quality stainless steel ball-bearing rollers in a clean, well-maintained track can last 15–25 years. Cheaper rollers, or those exposed to dust and humidity, often fail within 5–10 years. If your door is over a decade old and sluggish, assume the rollers are due for replacement even if they haven’t completely seized.
Common Causes of Premature Wear
Dust is the number one enemy. It acts like sandpaper, grinding down wheels and axles. Moisture from rain or condensation causes rust that seizes bearings. Slamming the door or overloading it with weight strains the internal components. And a bent or pitted track will destroy even brand-new rollers in 1–2 years, which is why track inspection must come first.
Gather Your Tools and Safety Gear
Tools and Materials Checklist
- Phillips screwdriver
- Flathead screwdriver or small pry tool
- Rubber mallet
- Block of wood
- Penetrating oil for rusted parts
- Narrow-nozzle vacuum cleaner
- Damp cloth
- Silicone-based dry lubricant
- Cardboard or foam padding
- Sawhorses or a sturdy work table
Keep screws in a small container so nothing gets lost. Avoid WD-40 at all costs, as it attracts dirt and creates a gummy residue that ruins rollers.
Safety Comes First
Sliding glass doors typically weigh between 80–150 lbs. Always work with a partner to lift and carry the door. Wear gloves and safety glasses, especially when handling penetrating oil or prying stuck components. Lay the door on protective padding to prevent scratches and hairline cracks in the glass.
Remove the Door from the Frame
Lower the Rollers First
Locate the adjustment screws on the bottom edge of the door, usually accessible through small holes in the side rail. Turn them counterclockwise to lower the rollers fully. This drops the door slightly so the top clears the upper track.
Lift the Door Out Safely
With your helper gripping both sides firmly, lift the door straight up until the top edge clears the upper track. Then swing the bottom outward and away from the frame. Carry it to your work area and lay it flat on the padded sawhorses or table.
Disassemble the Roller Assembly

Standard Door Roller Removal
On most modern doors, the roller assembly is secured by Phillips-head screws near the bottom corners. Remove these screws and set them aside. Gently wiggle the roller unit out of its housing. If it’s stuck, apply penetrating oil and wait five minutes before trying again. Never force it, as this can crack the aluminum frame.
Older Doors (30+ Years) May Need Frame Disassembly
Older doors often have integrated frames that must be partially taken apart. Look for two square-tip screws on the bottom sides of the frame. One adjusts height; the other holds the structure together. Remove both, then place a block of wood against the bottom rail and tap gently with a mallet to loosen it. Work slowly to avoid bending the frame or cracking the glass.
Release the Retaining Clip
Once the rail is off, you’ll see the roller assembly held by a metal clip or bracket. Use a flathead screwdriver to carefully release the clip, then slide or pry the rollers out. If corrosion is present, apply more penetrating oil and let it soak before extraction.
Identify the Correct Replacement Rollers

Measure and Document
Before buying new parts, take clear photos of the old rollers and the empty housing. Measure the wheel diameter and width precisely, since common sizes include 3/4″, 1″, and 1.25″. Note the mounting style, whether side-loaded, drop-in, or bracket-mounted. Incorrect replacements simply won’t fit or function properly.
Check Part Numbers and Compatibility
Look for any stamped part numbers on the old assembly. Search online using your door brand (such as Andersen or Pella) and model if known. Some aluminum doors use proprietary rollers, which can add $80–$150 to the parts cost. Make sure the new rollers match the original orientation, especially if they have offset axles or angled brackets.
Install the New Rollers
Insert in the Correct Orientation
Place the new rollers into the housing exactly as the old ones were positioned. Misalignment causes binding and uneven contact with the track. If your door has dual rollers, install both at the same time to ensure even support.
Secure Without Over-tightening
Reattach the securing screws with a Phillips screwdriver. Tighten until snug, but do not overtighten, as this can strip threads or deform the housing. For older doors, reattach the bottom rail using the square-tip screws, tapping it gently into place with the block and mallet.
Spin-Test Before Reinstalling
Spin each roller by hand. They should turn smoothly and silently. If there’s resistance, check for obstructions or incorrect installation. This quick test catches errors before the door goes back into the frame.
Prepare the Track for Maximum Roller Life
Vacuum and Wipe the Track
Use a narrow-nozzle vacuum to remove all dust, grit, and old lubricant from the entire track length. Follow up with a damp cloth to pick up any remaining grime. This step alone can prevent premature roller failure.
Inspect for Damage
Run your finger along the track surface. If you feel bends, pits, or warping, the track must be replaced. A damaged track will ruin new rollers quickly and is the #1 cause of repeat failures.
Lubricate the Right Way
Apply only silicone-based dry lubricant along the track. Spray a light coat and spin the rollers to distribute it evenly. Never use WD-40, oil, or grease, as these attract dirt and create sticky buildup that increases friction.
Reinstall and Adjust the Door

Align and Lower Into Place
With your helper, lift the door and align the top edge with the upper track. Slowly lower it, guiding the rollers into the bottom track. Make sure both rollers engage fully before releasing the door’s weight.
Adjust Roller Height
Use the adjustment screws at the bottom of the door. Turn them clockwise to raise the rollers. Aim for about 1/8″ clearance from the frame, enough to glide freely but not so much that you create a gap that compromises insulation or security.
Fine-Tune for Smooth Operation
Slide the door back and forth several times. It should move effortlessly. If it drags, raise the rollers slightly. If it wobbles or gaps, lower them. Make small adjustments and test repeatedly until the motion is smooth and even.
Maintain Your Rollers for Decades of Use
Clean the Track Twice a Year
Set a reminder to vacuum the track every six months. Use a soft brush attachment to reach corners and crevices. This simple habit prevents the dust buildup that grinds down rollers over time.
Lubricate Annually
Once a year, apply a fresh coat of silicone dry lube. Wipe away excess with a dry cloth to avoid attracting debris.
Avoid These Common Mistakes
- Never use WD-40 as a long-term lubricant.
- Don’t ignore track damage, as it destroys new rollers fast.
- Don’t work alone when lifting an 80–150 lb door.
- Don’t overtighten screws, which damages the housing.
Frequently Asked Questions About Replacing Sliding Glass Door Rollers
Can you replace rollers without removing the door?
No. While you can adjust height and lubricate the door while it’s in place, the roller housing is inaccessible when the door is seated in the track. Any claim of “no-remove” replacement is misleading for standard sliding glass doors.
How long does the replacement process take?
For a DIYer with a helper, the full process typically takes 60–90 minutes. First-timers may need more time, especially when working with older models that require frame disassembly.
What if the door still doesn’t glide smoothly after replacement?
Recheck the adjustment screws first. The door may still be too low. Confirm the track is clean and straight, and verify the rollers are installed correctly and spinning freely. If problems persist, the frame may be warped and require professional assessment.
When should I call a professional?
Seek expert help if the track is bent or damaged, the door frame is corroded or fragile, you’re unsure about older model disassembly, or you lack a second person to assist. Professionals charge $200–$450, which is worth it for complex cases.
How much does DIY roller replacement cost?
The total DIY cost is typically $20–$60 for the roller assembly and basic supplies. Specialized aluminum-door rollers may add $80–$150 to the parts cost.
How long do new rollers last?
High-quality stainless steel ball-bearing rollers in a clean track can last 15–25 years. Cheaper rollers or those in neglected tracks typically fail within 5–10 years.
Final Thoughts on Sliding Glass Door Roller Replacement
Replacing rollers on a sliding glass door is one of the most rewarding home repairs you can tackle. It restores daily convenience, improves energy efficiency, and saves you hundreds compared to hiring a pro. The key takeaways are simple: diagnose the symptoms early, always inspect the track before installing new rollers, use only silicone-based lubricant, and never work alone when lifting the door. With proper installation and twice-yearly track cleaning, your new rollers can deliver decades of smooth, effortless operation. Bookmark this guide for your next maintenance cycle, and enjoy a door that glides like new.