Cutting a glass bottle at home feels intimidating the first time, but the process is surprisingly approachable once you understand the science behind it. The key to learning how to cut a bottle with a glass cutter lies in two principles: creating a precise score line and using thermal shock to split the glass cleanly. With the right safety gear, a quality cutter, and a bit of patience, you can transform empty liquor and wine bottles into drinking glasses, vases, candle holders, and more. This walkthrough covers every stage, from setup to sanding, so you can skip the guesswork and get professional-looking results on your first or second try.
Safety First: Gear and Workspace Setup
Glass cutting produces sharp shards, hot water, and fine dust, so preparation matters more than speed. Skipping safety steps is the fastest way to turn a fun project into a trip to the emergency room.
Essential Protective Equipment
- Safety goggles: Protect your eyes from flying fragments during scoring and separation.
- Heat-resistant gloves: Handle boiling water and icy bottles without burns.
- Dust mask: Prevent inhalation of fine glass particles during sanding.
- Hearing protection: Required when using a rotary tool, which produces construction-level noise.
Set Up Your Workspace
Work inside or directly over a sink to contain any broken glass and water runoff. Clear a flat, stable surface with good lighting so you can spot micro-cracks or uneven score lines. Keep towels nearby for spills, and never attempt this on a wobbly table or near breakable items.
Choose the Right Glass Cutter
The tool you choose depends on the type of cut you want to make. For most beginners, a dedicated bottle cutter delivers the most consistent results.
Bottle Cutter vs. Rotary Tool
- Bottle cutter: Best for horizontal, full-circumference cuts. Uses a rotating wheel to score glass evenly around the bottle.
- Rotary tool with diamond disc: Designed for custom shapes like side panels or decorative windows in perfume bottles.
Stick with a manual bottle cutter if you are new. Models like the Kinkajou Bottle Cutter ($30 on sale) feature adjustable arms for different bottle diameters and are beginner-friendly.
Score the Bottle Correctly

The score line is the foundation of a clean break. A weak or uneven score leads to cracks, jagged edges, or full shattering.
Set Up the Cutter
Adjust the arms to match your bottle’s diameter. Too loose and the wheel wobbles; too tight and it crushes the glass. Align the cutting wheel perpendicular to the bottle’s surface for an even score.
Make a Single, Continuous Score
- Place the bottle firmly in the cutter.
- Apply firm, even pressure.
- Rotate the bottle one full turn only toward you.
- Listen for a crisp, consistent scratching sound.
A successful score is faint but audible. If you hear cracking or silence, the wheel is not engaging properly. Recheck your pressure and alignment before trying again. Never score the same line twice, as this creates weak spots that crack unpredictably.
Separate the Glass with Thermal Shock
Once scored, temperature change does the heavy lifting. Rapid expansion and contraction cause the glass to snap cleanly along the score line.
Boiling Water Method (Beginner-Friendly)
- Heat water to a rolling boil.
- Slowly pour it over the score line, rotating the bottle to cover the entire circumference.
- Immediately run the score under cold tap water or plunge the bottle into icy water.
The sudden temperature shift forces the glass to separate along the weakened line.
Candle Flame Alternative
- Rotate the bottle slowly over a candle flame, heating the score line evenly for 10 to 15 seconds.
- Dip the heated area into cold water.
- The top should detach with a light pop.
Avoid overheating. Too much flame weakens the glass unevenly and increases the chance of shattering.
Troubleshoot a Failed Cut
Even experienced crafters get occasional breaks that go wrong. Knowing why failures happen helps you adjust quickly.
Why the Bottle Didn’t Split
- Uneven heating: Ensure the entire score line receives equal heat before applying cold water.
- Double scoring: Going over the same line twice creates fragile areas that crack off-course.
- Hidden micro-cracks: Inspect bottles under light before cutting. Stress points from drops or manufacturing flaws increase shatter risk.
Bottle Shattered Instead of Splitting
Practice on cheap wine bottles first. Thinner glass is more forgiving than thick liquor bottles. Adjust your pressure, since too much force crushes the glass while too little fails to score it.
Smooth the Edge Safely
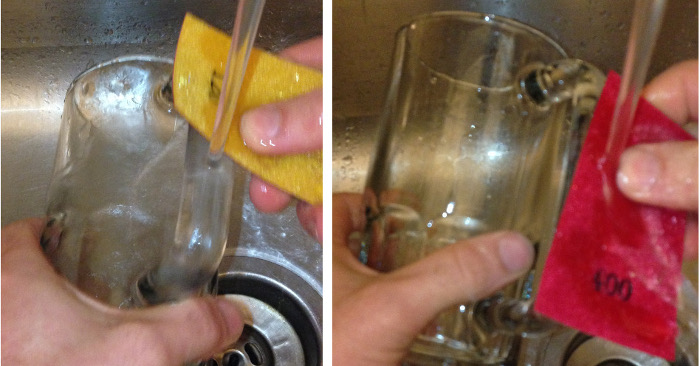
After cutting, the rim is razor-sharp. Sanding is mandatory before any functional use, especially for drinking glasses.
Start with Medium-Grit Sandpaper
- Wet both the edge and the sandpaper to reduce dust.
- Rub in circular motions until the edge feels blunt.
- Use 120 to 180 grit for initial shaping.
Finish with Fine Grit
Switch to 400-grit paper to polish the rim. For a professional finish, use a Kinkajou Wet Sander ($125) with 200/400 diamond resin discs ($20). These tools deliver a rounded, smooth edge ideal for drinking glasses.
Test for Sharpness
Gently run a finger along the rim. No catches or snags mean it is ready. If it feels rough, keep sanding.
Can You Use a Rotary Tool Instead?
Yes, but only for non-circular cuts like side panels or decorative openings. This method requires more skill and constant cooling.
When to Use a Rotary Tool
- Cutting custom shapes, such as a window in a whiskey bottle.
- Working on small or irregularly shaped containers like Chanel mini bottles.
Keep the Disc Cool
- Attach a diamond glass-cutting disc (never metal or wood).
- Run cold water over the cut zone continuously.
- Let the tool spin up before touching the glass, and never force it.
Overheating cracks the bottle and dulls the disc fast. Replace discs at the first sign of slowing or smoke.
What to Make After Cutting

Cut bottles open up a world of upcycling possibilities. Here are some popular projects to try.
Functional Projects
- Drinking glasses: Smooth the rim thoroughly and hand-wash only.
- Storage jars: Hold spices, cotton balls, or office supplies.
- Planters: Add pebbles for drainage, then soil and succulents.
- Watering cans: Cut the bottom off to create a precise spout for potted plants.
Decorative Ideas
- Candle holders: Drop a tea light into the base or pour soy wax inside.
- Bird feeders: Attach a wooden perch below the cut line.
- Vases or lamps: Paint, wrap in twine, or wire a light fixture through the neck.
Prep Bottles Before Cutting
A clean, inspected bottle cuts better and safer. Skipping prep is a common cause of failed projects.
Remove Labels and Residue
Soak bottles in warm, soapy water for 30 minutes. For sticky glue, use vinegar or rubbing alcohol. Dry completely before scoring.
Check for Flaws
Hold the bottle up to light and look for:
– Hairline cracks
– Chips on the base or neck
– Stress marks from prior drops
Discard flawed bottles. Thermal shock can turn hidden weaknesses into dangerous shards.
Maintain Your Tools for Longevity
Proper care keeps your cutter and discs working smoothly for years.
Care for the Bottle Cutter
- Wipe the wheel with rubbing alcohol after each use.
- Store in a dry place to prevent rust.
- Replace wheels if scoring becomes inconsistent.
Replace Diamond Discs Promptly
Diamond discs wear fast on glass. If cutting slows or smoke appears, stop and swap the disc. A dull blade increases heat and breakage risk.
Expert Tips for Success
A few insider tricks can dramatically improve your results.
Practice on Junk Bottles
Test pressure, rotation speed, and heat technique on bottles you don’t care about. Wine bottles are ideal starters because the glass is thin and forgiving.
Know Your Glass
Thicker glass, like Hendricks gin bottles, needs more heat and precise scoring. Thin glass responds faster to thermal shock, so adjust your timing accordingly.
Join the Community
Online forums and YouTube channels are full of real-world tips. Many crafters recommend separation ties ($7.50) to guide the crack or cork bottle tops ($4) to seal finished jars.
Frequently Asked Questions About Cutting Bottles with a Glass Cutter
What type of glass cutter works best for bottles?
A dedicated bottle cutter with an adjustable rotating wheel works best for horizontal, full-circumference cuts. Rotary tools with diamond discs are better for custom shapes but require more skill and constant water cooling.
Can you cut a bottle without a glass cutter?
Yes, but results are less predictable. The string-and-fire method involves wrapping the bottle in yarn soaked in lighter fluid, lighting it, and plunging the bottle into cold water. However, this technique is harder to control and more dangerous than using a proper cutter.
Why did my bottle shatter instead of cutting cleanly?
Shattering usually results from uneven heating, double scoring, or hidden micro-cracks in the glass. Always inspect bottles under bright light before cutting, and apply heat evenly around the entire score line.
How do you smooth the sharp edge after cutting?
Start with medium-grit sandpaper (120 to 180) to blunt the edge, then switch to fine-grit (400) for polishing. Keep both the sandpaper and glass wet to reduce dust. For a factory-quality finish, use a wet sander with diamond resin discs.
Are cut glass bottles food safe?
Yes, once the edges are properly sanded smooth. Hand washing is recommended to preserve the finish. Avoid using bottles that previously held non-food substances for food or drink purposes.
What bottles are easiest for beginners to cut?
Thin glass wine bottles are the most forgiving for beginners. Thicker liquor bottles like Hendricks require more heat and precise scoring, making them better suited for practice sessions after you have mastered the basics.
Final Thoughts on Mastering Bottle Cutting
Learning how to cut a bottle with a glass cutter is a blend of precision, patience, and a little bit of science. The three pillars of success are proper scoring, controlled thermal shock, and thorough edge sanding. Start with affordable wine bottles to build confidence, invest in a quality cutter like the Kinkajou, and always prioritize safety gear over speed. Once you have a few clean cuts under your belt, you will find endless upcycling possibilities, from elegant barware to garden decor. Grab a bottle, set up your sink, and make your first cut today.