
A blurry mirror can ruin your morning routine in seconds. One minute you are ready to face the day, and the next you are squinting at a foggy, streaky reflection that makes grooming impossible. The good news is that most mirror blurriness is fixable. The key is knowing whether the problem sits on the glass surface or has developed behind it, because each location requires a completely different approach.
This guide walks you through diagnosing the exact cause of your blurry mirror, choosing the right cleaning method for your situation, and preventing the problem from returning. You will learn which household items work best, what techniques professional cleaners use, and when it is time to simply replace the mirror entirely.
Diagnose the Blur: Surface Problem or Backing Damage?

Before you grab any cleaner, you need to figure out where the blurriness is coming from. Cleaning a mirror with internal damage waste your time and money, so run through these quick checks first.
Is the Haze on the Surface or Behind the Glass?
Run your finger across the hazy area. If the glass feels smooth and clean but still looks cloudy, the problem is likely internal. Clean the mirror thoroughly with vinegar or rubbing alcohol. If the haze remains after a proper cleaning, you are dealing with backing failure, not surface residue.
Inspect the edges closely. Dark spots, peeling, or bubbling at the corners are telltale signs of moisture damage. Shine a flashlight across the mirror surface at an angle. If the cloudiness appears within the glass rather than on top of it, cleaning will not help.
Quick Diagnostic Checklist
Look for these warning signs that indicate the mirror backing has failed. Dark spots or foggy patches concentrated at edges or corners. Cloudiness that does not change after thorough cleaning. Peeling, bubbling, or iridescent patches on the reflective coating. A hazy appearance that is more visible when viewing from an angle.
If any of these apply, skip the cleaning methods below. Your mirror needs replacement or re-silvering, not wiping.
Clean Surface Haze: 7 Proven Methods
If your diagnostic tests confirm the haze is on the front of the glass, you have options. These seven methods range from gentle to heavy-duty, so work through them in order.
1. Magic Eraser for Stubborn Film
A damp Magic Eraser works wonders on hard water buildup, soap scum, and sticky residues. Gently rub hazy spots in circular motions. Do not press too hard, as melamine foam can micro-scratch glass over time. Follow with a dry microfiber cloth to remove any residue left behind.
2. Vinegar Solution to Dissolve Grime
Mix equal parts white vinegar and distilled water in a spray bottle. Add a few drops of dish soap for extra cleaning power if needed. Spray the solution onto a microfiber cloth rather than directly onto the mirror. Wipe using an S-pattern, then buff dry with a second clean cloth. The acetic acid breaks down mineral deposits and film effectively.
3. Rubbing Alcohol for Oily Residue
Use 70% isopropyl alcohol or higher. Apply to a cotton pad or microfiber cloth and wipe away toothpaste, hairspray, and makeup. Alcohol evaporates quickly and leaves no streaks. It also disinfects the surface while it cleans.
4. Baking Soda Paste for Tough Stains
Mix baking soda with water until you form a thick paste. Apply gently to dried toothpaste or hard water spots. Use light pressure, as baking soda is mildly abrasive. Wipe with a damp cloth, then dry immediately to prevent water spots.
5. Lemon Juice for Natural Cleaning
Apply fresh lemon juice directly or mix with baking soda for extra grit. Wipe with a soft cloth in straight lines. Rinse and dry thoroughly to prevent citric acid from sitting too long. This method works best for light grime and leaves a pleasant scent.
6. Best Commercial Cleaners
Several commercial options outperform DIY solutions for specific situations. Blue Juice is ammonia-free, streak-free, and safe for daily use on all mirror types. Sprayway is affordable, widely available, and delivers professional-grade results. Ammonia-free Windex provides a safer alternative to the classic version, though you should still spray it onto a cloth rather than the mirror directly.
Avoid traditional Windex with ammonia. It leaves residue and produces fumes that can cause problems in small bathrooms.
7. E-Cloth: Water-Only Cleaning System
The E-cloth system uses one damp cloth to wipe and one dry cloth to buff. No chemicals required. The electrostatic fibers lift dirt using only water. This method works exceptionally well for weekly maintenance and prevents streaks entirely. For stubborn spots like hairspray or makeup, spot-clean with rubbing alcohol first.
Professional Cleaning Routine for Streak-Free Results
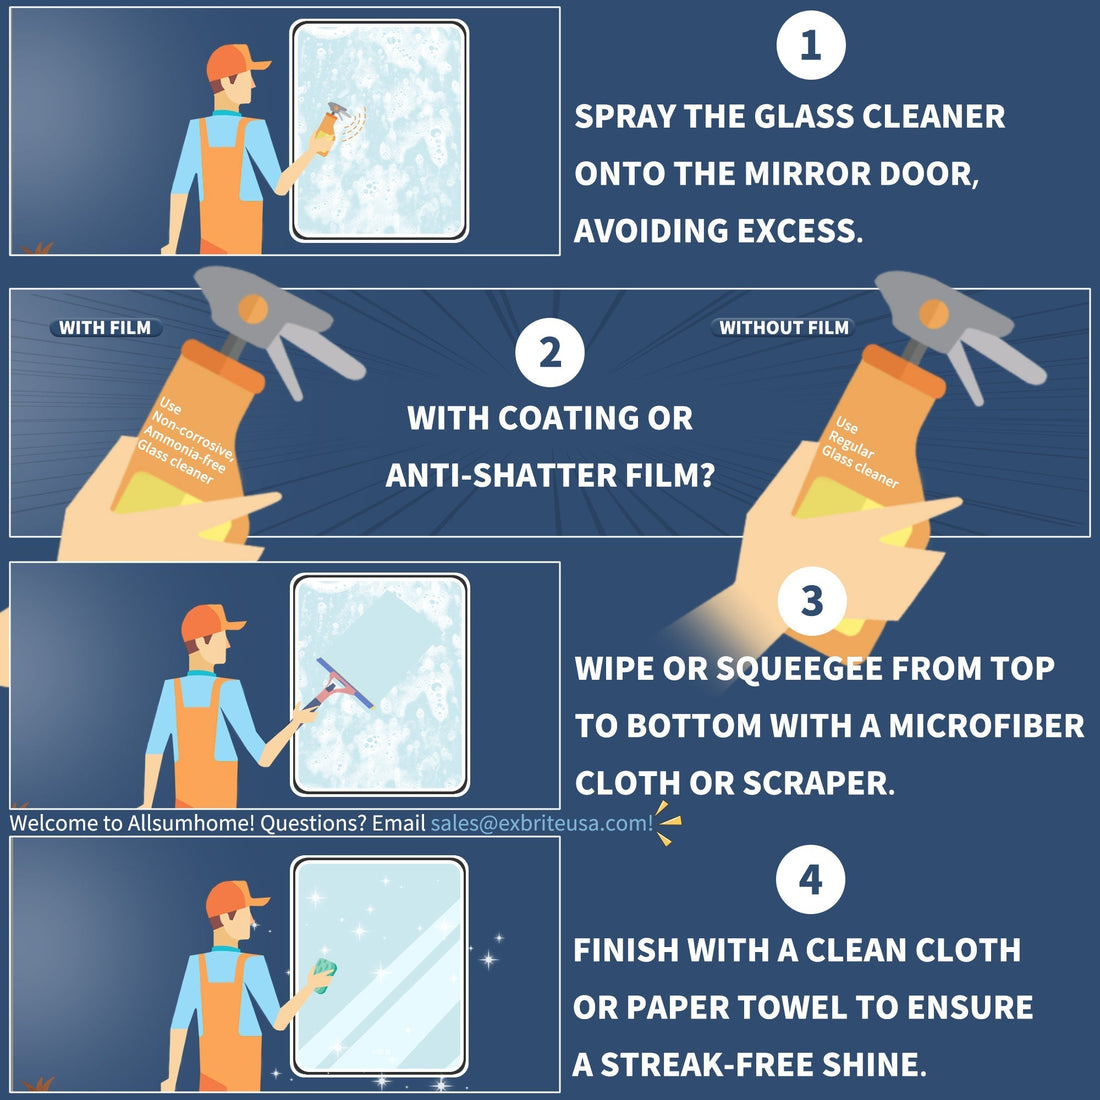
Follow this sequence for a mirror so clear you will forget what haze looked like.
Step 1: Dry Dust First
Wipe the entire surface with a dry microfiber cloth. This removes loose dust and prevents scratches during wet cleaning. Clean the frame and edges at the same time to avoid recontaminating the glass.
Step 2: Apply Cleaner to Cloth
Never spray cleaner directly onto the mirror. Liquid can seep behind the glass and damage the backing. Instead, spray onto your cleaning cloth or apply directly to the cloth surface. Let the cleaner sit for one to two minutes on tough spots.
Step 3: Wipe with Correct Motion
Use top-to-bottom strokes or an S-pattern. Avoid circular motions entirely, as they create visible swirls that are harder to remove. Overlap your strokes to ensure full coverage without missing spots.
Step 4: Buff to a Shine
Use a dry microfiber cloth to remove all moisture. Check for streaks by viewing the mirror under angled light. For a traditional streak-free finish, polish with crumpled newspaper.
Fix Specific Types of Blurriness
Different causes require targeted solutions. Here is how to handle the most common problems.
Hard Water Stains
Soak the affected area with vinegar for two minutes, then wipe clean. For heavy buildup, apply baking soda paste with light pressure. Prevent future stains by cleaning with distilled water or installing a water softener if your area has hard water.
Hairspray, Toothpaste, or Makeup Residue
These products leave sticky films that water alone cannot remove. Dab the area with rubbing alcohol, wipe clean, then follow with a vinegar-water rinse. Always dry immediately after cleaning.
Cloudiness After Cleaning
If your mirror looks hazier after you clean it, residue from ammonia-based cleaners is likely the culprit. Re-clean with vinegar-water or switch to an ammonia-free product like Blue Juice. This problem is entirely preventable by choosing the right cleaner.
Prevent Future Blurriness
Cleaning a mirror is only half the battle. Preventing buildup keeps it clear longer.
Care for Your Cleaning Tools
Wash microfiber cloths in hot water without fabric softener. Softener clogs the fibers and reduces their effectiveness. Use separate cloths for mirrors, counters, and bathrooms to avoid cross-contamination.
Use the Right Technique
Clean mirrors using straight lines or S-patterns, never circles. Work in low light or shade, because sunlight dries cleaner too fast and causes streaks. Clean bathroom mirrors weekly and decorative mirrors biweekly.
Control the Environment
Run exhaust fans during and after showers. Wipe the mirror with a squeegee or dry towel immediately after showering. Open windows to reduce humidity in the bathroom.
Daily Habits
Keep a dry microfiber cloth near frequently used mirrors for quick wipe-downs. Squeegee the mirror after every shower. Avoid spraying cologne, shaving cream, or hairspray toward the mirror.
When to Replace Instead of Clean
If cloudiness is behind the glass, no amount of cleaning will help. The silver backing has failed.
Signs of Backing Failure
Haze that appears under the glass rather than on the surface. Dark spots or fog-like patches, especially at edges or corners. Peeling, bubbling, or iridescent patches. No improvement after deep cleaning with multiple methods.
Your Options
Re-silvering is technically possible but requires handling hazardous chemicals like silver nitrate and tin chloride. You need gloves, goggles, a respirator, and excellent ventilation. The risk of bubbles and uneven coverage is high. This option is best for sentimental or antique mirrors only.
Replacement is the most practical solution for most people. Low-end mirrors cost as little as $20, and thrifted or upcycled options provide budget-friendly upgrades.
Common Mistakes That Make Mirrors Blurry
Using paper towels leaves lint and can scratch the glass. Always use microfiber or cotton cloths. Spraying cleaner directly onto the mirror risks liquid seeping behind the glass and causing damage. Over-wetting creates streaks and can damage edges. Cleaning in sunlight causes fast drying that leaves visible streaks. Ammonia cleaners leave residue and produce harmful fumes. Circular wiping creates swirl marks that are highly visible.
Frequently Asked Questions About Fixing Blurry Mirrors
Can I use Windex on my mirror?
You can use Windex, but choose the ammonia-free version. Always spray onto a cloth rather than directly onto the mirror to prevent seepage and reduce streaks.
How often should I clean my bathroom mirror?
Clean bathroom mirrors weekly due to high humidity and frequent use. Decorative mirrors in other rooms need cleaning every two weeks.
Why does my mirror get hazy right after I clean it?
Haze returning immediately usually means residue from your cleaner, especially if it contains ammonia. Switch to vinegar, rubbing alcohol, or an ammonia-free commercial cleaner.
Are E-Cloths worth the cost?
Yes. E-Cloths are reusable, work with just water, and consistently deliver streak-free results. They last for years with proper care, making them cost-effective long-term.
Can I fix a mirror with backing damage myself?
Re-silvering is possible but requires hazardous chemicals and technical skill. It is not recommended for beginners. Replacement is safer and usually more economical.
Key Takeaways for Maintaining Clear Mirrors
Most blurry mirrors are fixable with the right approach. Surface haze cleans up easily with vinegar, rubbing alcohol, or an E-cloth system. Internal cloudiness behind the glass cannot be cleaned and requires replacement. The best cleaning combo is E-cloth for maintenance with alcohol spot treatment for stubborn residue. Prevention beats repair every time. Weekly cleaning, humidity control, and wiping the mirror after showers keep it clear far longer than any cleaning method can restore it. When in doubt about backing damage, replace the mirror. A new mirror is cheaper and safer than attempting risky DIY re-silvering.


