A shattered vase, a cracked picture frame, or a snapped stem on your favorite wine glass can feel like a total loss. The good news is that how to glue glass together effectively is a skill anyone can master with the right knowledge. Glass is smooth and non-porous, which makes it tricky for ordinary craft glues, but specialized adhesives create bonds that rival the original strength of the material.
This guide covers everything you need to know about gluing glass together successfully. You’ll learn how to pick the perfect adhesive for your project, prepare surfaces like a pro, apply glue without messy squeeze-out, and avoid the common mistakes that cause cloudy or weak repairs. Whether you’re restoring a delicate heirloom or tackling a heavy-duty installation, you’ll finish with a repair that looks clean and lasts for years.
Select the Best Adhesive for Your Project
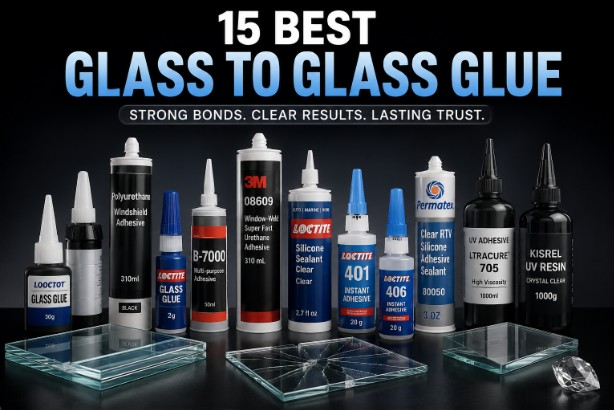
Choosing the right glue is the single most important decision in glass bonding. Not all adhesives work on smooth, non-porous surfaces, and using the wrong one leads to failed repairs. Your choice depends on the size of the job, stress levels, moisture exposure, and whether clarity matters.
Match the Glue to the Repair Type
Different repairs demand different formulas. A heavy-duty construction adhesive on a delicate wine glass creates a visible blob, while thin super glue on a large panel won’t hold. Use this breakdown to guide your selection:
- Small or delicate items: Specialty glass glue (cyanoacrylate-based) works best for stems, rims, and decorative pieces.
- Medium structural repairs: Two-part epoxy delivers strength and gap-filling for cracked vases or picture frames.
- Large installations: Construction adhesive handles mirrors, glass panels, and outdoor mounting.
- Wet environments: Marine epoxy or silicone suits aquariums, sinks, and outdoor fixtures.
Compare the Top Adhesive Categories

Each adhesive type has unique strengths. Understanding their capabilities helps you avoid costly errors.
Two-Part Epoxy for Maximum Strength
Epoxies combine a resin and hardener that you mix before application. Once cured, they form a rigid, water-resistant bond that fills small gaps, making them ideal when shards don’t fit perfectly.
- Best for: Cracked bowls, broken handles, and repairs with missing pieces.
- Top picks: Gorilla Clear Epoxy, Loctite Clear Epoxy, and LePage Gel Epoxy.
- Pro tip: Gel formulas resist dripping on vertical surfaces and offer about 5 minutes of working time for alignment.
Specialty Glass Glue for Fast, Clear Fixes
Standard super glues often fail on glass, but specialty formulations like Loctite Glass Glue contain additives designed for non-porous surfaces. They bond instantly and dry clear.
- Best for: Clean breaks in drinking glasses, picture frames, and small decorative items.
- Limitations: Brittle when dry, so avoid high-stress areas. Cannot fill gaps.
- Bonus: Many become dishwasher-safe after a full one-week cure.
Construction Adhesive for Heavy-Duty Projects
When attaching glass to walls, frames, or outdoor structures, regular glue won’t hold. Construction adhesives like Gorilla Grab Adhesive or Loctite Power Grab offer weatherproof, temperature-resistant bonds.
- Best for: Mirrors, glass backsplashes, and patio enclosures.
- Application: Apply in a zig-zag bead using a caulk gun.
- Flexibility: Some formulas stay flexible to handle thermal expansion and contraction.
Silicone for Flexible, Waterproof Sealing
Silicone isn’t the strongest option, but it excels where movement and moisture exist. It forms a rubbery seal that absorbs stress instead of cracking under pressure.
- Best for: Aquariums, glass sinks, and window repairs.
- Cure time: 24 to 72 hours depending on humidity and thickness.
- Note: Not suitable for load-bearing joints.
UV-Curing Glue for Invisible Precision Bonds
UV adhesives stay liquid until exposed to ultraviolet light, then harden almost instantly. They’re perfect for art projects and precision work where visibility matters.
- Best for: Glass sculptures, art pieces, and electronics.
- Tool needed: UV flashlight or lamp.
- Speed: Cures in 10 to 30 seconds under proper UV light.
Prepare Glass Surfaces for a Lasting Bond
Even the strongest adhesive fails if the glass isn’t clean. Oils, dust, and fingerprints create invisible barriers that prevent proper adhesion. Thorough surface prep is non-negotiable.
Clean with Isopropyl Alcohol or Acetone
Start by washing both surfaces with mild soap and water to remove loose dirt. Then wipe them down with isopropyl alcohol (70% concentration or higher) or acetone. These solvents dissolve skin oils and remove residues that soap leaves behind.
- Use a lint-free cloth to avoid leaving fibers on the surface.
- Wear gloves during cleaning to prevent recontaminating the glass with fingerprints.
- Work quickly after cleaning; don’t touch the bonding area once it’s prepped.
Dry Completely Before Applying Adhesive
Moisture interferes with most adhesives and weakens the final bond. After cleaning, let the glass air-dry or gently wipe it with a clean, dry microfiber cloth. Never proceed if the surface feels damp to the touch.
Roughen Surfaces for Extra Grip (Optional)
For structural epoxy repairs, lightly sanding the bonding area with fine-grit sandpaper (220 to 400 grit) or steel wool improves mechanical adhesion. The tiny grooves give the glue more surface to grip.
- Caution: Sanding reduces transparency, so only do this on edges or hidden areas.
- Re-clean after sanding to remove all dust particles before applying glue.
Create a Dust-Free Workspace
Dust settles quickly and can ruin a clear bond line. Close windows, turn off fans, and work on a clean table. Setting up a temporary clean zone with cardboard or a plastic sheet helps keep debris away.
Apply Adhesive the Right Way
How you apply the glue matters as much as which type you choose. Too much causes seepage and cloudiness; too little leads to weak joints. Follow these steps for a clean, strong bond every time.
Test Fit Before Gluing
Dry-fit the pieces together to check alignment and identify gaps. If shards don’t meet flush, you’ll need an epoxy or construction adhesive with gap-filling properties. Thin super glue won’t bridge spaces.
Use the Correct Amount
Less is more when applying adhesive. Over-applying leads to messy squeeze-out and hazy joints.
- For liquid glues: One drop covers approximately one square inch.
- For epoxies and pastes: Use a toothpick or small stick to spread a thin, even layer.
- For construction adhesive: Apply in a zig-zag pattern across large surfaces.
Apply to One Surface Only
Apply glue to just one side of the joint to maintain control and minimize excess. Press the second piece firmly into place immediately after application.
Press and Hold Without Sliding
Once the pieces touch, do not slide them. Shifting traps air bubbles and misaligns the bond. Instead:
- Press together firmly with steady pressure.
- Hold for 15 to 60 seconds to establish initial tack.
- Use clamps, heavy books, or strong tape to maintain constant pressure during curing.
Support Vertical or Heavy Pieces
For mirrors or large panels, gravity can pull the glass down before the glue sets. Use wooden blocks, masking tape, or brackets to hold the position until the adhesive cures fully.
Understand Curing Times for Full Strength
Knowing the difference between set time and cure time prevents you from stressing the bond too early.
Set Time vs. Cure Time
- Set time: When the glue becomes tacky enough to hold pieces without clamping (typically 5 minutes for epoxy).
- Cure time: When the bond reaches full structural strength (usually 24 hours).
A quick set doesn’t mean the job is finished. Applying force too early causes cracks or complete separation.
Follow Recommended Curing Timelines
| Adhesive Type | Initial Set | Full Cure |
|---|---|---|
| Specialty Glass Glue | 15 to 60 seconds | 24 hours |
| Two-Part Epoxy | 5 minutes | 24 hours |
| Marine Epoxy | 2 hours | 24 hours |
| Construction Adhesive | 20 to 60 seconds | 24 hours |
| Silicone | Skin forms quickly | 24 to 72 hours |
| UV Adhesive | 10 to 30 seconds | Instant with light |
Wait the full cure time before handling, washing, or stressing the repair. For dishwasher-safe items, wait at least one week before exposing them to high heat and water.
Ensure Proper Ventilation
Some adhesives release fumes during curing. Work in a well-ventilated area, especially with epoxies and construction glues. Keep pets and children away from the workspace until curing is complete.
Troubleshoot Common Gluing Problems
Even experienced DIYers encounter issues. Fortunately, most problems have simple solutions when caught early.
Cloudy or Hazy Bond Line
A milky appearance usually means too much glue was applied or dust contaminated the joint during assembly.
- Prevention: Apply adhesive sparingly and work in a clean space.
- Fix: Once fully cured, gently scrape off excess with a razor blade held at a low angle.
Complete Bond Failure
If the glass separates after curing, the most likely causes include:
- Poor cleaning: Oil or residue blocked adhesion.
- Movement during set: Pieces shifted before initial tack formed.
- Wrong adhesive: A brittle glue was used on a stressed joint.
Always clean with alcohol, clamp securely, and choose an adhesive suited to the stress level.
Cracking After Repair
Cracks often appear when:
- A brittle adhesive (like standard super glue) is used on a flexible or stressed joint.
- The item was handled before full cure.
- Thermal stress, such as dishwasher heat, breaks a weak bond.
Switch to a flexible or epoxy-based glue for items exposed to temperature changes.
White Residue Around the Bond
Some cyanoacrylates leave a white haze around the bond line, known as “blooming.” This happens when vapor reacts with moisture in the air.
- Prevention: Use low-odor, non-blooming formulas like Loctite Glass Glue.
- Fix: Wipe with acetone after full cure, testing on a hidden area first to avoid damage.
Bond Glass to Other Materials

Glass often needs to attach to wood, metal, or plastic. Each combination requires specific preparation and adhesive selection.
Glass to Wood
Wood absorbs moisture and expands, while glass does not. Use a flexible, moisture-resistant adhesive to handle these differences.
- Best glue: Clear Gorilla Glue (polyurethane-based).
- Prep: Clean glass with alcohol. Lightly dampen the glass surface to activate the glue’s foaming action.
- Clamp for 2 hours, then allow 24 hours for full cure.
Glass to Metal
Metal may have rust or paint, and its thermal expansion rate differs from glass. A flexible adhesive handles stress better.
- Best glue: Gorilla Contact Adhesive or Grab Adhesive.
- Prep: Sand metal to bare surface, then clean both materials with alcohol.
- Apply in a zig-zag pattern, press together, and hold for 20 to 60 seconds.
Clean Up and Store Adhesives Properly
Proper cleanup and storage extend the life of your adhesive and protect your work.
Remove Uncured Glue
Act quickly before the adhesive sets:
- Water-based glues: Wipe with a damp cloth.
- Solvent-based adhesives: Use acetone or the manufacturer’s recommended cleaner.
- Never use water on uncured polyurethane glue, as it activates curing.
Remove Cured Glue
Once hardened, most glass adhesives become brittle and can be scraped away.
- Scrape gently with a razor blade or plastic scraper.
- Soak stubborn residue in acetone for 5 to 10 minutes before scraping.
- Test acetone on an edge first to ensure it doesn’t etch the glass surface.
Store Adhesives for Longevity
- Seal tubes tightly after use, especially cyanoacrylates, which react with moisture.
- Store in a cool, dry place away from direct sunlight.
- Check expiration dates before starting a project; old epoxy may not cure properly.
Apply Expert Tips for Special Cases
Certain repairs need extra care and precision. Follow these strategies for the best results.
Repairing Delicate Glassware
For wine glasses or thin crystal:
- Use specialty glass glue, not standard super glue.
- Apply one drop maximum at the break point.
- Rotate slowly as you join pieces to avoid trapping air bubbles.
Weatherproofing Outdoor Repairs
UV rays and temperature swings destroy weak bonds. For outdoor projects, use:
- Marine epoxy such as LePage Marine Epoxy for underwater or wet conditions.
- Outdoor-rated construction adhesive like Loctite Power Grab for panels and frames.
These formulations resist freezing, thawing, and direct sunlight exposure.
Achieving Invisible Bonds with UV Glue
For art pieces or precision work:
- Apply a tiny amount to one surface.
- Align pieces perfectly; no repositioning is possible after UV exposure.
- Shine UV light for 10 to 30 seconds.
The result is a nearly invisible, rock-solid bond that preserves the beauty of clear glass.
Frequently Asked Questions About Gluing Glass
What is the strongest glue for glass?
Two-part epoxy delivers the strongest bond for structural glass repairs. Products like Gorilla Clear Epoxy and Loctite Clear Epoxy offer excellent strength, gap-filling ability, and water resistance once fully cured.
Can you use super glue on glass?
Standard super glue often fails on glass because the surface is too smooth. However, specialty glass glues like Loctite Glass Glue are formulated with additives that bond effectively to non-porous surfaces for small, non-load-bearing repairs.
How long does glass glue take to dry?
Set times vary by adhesive type. Specialty glass glue sets in 15 to 60 seconds, while two-part epoxy sets in about 5 minutes. However, full cure strength typically requires 24 hours regardless of the adhesive used.
Is glass glue waterproof?
Many specialty glass glues and marine epoxies become waterproof after full curing. Some products, like Loctite Glass Glue, become dishwasher-safe after waiting one week for complete cure.
How do you fix a cloudy bond on glass?
Cloudy bonds result from excess adhesive or dust contamination. Prevention is best: apply glue sparingly and work in a clean space. Once cured, gently scrape off excess with a razor blade held at a low angle.
Can you glue glass to wood or metal?
Yes, but you need the right adhesive. Clear Gorilla Glue works well for glass-to-wood bonds, while Gorilla Contact Adhesive handles glass-to-metal applications. Always clean both surfaces with alcohol and clamp until fully cured.
Key Takeaways for Successful Glass Bonding
Learning how to glue glass together properly comes down to three critical factors: choosing the right adhesive, preparing surfaces thoroughly, and allowing adequate curing time. Match your glue to the project type; epoxy for strength, specialty glass glue for clarity, and construction adhesive for heavy-duty installations. Clean every surface with isopropyl alcohol to remove invisible oils, apply adhesive sparingly to avoid messy squeeze-out, and clamp pieces without sliding them.
Avoid the most common pitfalls: moving pieces too soon, using brittle glue on stressed joints, and skipping surface preparation. With patience and precision, you can restore broken glass to near-original durability and beauty. Start your next repair with confidence, knowing you have the knowledge to get it right the first time.