You’ve found an old mirror destined for a creative reuse project, but the reflective coating won’t budge with ordinary cleaning methods. Whether you’re restoring antique glass, upcycling mirrored furniture, or creating artistic half-transparent panels, removing mirror coating requires a specific chemical approach. This guide provides step-by-step instructions using proven methods and safety protocols that deliver real results.
You’ll learn which chemicals work, how to handle them safely, and the exact process for achieving crystal-clear glass or controlled vintage effects. Every method here comes from verified user experiences and technical data.
Strip the Paint Backing First
The paint layer on the back of a mirror acts as a protective barrier over the metallic coating. Removing this layer first is essential because chemicals cannot penetrate to the silver or aluminum underneath without this step.
Apply Alkaline Poly Paint Stripper
Alkaline-based strippers penetrate and soften mirror backing within minutes. This method works fastest for thick, durable coatings.
What You Need:
– Alkaline poly paint stripper
– Foam brush or paintbrush
– Razor blade or scraper
– Nitrile gloves and safety goggles
– Soft towel or foam padding
Process:
1. Place the mirror face-down on a padded surface to protect the glass front.
2. Apply a thick, even coat of stripper across the entire back surface using your brush.
3. Wait 3 to 10 minutes, watching for bubbling or wrinkling that signals active breakdown.
4. Hold your razor blade at a low angle and gently scrape off softened material.
5. Reapply stripper to any stubborn spots and repeat until all paint is removed.
Older mirrors made before the 1950s typically strip faster because their coatings have degraded over time. Modern mirrors with polymer sealants may need multiple applications.
Use Citristrip for Indoor Projects
Citristrip offers a citrus-scented, biodegradable alternative with minimal fumes. It requires longer dwell time but works well in enclosed spaces.
How to Apply:
1. Shake the container well and apply a generous layer with a brush.
2. Cover with plastic wrap to prevent the product from drying out.
3. Allow 30 minutes to 24 hours, depending on coating thickness.
4. Scrape away softened material with a razor blade.
5. Rinse thoroughly with water.
Most users report needing a second application for completely clean results. Follow with a bleach-water rinse (1:1 ratio) to lift any remaining film residue.
Dissolve the Metallic Layer Completely
Once the paint backing is gone, a faint silver or aluminum sheen remains. This reflective layer must be chemically dissolved for full transparency.
Apply Muriatic Acid Safely
Muriatic acid (dilute hydrochloric acid) reacts aggressively with silver and aluminum, producing visible bubbling as the metal breaks down. This is the most effective method for complete removal.
Critical Safety Requirements:
– Wear acid-resistant gloves, face shield, and respirator
– Work outdoors or in a well-ventilated area only
– Keep baking soda nearby to neutralize any spills
– Never exceed recommended contact time
Removal Steps:
1. Dip a sponge or brush in muriatic acid and apply sparingly to the exposed metal layer.
2. Wait 1 to 2 minutes maximum—exceeding this time risks etching the glass surface.
3. Rinse immediately with copious amounts of water.
4. Apply a baking soda solution (1 tablespoon per cup of water) to neutralize residual acid.
5. Repeat if a haze persists after drying.
DIY restorer Bob Ray confirms: “Used muriatic acid many times. Always wear gloves and eye protection.”
Try Bleach-Water for Vintage Effects
If you want a translucent, aged look rather than optically clear glass, a 50/50 bleach-water mixture offers controlled removal.
Application:
1. Spray or dab the mixture onto the exposed metal after paint removal.
2. Dab off quickly to control the degree of removal.
3. Rinse well with water.
This method won’t deliver full clarity, but it excels at creating decorative, distressed finishes. Restorer Shelby Breckenridge notes: “Old mirrors are easier. Dab off to get desired effect. Start slow.”
Prevent Scratches with Proper Tools
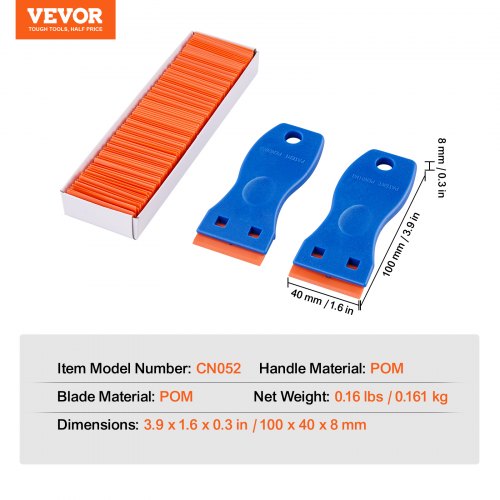
Mechanical scraping is necessary but risky. Using the wrong tools guarantees scratches that ruin the glass permanently.
Choose Razor Blades Over Plastic Scrapers
A sharp razor blade gliding at a low angle actually causes less damage than plastic scrapers. Plastic traps debris and requires more force, increasing scratch risk.
Best Practices:
– Replace blades when they dull or catch on the surface
– Always scrape at a 15 to 30 degree angle
– Rinse frequently between passes to inspect your progress
– Let chemicals do the work—never force the blade
Achieve Sharp Lines for Partial Removal

Creating a clean half-mirror, half-clear effect requires more than tape. Standard masking fails because strippers seep underneath.
Clamp a Glass Plate for Precision
Steps:
1. Cut a flat piece of glass to cover the section you want to preserve.
2. Place it over the mirror’s back and clamp securely using wood blocks or foam pads.
3. Seal edges with petroleum jelly to reduce chemical wicking.
4. Apply stripper to the exposed area only.
Expect slight bleed at the boundary—this is normal for DIY methods. Accept minor seepage as a limitation rather than a failure.
Avoid Unsafe or Ineffective Methods
Not all online recommendations work. Some are dangerous, others simply fail.
Household Substitutes Do Not Work
Vinegar, baking soda, ammonia, and oven cleaner have no verified effectiveness against mirror coatings. Chlorine-based cleaners alone cannot strip paint or metal layers.
Caustic Soda Requires Extreme Caution
Sodium hydroxide (caustic soda) can break down stubborn coatings but causes severe chemical burns. Keith Gourlay warns: “Caustic soda is horrible stuff—but works when all else fails.”
Use caustic soda only as a last resort after safer methods fail, and always wear heavy-duty rubber gloves and full-face protection.
Follow the Complete Step-by-Step Process
Combining all proven steps into one workflow delivers the best results.
Full Process Overview
- Prepare your workspace outdoors or in a ventilated garage. Lay down a tarp and wear gloves, goggles, and long sleeves.
- Clean and position the mirror face-down on a soft towel. Wipe both sides with isopropyl alcohol.
- Apply chemical stripper using Citristrip or alkaline stripper. Brush on thickly and cover with plastic wrap if extending dwell time.
- Scrape off paint after 3 to 60 minutes depending on product strength. Use a razor blade at a low angle.
- Treat the metallic layer with muriatic acid for full clarity or bleach-water mix for vintage effects.
- Rinse and dry with lint-free cloth, then inspect under bright light.
- Post-process as needed with black paint, gold spray, decoupage, or frosted film.
Know the Limitations
DIY mirror coating removal has boundaries even with perfect technique.
Not Suitable for Optical Applications
No method achieves micron-level precision. Micro-scratches and haze are common. Results are not suitable for laser optics, scientific instruments, or first-surface mirror conversion.
Older Mirrors Strip More Easily
Mirrors made before the 1950s have degraded protective layers that respond better to chemical treatment. Modern mirrors with aluminum and polymer sealants may resist milder strippers.
Prioritize Safety at Every Step
Chemical work demands respect and proper protection.
Essential Protective Equipment
- Gloves: nitrile for strippers, acid-resistant for muriatic acid, heavy-duty rubber for caustic soda
- Eye protection: splash goggles or full face shield
- Respiratory protection: N95 mask or respirator for strong fumes
Safe Chemical Handling
Store chemicals in original containers away from heat sources. Keep neutralizing agents nearby—baking soda for acids, white vinegar for bases. Never mix chemicals.
Proper Waste Disposal
Do not pour chemical waste down drains. Follow local hazardous waste guidelines and neutralize acids and bases before disposal.
Inspect Your Results
Hold the glass up to a bright window or light source to check success.
Signs of Complete Removal:
– No cloudiness or haze visible
– No metallic sheen remaining
– Scratch-free surface under direct light
If residue remains, repeat the acid or bleach treatment until satisfied.
Frequently Asked Questions About Removing Mirror Coating
Can I remove mirror coating without chemicals?
No verified mechanical-only methods exist. Scraping without chemical pretreatment guarantees scratches. Chemical softening is essential for safe removal.
How long does the entire process take?
Plan for 2 to 4 hours for full paint and metal removal, plus drying time. Citristrip methods may extend to 24 hours due to longer dwell time.
Will this work on antique mirrors?
Yes, older mirrors (pre-1950s) actually strip more easily because their coatings have naturally degraded. Expect faster results and potentially fewer applications.
Can I use vinegar or ammonia instead?
No. These household products have no verified effectiveness against mirror coatings. Stick to proven strippers and acids for reliable results.
Is the process safe for framed mirrors?
Remove the mirror from its frame first. Chemical strippers and acids can damage frame materials, and framing edges complicate thorough rinsing.
What’s the difference between muriatic acid and sulfuric acid?
Both dissolve metallic layers effectively. Muriatic acid (hydrochloric acid) is more commonly available and slightly safer to handle. Sulfuric acid works faster but requires greater caution.
Key Takeaways for Removing Mirror Coating Successfully
Successful mirror coating removal requires tackling two distinct layers: the protective paint backing and the metallic reflective film underneath. Alkaline or citrus-based strippers handle the paint first, while muriatic acid dissolves the silver or aluminum for complete transparency.
Always prioritize safety with proper PPE, work in ventilated areas, and neutralize chemical waste properly. Use razor blades rather than plastic scrapers to avoid scratches, and accept that DIY results won’t achieve optical-grade precision.
For artistic projects seeking vintage or translucent effects, the bleach-water method offers controlled removal without aggressive acids. Whatever your goal, patience and proper technique transform old mirrors into beautiful, reusable glass.