Is your mirror showing dark spots, brown edges, or transparent patches? You’re likely dealing with mirror desilvering—a common issue caused by moisture damage over time. This guide will show you how to repair, conceal, or prevent mirror damage using safe, effective methods. Whether you’re working with a modern bathroom mirror or a vintage antique, you’ll learn the best restoration options based on your mirror’s condition and value.
We’ll cover everything from quick fixes like aluminum foil patches and WD-40 treatments to professional resilvering and replacement. You’ll also discover why some damage should not be fixed—especially if you own a valuable antique. By the end, you’ll know exactly what to do (and what to avoid) to make your mirror look better or preserve its character.
Identify Mirror Damage Type
Before attempting any fix, determine the type and cause of your mirror’s damage. This helps you choose the right repair method—and avoid costly mistakes.
Look for Common Signs of Desilvering
The most common signs of mirror damage include:
- Black or brown spots near edges or corners
- Faded, cloudy, or dull areas on the surface
- See-through patches where the backing has worn off
- Peeling or bubbling along the mirror’s back or frame
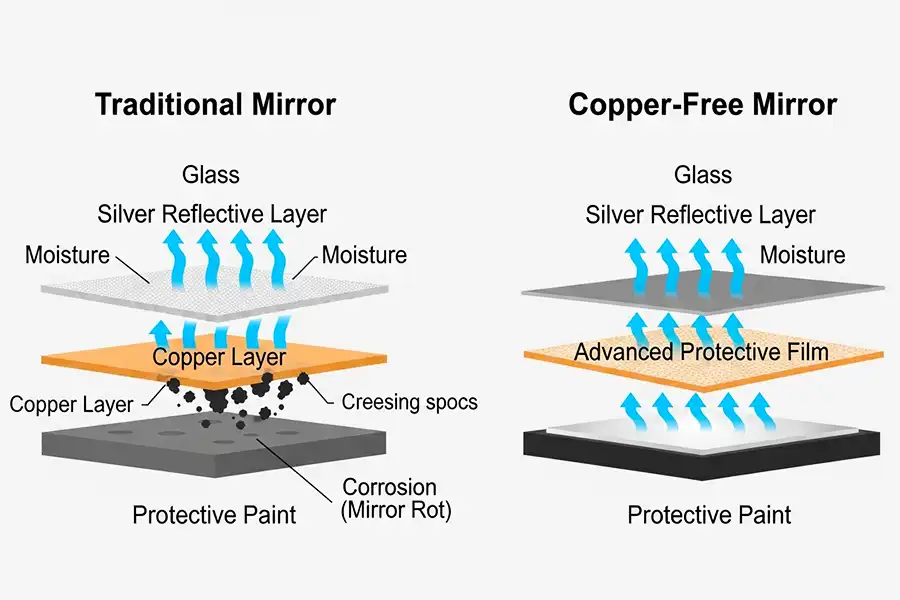
These are all signs of moisture penetration, which breaks down the metal layer (usually silver or tin) behind the glass.
Distinguish Between Damage Types
| Damage Type | Cause | Appearance | Can It Be Fixed? |
|---|---|---|---|
| Edge tarnish | Humidity exposure | Dark lines along sides/bottom | Yes – treat or seal |
| Spot desilvering | Water seepage through cracks | Black clusters or specks | Partially – patch or paint |
| Full oxidation | Long-term moisture damage | Large dull or clear zones | No – requires resilvering |
| Foxing (antique) | Natural aging | Rust-like spots, aged look | No – often best left alone |
Pro Tip: If the mirror is old and has character, foxing may increase its value. Avoid aggressive cleaning or repairs unless necessary.
Quick Fixes for Minor Mirror Damage
For small spots or edge wear, these simple DIY methods can improve appearance fast—without replacing the entire mirror.
Aluminum Foil Patching
Best for: Small see-through spots on the back.
Steps:
- Remove the mirror from its frame if possible.
- Cut a piece of shiny aluminum foil slightly larger than the damaged area.
- Place it smooth-side out over the bare spot.
- Secure with clear tape or adhesive-backed patches.
- Reinstall the mirror.
Why it works: Foil reflects light like the original backing, making holes less visible from the front.
Warning: This won’t stop further damage—only masks it. Use indoors in low-humidity areas.
Mirror-Reflective Spray Paint
Best for: Multiple small spots or widespread backing loss.
Steps:
- Take the mirror out of the frame.
- Clean the back thoroughly with rubbing alcohol.
- Mask off any areas you don’t want painted.
- Spray a thin, even coat of mirror-reflective paint (e.g., Rust-Oleum Specialty Mirror Spray).
- Let dry 24 hours before reassembly.
Tips:
- Apply in a well-ventilated area.
- Multiple light coats work better than one thick layer.
- Avoid getting paint on the edges or front glass.
Result: A uniform reflective surface that hides most imperfections.
Frame Painting to Hide Edge Damage
Best for: Mirrors with darkened borders or bottom-edge corrosion.
Options:
- Spray paint a border using painter’s tape to create a clean frame.
- Add a decorative molding to cover damaged edges.
- Use stencils or metallic pens for a custom design.
Paint recommendations:
- Rust-Oleum Universal Metallic
- Krylon Looking Glass Spray
- Acrylic enamel for detailed hand-painting
Expert Note: A new frame can turn a damaged mirror into a vintage-style piece. Test paint on a spare glass piece first.
Treat Rust and Oxidation With WD-40
Brown edges caused by oxidation can often be reduced—even if full reflectivity cannot be restored.
WD-40 Edge Treatment
Best for: Bathroom mirrors with moisture-damaged bottoms.
Steps:
- Tilt the mirror forward or remove it from the wall.
- Attach a straw nozzle to a WD-40 can.
- Spray along the bottom edge where the glass meets the backing.
- Let sit for 10 minutes to penetrate rust.
- Gently scrub with an old toothbrush.
- Wipe clean with a dry cloth.
Why it helps:
- Displaces trapped moisture
- Inhibits further rust formation
- Dark spots become less noticeable from a distance
“After this fix, you can’t see the damage unless you’re inches away.” – Claire Douglas Styling
Maintenance: Repeat every 3–6 months in humid environments.
When to Replace the Mirror Glass

If damage is extensive, replacement is often the most practical solution—especially for modern mirrors.
Signs You Need a New Mirror
- Over 30% of the backing is gone
- Glass is cracked or warped
- Frame is intact but mirror is beyond repair
- You want moisture-resistant features
How to Replace Mirror Glass
- Remove the old mirror carefully from the frame.
- Measure height, width, and thickness precisely.
- Order a custom-cut mirror:
– Standard clear glass
– Beveled edges for elegance
– Antiqued or fogged look to match vintage style - Install the new mirror using mirror clips or adhesive.
Cost: $20–$100 depending on size and finish.
Advantage: New mirrors can include back-coated waterproof protection, reducing future desilvering risk.
Pro Tip: Ask for a “reverse bevel” or sealed edge treatment to block moisture entry.
Full Restoration: DIY Resilvering
For mirrors where appearance matters and replacement is not an option, resilvering rebuilds the reflective layer.
What Is Resilvering?
A chemical process that:
- Removes old silver and paint from the back
- Applies a new silver nitrate solution to the glass
- Seals it with fresh protective coating
Can You Do It Yourself?
Yes—but it is advanced and hazardous.
Requirements:
- Resilvering kit (e.g., from Amazon, ~$80+)
- Large non-reactive tray (glass or plastic)
- Protective gear: gloves, goggles, respirator
- Well-ventilated workspace (outdoors preferred)
Basic Steps:
- Strip old backing with chemical remover.
- Clean glass with distilled water and solvents.
- Apply sensitizing solution (tin chloride).
- Spray or flood with silvering solution (ammoniacal silver nitrate).
- Rinse and dry.
- Paint on new copper or paint backing.
- Seal edges.
“It’s a dicey process if you’ve never done it…” – lunk (Reddit)
Challenges:
- Uneven coating leads to blotchy reflection
- Fumes are toxic
- Success rate is low for beginners
Best For: Sentimental or rare mirrors worth the effort.
Professional Resilvering Services
For valuable or antique mirrors, hiring an expert ensures quality and safety.
What to Expect
- Full disassembly and cleaning
- Precision chemical silvering
- Edge sealing and protective coating
- Reassembly and mounting
Cost: $100–$300+ based on size and complexity.
Finding a Pro:
- Search for “mirror resilvering near me“
- Check restoration studios or glass artisans
- Ask antique dealers for referrals
Note: Some antique collectors prefer original patina over a restored finish. Resilvering may reduce value.
Prevent Future Mirror Damage
Restoration means nothing if the same problem returns. Protect your mirror with these long-term strategies.
Seal the Edges
Best defense against moisture.
How to do it:
- Remove the mirror from the wall or frame.
- Apply clear silicone sealant or waterproof caulk to all four edges.
- Focus on the bottom edge, where water accumulates.
- Let cure for 24 hours before reinstalling.
Reapply every 2–3 years in bathrooms.
Improve Bathroom Ventilation
Reduce humidity at the source.
Solutions:
- Run exhaust fan during and 20 minutes after showers
- Open windows when possible
- Use a dehumidifier
- Avoid hanging wet towels near the mirror
Goal: Keep humidity below 60%.
Apply Back Coating After Repair
After any fix, protect the rear surface.
Options:
- Polyurethane spray (e.g., Minwax)
- Clear lacquer or automotive clear coat
- Moisture-resistant mirror paint
Apply 1–2 coats to the entire back, especially around edges.
“Use a layer of protective polyurethane on the back.” – A Beautiful Mess
Avoid Harsh Cleaners
Many common cleaners accelerate mirror damage.
Never use:
- Ammonia-based products (like Windex)
- Abrasive scrubbers
- Vinegar or acidic solutions near edges
Safe cleaning:
- Damp microfiber cloth
- Isopropyl alcohol (70%) for streaks
- Dry immediately with a second cloth
Special Tips for Antique Mirrors
Old mirrors are delicate—and sometimes more valuable because of their imperfections.
Know the Value of Patina
- Foxing, tarnish, and age spots are often desirable
- Collectors appreciate wabi-sabi beauty—the charm of aging
- Over-cleaning or restoring can devalue an antique
“Don’t touch it, enjoy it for what it is.” – corinari717
Handle Old Materials Safely
Pre-1900 mirrors may contain:
- Mercury (in silvering process)
- Arsenic or lead in backing compounds
- Tin or gold layers
Never sand or chemically strip without professional guidance.
When to Leave It Alone
- The mirror has historical or sentimental value
- Damage is minimal and stable
- You are unsure of its age or composition
Bottom line: For antiques, preservation > perfection.
Compare Mirror Repair Options
| Method | Best Use | Cost | Difficulty | Stops Further Damage? | Reversible? |
|---|---|---|---|---|---|
| Aluminum Foil | Tiny holes | $ | Easy | No | Yes |
| Reflective Paint | Multiple spots | $ | Easy | Partially | No |
| Frame Painting | Edge damage | $ | Easy | No | No |
| WD-40 Treatment | Rusty edges | $ | Easy | Yes (temporarily) | Yes |
| Mirror Replacement | Severe damage | $$ | Moderate | Yes | Permanent |
| DIY Resilvering | Full restoration | $$$ | Hard | Yes | No |
| Professional Resilvering | Antique/value | $$$$ | Expert | Yes | No |
Quick Decision Guide:
– Modern mirror, ugly spots? → Replace or paint.
– Vintage mirror, minor damage? → Foil patch or leave as-is.
– Antique with foxing? → Do nothing. Enjoy the character.
– Must look like new? → Professional resilvering or replacement.
Frequently Asked Questions About Mirror Restoration
Can you fix black spots on a mirror?
No, black spots cannot be cleaned off. They result from permanent chemical degradation of the backing layer. You can only conceal them with foil, paint, or frame, or replace the mirror entirely.
Does WD-40 actually restore mirrors?
WD-40 does not restore original reflectivity. However, it does reduce the visibility of rust and dark edges by displacing moisture and inhibiting further corrosion. It works best as a preventive treatment.
How much does professional mirror resilvering cost?
Professional resilvering typically costs $100–$300 or more, depending on mirror size and complexity. DIY kits are available for around $80 but require advanced skills and proper safety equipment.
Should I restore an antique mirror?
Generally, no. Foxing and age spots often increase an antique mirror’s value. Restoration may diminish its worth. Consult an antique dealer before attempting any repairs on valuable pieces.
What is the best way to prevent mirror desilvering?
Seal the edges with silicone sealant, control bathroom humidity below 60%, and avoid ammonia-based cleaners. Apply a protective back coating after any repair to extend the mirror’s life.
Key Takeaways for Restoring Your Mirror
Mirror restoration is possible, but the right approach depends entirely on your mirror’s condition and value. For modern bathroom mirrors with minor damage, simple fixes like WD-40 treatment, aluminum foil patches, or reflective spray paint can significantly improve appearance at low cost. For extensive damage, replacement is often the most practical solution—especially when the frame is still in good condition.
If you own an antique or vintage mirror, think twice before restoring. Foxing and age marks are often desirable features that add character and value. Professional resilvering exists for irreplaceable pieces, but it is expensive, complex, and may actually reduce collectible worth.
Regardless of which restoration method you choose, prevention is your best investment. Seal edges, control humidity, and avoid harsh cleaners to keep your mirror looking its best for years to come.