Tinting car glass is one of the smartest upgrades you can make to your vehicle. It blocks up to 99% of UV rays, rejects infrared heat, protects your interior from sun damage, and adds a layer of privacy that deters theft. While professional shops charge $300 to $600 for installation, a DIY approach using the same quality film costs just $50 to $140 if you follow the right method.
This guide breaks down the entire process into clear, actionable steps. You will learn how to choose the right film, prepare your workspace, execute the dry-shrink and wet-application technique, and avoid the common mistakes that ruin first-time installs. Whether you want a subtle 70% ceramic film or a darker 5% limo look, mastering these fundamentals will save you money and deliver results that rival any shop.
Choose the Right Film for Heat Rejection and Legal Compliance

Your film selection determines performance, durability, and whether your tint is street-legal. Not all films are created equal, and darkness alone does not equal heat protection.
Compare the 5 Main Film Technologies
Dyed Tint
Uses dye to absorb light, creating a dark appearance. Offers minimal heat rejection and fades to purple over time. Best for tight budgets focused on aesthetics, not performance.
Metalized Tint
Contains microscopic metallic particles that reflect heat and strengthen glass. Highly durable but interferes with GPS, cellular, and radio signals. A solid choice if signal loss is not a concern.
Hybrid Tint
Blends dyed and metalized layers for a balance of appearance and heat control. A mid-tier option that falls short of ceramic performance.
Carbon Tint
Infused with carbon particles that block infrared light. Non-reflective, color-stable, and resistant to fading. Delivers a sleek matte finish with better heat rejection than dyed or hybrid films.
Ceramic Tint
The top-tier option. Contains non-conductive ceramic nanoparticles that block up to 70% of infrared heat and 99% of UV rays without affecting signals. Stays clear, never fades, and keeps your cabin cool even with high visible light transmission.
Pro Tip: A 70% VLT ceramic film can block more heat than a 5% dyed film. Judge tint by infrared rejection, not darkness.
Understand VLT and Check Your State Laws
Visible Light Transmission (VLT) measures how much light passes through the glass. Lower percentages mean darker tint.
- 5% VLT (“Limo Tint”): Nearly opaque. Legal only on rear windows in most states.
- 15% VLT: Very dark. Often allowed on rear side and back windows.
- 35% to 70% VLT: Light to medium. Typically required for front side windows.
Front windshield rules are strict. Most states allow tint only above the AS-1 line, which sits 5 to 6 inches from the top of the glass. Full windshield tint is illegal without a medical exemption.
Action Step: Look up your state’s tint laws before buying film. A product sold online may not be legal where you drive.
Gather the Essential Tinting Tools
Skipping the right tools leads to bubbles, dust contamination, or torn film. Most tools last for multiple vehicles, making them a one-time investment.
Must-Have Equipment
- Heat gun (not a hair dryer): Required to shrink film tightly to curved glass.
- Utility knife with fresh blades: Ensures clean cuts without snagging.
- Hard and soft squeegees: Hard card for edges, soft one for water removal.
- Spray bottles: One for soapy water, one for clean rinse water.
- Single-edge razor blade: For trimming and adhesive removal.
- Microfiber cloths: Lint-free only.
- White scrub pad: Non-abbrasive, for deep cleaning glass.
- Peel board (optional): A clean sheet of glass to safely peel the film liner.
Mix the Correct Slip Solution
Combine water with a few drops of baby shampoo or mild dish soap. This allows the film to slide into position without scratching the surface.
Warning: Never use Windex or ammonia-based cleaners. Ammonia degrades adhesive and ruins film permanently.
Prepare Your Workspace and Vehicle
A dusty garage or extreme temperatures can destroy your install. Control the environment before you start.
Set Up a Clean, Climate-Controlled Area
- Ideal temperature: 65°F to 75°F (18°C to 24°C).
- Below 60°F: Adhesive will not bond properly.
- Above 90°F: Slip solution evaporates too fast.
- Enclosed space: A garage blocks wind, pollen, and insects.
- Good lighting: Helps you spot dust and alignment issues.
Clean Windows with the Two-Stage Method
Dirt trapped under the film causes white spots, which are the number one DIY failure. Prevention requires a rigorous cleaning protocol.
Stage 1: Mechanical Decontamination
Spray interior glass with soapy water. Scrub the entire surface with a white pad to remove invisible oils, oxidation, and residue that sprays alone cannot dissolve.
Stage 2: Hydrodynamic Flush
Heavily spray water into the rubber seals and gaskets to flush out trapped debris. Let dirty water run down the glass, then squeegee it off. Repeat until the runoff is completely clear.
Final Rule: After cleaning, never touch the glass with a towel. Only the film should make contact.
Cut and Shrink the Film on the Exterior
Shape the film outside the car first. This avoids costly mistakes on the fragile interior install.
Apply Film and Anchor with the H-Pattern
- Spray the outside of the glass with slip solution.
- Place tint on the exterior with the liner side facing up (adhesive touches glass).
- Squeegee water out in an “H” pattern:
– One horizontal stroke across the middle.
– Two vertical strokes down the sides. - This pushes excess film (“fingers”) to the top and bottom, where it can be safely shrunk.
Shrink Film with Controlled Heat
- Set the heat gun to medium-high and hold it 4 to 6 inches from the film.
- Target vertical fingers only at the top and bottom. Never shrink side edges, as they will crease.
- Heat until the film squiggles, then smooth it down immediately.
- Keep the heat gun moving constantly. Stationary heat burns the polyester.
Warning: Overheating melts the film. Continuous motion is critical.
Trim the Film Using the Micro-Edge Strategy
A precise cut prevents the window channel from peeling the tint down over time.
Create a 1/16-Inch Gap at the Top
- Roll the window down about 2 inches.
- Use a fresh razor blade to trim the top edge.
- Leave a 1 to 2mm gap between the film and the top of the glass.
If the film touches the window channel, friction will pull it down every time you roll the window. The micro-gap eliminates this stress point.
Round the Corners
Cut corners with a small curve rather than sharp 90-degree angles. Rounded edges resist lifting and peeling far better.
Transfer and Install the Film on the Interior
Move the shaped film to the inside of the glass quickly and cleanly.
Peel the Liner Safely
- Wash and dry your hands. Dampen fingertips slightly to reduce static.
- Lay the trimmed film on a clean surface or the exterior glass.
- Start peeling the clear liner from one corner.
- Spray slip solution onto the exposed adhesive as you peel. This kills static and traps dust.
Position the Film on Interior Glass
- Spray the inside of the window with soapy water.
- Lift the film by the corners using wet fingers and place it on the glass.
- Let it float on the solution and adjust the position carefully.
- Ensure the 1/16-inch gap is maintained at the top.
Squeegee and Seal for a Flawless Finish
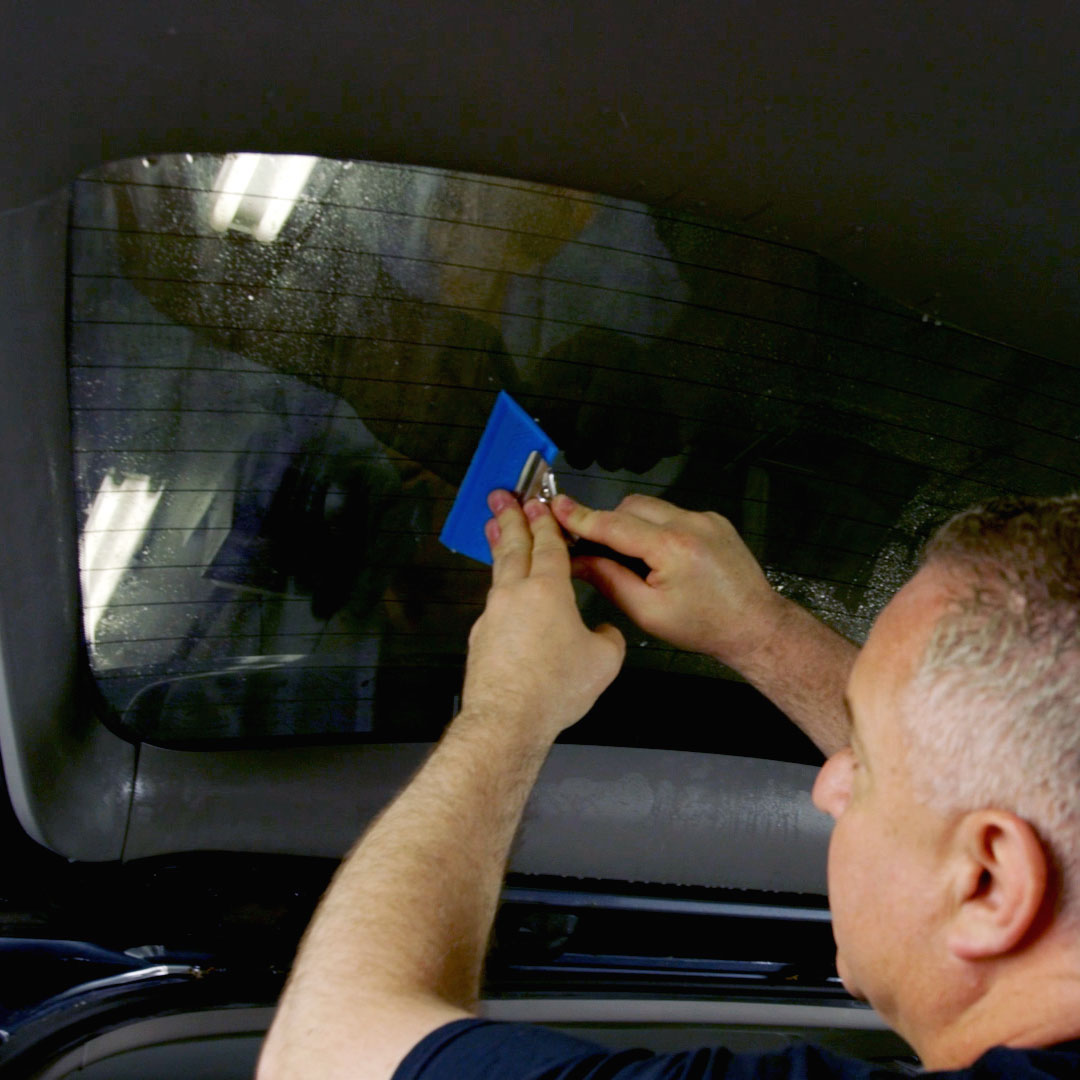
This step locks the film in place and removes trapped water.
Anchor with a Cross Pattern
- Spray the film’s surface with slip solution.
- Squeegee one horizontal stroke across the center.
- Squeegee one vertical stroke down the center.
- This forms a cross that anchors the film in position.
Wipe Water from Center to Edges
- Work in quadrants, overlapping strokes by 50%.
- Push water toward the edges and avoid leaving pockets.
- Small water bubbles are normal and will evaporate in 3 to 5 days.
Seal the Edges
Wrap a microfiber cloth around a hard card. Press firmly along all edges to push out moisture and lock the film into the gasket.
Pro Move: Edge sealing prevents peeling, which is the most common failure point.
Avoid Common Mistakes and Fix Issues

Even small errors can ruin the final appearance. Know what to watch for during and after installation.
Do Not Roll Windows Too Soon
Wait 24 to 48 hours before rolling windows down. The adhesive needs time to cure, and premature use can shift or detach the film.
Prevent White Spots
White spots are caused by dust trapped under the film. There is no fix once the film has cured. Prevention is everything:
- Keep fans off and doors closed.
- Follow the two-stage cleaning method.
- Spray adhesive while peeling the liner.
Handle Creases and Bubbles Correctly
- Creases: Irreversible. Caused by shrinking the wrong direction or folding the film. Replace the piece.
- Water bubbles: Normal. Disappear in 3 to 5 days. Do not poke them.
Stop Edges from Peeling
- Ensure the 1/16-inch micro-gap at the top.
- Seal edges firmly during installation.
- Re-trim if the film was cut flush to the edge.
Remove Old Tint Before Reapplying
Start with bare, clean glass if you are replacing existing film.
Heat and Peel Off Old Tint
- Use a heat gun or hairdryer to soften the adhesive.
- Start at a corner and peel slowly.
- Old film may break into pieces, so be patient.
Scrape Off Residual Adhesive
- Spray soapy water on any glue left behind.
- Use a razor blade to scrape the surface clean.
- Wipe with a lint-free cloth.
Re-Clean with the Two-Stage Method
Repeat the deep clean (scrub and flush) before installing new film. Any leftover adhesive will show through the new tint.
Understand the Real Benefits of Quality Tint
Tinting is not just about appearance. The right film improves comfort, safety, and vehicle value.
Block Heat and UV Rays
Ceramic and carbon films reject up to 70% of solar heat, reducing AC use and improving fuel efficiency. They also block 99% of UV rays, preventing dashboard cracks and seat fading.
Increase Privacy and Security
Tinted windows deter theft by hiding valuables from view. A 15% to 35% VLT on rear windows keeps prying eyes out.
Strengthen Glass
Metalized films hold shattered glass together during accidents or break-ins, adding a layer of safety for occupants.
Final Tips for Long-Lasting Tint
Proper care extends the life of your tint to 5 to 10 years.
- Wait 48 hours before cleaning windows after installation.
- Use only ammonia-free cleaners.
- Avoid sharp objects near the edges.
- Park in shade when possible to reduce thermal stress.
Bottom Line: A $100 DIY job with ceramic film outperforms a $500 shop job with dyed tint when you follow the correct method.
Frequently Asked Questions About How to Tint Car Glass
How much does it cost to tint car windows yourself?
A DIY tint project typically costs $50 to $140 for materials and tools. Professional installation ranges from $300 to $600 or more. DIY offers 70% to 80% savings if the installation is successful on the first attempt.
How long does DIY window tinting take?
First-time installers should plan for 3 to 5 hours. Professionals usually complete the job in 2 to 4 hours. The extra time for DIY accounts for learning curve and careful preparation.
Can I use Windex to apply window tint?
No. Ammonia-based cleaners like Windex damage the adhesive and degrade the film. Use only water mixed with a few drops of baby shampoo or mild dish soap as a slip solution.
What does 5% tint mean?
5% VLT means only 5% of visible light passes through the glass. This “limo tint” is nearly opaque and provides maximum privacy. It is legal only on rear windows in most states.
How long should I wait before rolling down tinted windows?
Wait 24 to 48 hours before rolling windows down. The adhesive requires time to cure and reach full bond strength. Rolling too soon can shift or detach the film.
Is window tinting hard to do?
Tinting requires patience, precision, and a dust-free environment. There is a learning curve, but following the dry-shrink and wet-apply methodology significantly reduces errors. Most beginners achieve professional results on their first attempt with proper preparation.
Key Takeaways for Tinting Car Glass Successfully
Tinting car glass is a precise process that rewards careful preparation and the right materials. Ceramic film offers the best heat rejection and UV protection, while a 1/16-inch micro-gap at the top edge prevents peeling over time. The two-stage cleaning method and dust-free workspace are non-negotiable for avoiding white spots.
Your next step is simple: check your state’s VLT laws, order a quality ceramic film kit, and set aside a full afternoon in a clean garage. Follow the H-pattern anchor and dry-shrink technique, and you will achieve a flawless, professional-grade finish at a fraction of shop prices.