Hanging a mirror securely isn’t just about aesthetics. A poorly wired mirror can tilt, sag, or fall, risking damage to your walls and potentially causing injury. Learning how to wire a mirror for hanging gives you balanced support, easy leveling, and long-term durability, especially for medium to heavy pieces. Whether mounting a bathroom mirror, hallway accent, or large statement piece, using picture wire with proper hardware provides flexibility, strength, and a clean, professional finish.
This guide walks you through every step. You’ll learn how to choose the right wire strength, attach it correctly to your mirror frame, select the appropriate wall anchors for your wall type, and install everything with precision. By the end, you’ll know exactly how to hang any mirror safely, level, and flush against the wall.
Choose the Right Hanging Wire
Match Wire Strength to Mirror Weight
The wire you use must support at least twice the mirror’s actual weight. This safety margin accounts for daily use, humidity changes, and unexpected stress. To find your mirror’s weight, use a bathroom scale or check the manufacturer’s specifications.
Select steel picture wire rated accordingly:
– Up to 10 lb mirror → use 20 lb rated wire
– Up to 15 lb mirror → use 30 lb rated wire
– Over 20 lb → use dual hooks with 50 lb+ rated hardware, or consider a cleat system
Warning: Never use braided cord, ridged wire, or nylon cord. These materials can slip, fray, or stretch over time, causing your mirror to fall.
Use Smooth, Non-Braided Steel Wire
Always choose smooth-coated steel wire for picture hanging. Smooth wire slides easily on hooks, allowing you to fine-tune the level after installation. Braided wire grips unevenly, making precise leveling difficult and frustrating.
Purchase at least 9 feet of wire. This length gives you enough material for knotting, adjustments, and reaching across wider mirrors.
Pro Tip: If you’re working on multiple projects, buy a universal picture-hanging kit with pre-cut wire and hooks included.
Prepare the Mirror for Wiring
Lay Mirror Face-Down Safely
Place your mirror face-down on a soft surface before beginning any work. Carpet, foam padding, or a thick towel will protect the glass from scratches and chips. If your mirror has no frame, create a simple cardboard cradle to protect the edges during wiring.
Critical Safety Note: Never lay tempered glass or large mirrors directly on hard floors. Even minor impacts can cause internal stress fractures that may lead to spontaneous breakage later.
Measure Correct Wire Height
Determine where the wire will attach to the back of your mirror frame. Mark a position 2 to 3 inches below the top edge of the frame. This measurement keeps the mirror flush against the wall while leaving enough room for the wire to hang freely.
Attachment points that are too high (1 inch or less) risk lifting the frame or exposing glass edges. Attachment points too low (over 4 inches) make the mirror appear bottom-heavy and more prone to wobbling.
Dual-hook note: If using two mounting points, keep both at the same height to ensure even tension and prevent tilting.
Attach the Wire Securely

Thread and Position the Wire
Insert one end of the wire through the left-hand D-ring or bracket on your mirror frame. Leave approximately 6 inches of slack on this side for knotting. Pull the wire across the back of the frame to the right-side bracket.
Do not over-tighten the wire. The wire should form a shallow V shape when hung. This allows lateral adjustment for leveling and reduces stress on the frame material.
Tie a Loop Knot with Reinforcement
Follow these steps to create a secure, adjustable knot:
- Pass the wire through the right bracket
- Bring the end back through its own loop to create a loop knot
- Pull tight so the knot seats firmly against the bracket
- Wrap the excess wire 5 to 6 times around the main strand to lock it in place
- Trim the end, leaving a ¼-inch tail for future adjustments
Test immediately: Lift the mirror by the wire only. If the knot slips or the frame bends under the weight, re-tie with tighter wraps and more reinforcement.
Select Wall Anchors by Wall Type
Drywall: Use Plastic Anchors or Toggles
For mirrors under 20 lb mounted on drywall, you have two main options:
Standard plastic wall anchors:
– Drill a ¼-inch hole
– Insert the plastic anchor
– Drive in the screw, leaving threads exposed for the wire to hook onto
Toggle bolts for heavier mirrors:
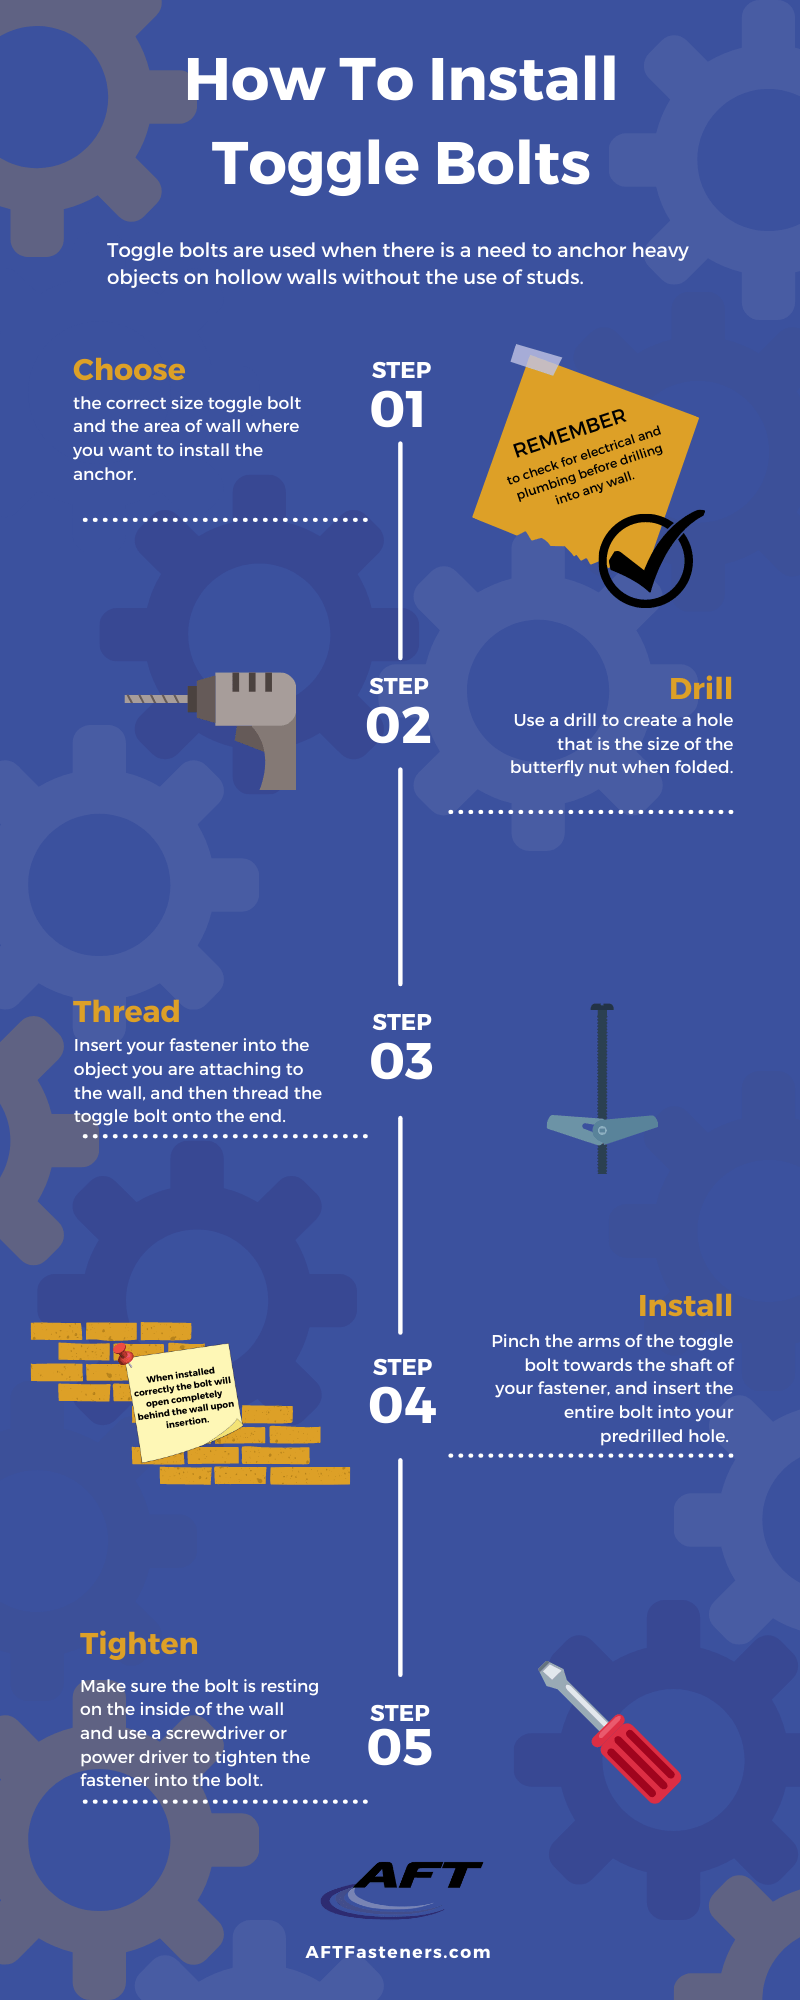
– Toggle bolts expand behind the drywall for superior holding power
– One anchor may suffice for mirrors under 15 lb
– Use two anchors for mirrors over 20 lb to balance the load
Avoid hammer-in anchors. These can crack drywall and fail under load, especially over time.
Plaster and Lath: Use Toggle Bolts Only
Plaster walls are brittle and hide wooden lath strips behind them. Standard drywall anchors will crack the surface and pull out easily. Always use toggle bolts for these older walls.
To install in plaster:
1. Drill a ¼-inch hole through the plaster
2. Insert a spring-loaded toggle bolt
3. Push the nut through the hole until the wings open behind the lath
4. Tighten with a screwdriver until snug, then attach your screw
Never force plastic anchors into plaster. Always pre-drill and use proper toggle hardware.
Stud Walls: Mount Directly into Wood
If a wall stud aligns with your desired hanging spot, you have the strongest mounting option available:
- Use a 2-inch wood screw driven directly into the stud
- Leave ½ inch protruding to act as a hanging hook
- No anchor needed—this method supports very heavy mirrors
Use a stud finder and scan for pipes before drilling, especially in bathrooms where plumbing is common.
Install Wall Fasteners Correctly

Mark Precise Hook Locations
For single-hook setup:
– Measure 5 inches down from where the top of your mirror will sit
– Mark the wall at center—this aligns with the wire’s midpoint when hung
For dual hooks:
– Use a 12-inch scrap board as a spacing guide
– Place the board across the mirror’s top edge
– Align it with the wire ends
– Mark the wall where each hook will go
– Install anchors so the bottom of each hook matches your marks
Why this works: The scrap board method guarantees perfect spacing and prevents the misalignment that makes leveling impossible.
Install Anchors or Screws
Insert your plastic anchor or toggle bolt into the pre-drilled hole. Drive the screw partially in, leaving enough exposed thread for the wire to hook over. Ensure both screws are level by using a small level across their heads.
Check load ratings: Every anchor must be rated to support at least the full weight of your mirror. When in doubt, go heavier.
Hang and Level the Mirror
Slide Wire Over Wall Hooks
Lift the mirror and drape the wire over your installed screws or hooks. For a single hook, the wire forms a saddle shape. For dual hooks, ensure both sides of the wire engage evenly.
Safety check: Make sure the wire doesn’t rest on sharp screw edges. This can cause fraying and eventual failure.
Adjust for Perfect Level
Place a level on the mirror’s top edge. Shift the mirror left or right along the wire to correct any tilt. With a single hook, slide the mirror until level. With dual hooks, minor adjustments come from slight wire movement on both sides.
Pro Tip: Have a helper hold the mirror while you check level and alignment from across the room.
Ensure Long-Term Safety
Test Stability Before Finalizing
After hanging your mirror:
1. Gently tug forward to simulate daily use and vibration
2. Check that anchors don’t shift or pop out
3. Recheck the level after 24 hours—some settling may occur
Red flag: If the mirror sags or one side drops lower than the other, re-tighten your knots and verify anchor security immediately.
Inspect Wire Annually
In bathrooms or humid areas, inspect the wire at least once per year. Look for rust, kinks, or fraying. Replace the wire if you notice any damage. Tighten wall screws if the mirror feels loose or shifts when touched.
Maintenance rule: Retie or replace wire every 3 to 5 years for heavy mirrors in high-humidity environments.
Avoid Common Mistakes
Don’t Over-Tighten the Wire
Excessive tension warps wooden frames, stresses glass edges, and increases outward pull on your wall anchors. The ideal wire angle is less than 45 degrees from vertical. A shallow V shape provides safer load distribution.
Don’t Use Drywall Anchors in Plaster
Standard plastic anchors crack plaster and pull out easily. Always use toggle bolts for pre-1940s walls. This one mistake causes the majority of mirror-hanging failures in older homes.
Don’t Skip the Level Check
Even a 1-degree tilt is noticeable once the mirror is on the wall. Always use a real level, never rely on your eye alone.
Quick fix: If your mirror leans forward after hanging, raise the wire height on the frame slightly to correct the angle.
Handle Different Mirror Weights
Lightweight Mirrors (Under 10 lb)
- Best method: Single screw into stud or plastic anchor
- Wire: 20 lb rated
- Tools needed: Screwdriver, tape measure, level
- Skill level: Beginner-friendly
Shortcut: Use adhesive hooks rated for 10+ lb on small, lightweight mirrors only.
Medium Mirrors (10–20 lb)
- Best method: Dual toggle bolts or stud-mounted screw
- Wire: 30 lb rated
- Tools needed: Drill, wire cutters, level
- Skill level: Intermediate
Pro move: Use two anchors even if one is near a stud. This balances the load and prevents twisting over time.
Heavy Mirrors (Over 20 lb)
- Best method: Two toggle bolts or direct stud mounting
- Avoid: Single-point hanging unless both wire and anchor are rated for 2x the mirror weight
- Alternative: Consider Z-bar or French cleat systems for mirrors over 30 lb
Expert advice: Hire a professional if your mirror exceeds 50 lb or is positioned over a valuable surface that could be damaged.
Troubleshoot Hanging Issues
Mirror Tilts or Leans Forward
Cause: Uneven wire tension or too-tight wire
Fix: Retie knots with equal slack on both sides. Ensure the wire forms a shallow V, not a tight triangle.
Wall Anchor Pulls Out
Cause: Overloaded anchor or wrong anchor type for your wall
Fix: Replace with a toggle bolt or mount directly into a wall stud.
Wire Slips Through Bracket
Cause: Poor knot construction or no wrap reinforcement
Fix: Retie using the loop knot method with 5 to 6 wraps around the main strand.
Plaster Cracks Around Anchor
Cause: Used drywall anchor instead of toggle in plaster wall
Fix: Patch the hole with spackle, then reinstall using a proper toggle bolt.
Mirror Hangs Too High or Low
Cause: Incorrect wire drop or wall hook placement
Fix: Re-thread the wire higher or lower on the frame, or adjust your wall hook height.
Frequently Asked Questions About Wiring a Mirror for Hanging
What type of wire is best for hanging a mirror?
Smooth-coated steel picture wire is best. Avoid braided, ridged, or nylon cord because they slip, fray, or stretch over time. The wire must be rated for at least twice your mirror’s weight.
How do I determine where to attach the wire on my mirror frame?
Measure 2 to 3 inches down from the top edge of your mirror frame. This positioning ensures the mirror hangs flush against the wall while allowing enough slack for leveling adjustments.
Can I hang a heavy mirror on drywall without studs?
Yes, but you must use toggle bolts. Standard plastic anchors will pull out under heavy load. Toggle bolts expand behind the drywall for superior holding power and are essential for mirrors over 20 lb.
How do I keep my mirror level after hanging?
Use a level placed on the mirror’s top edge. With a single-hook setup, slide the mirror left or right along the wire until level. With dual hooks, adjust the wire position on both hooks slightly until even.
How often should I inspect my mirror’s wiring?
Inspect wire condition annually, especially in bathrooms or humid environments. Look for rust, kinks, or fraying. Replace wire immediately if damaged, and check that wall screws remain tight.
Key Takeaways for Wiring and Hanging Your Mirror
A properly wired mirror stays secure, level, and damage-free for years. The most important factors are matching wire strength to mirror weight (always use wire rated at least 2x the actual weight), choosing the right anchors for your wall type (toggle bolts for plaster, plastic anchors or studs for drywall), and ensuring even tension when tying your knots.
Take time to test stability after hanging. Gently tug the mirror to check anchor security and recheck the level after 24 hours to account for any settling. Annual inspections in humid environments will prevent failures before they happen.
Follow these steps and you’ll achieve a professional-quality hang every time. Your mirror will be secure, perfectly level, and ready to enhance your space for years to come.