Removing fireplace glass doors can feel intimidating, but with the right tools and approach, it’s a manageable DIY task. Whether you’re upgrading, replacing damaged glass, or simply preferring an open hearth look, knowing how to remove fireplace glass doors correctly is essential to avoid harming your fireplace or injuring yourself.
Most standard wood-burning fireplaces use glass doors for decoration rather than function. That means removing them will not compromise the firebox or its safety, unless you have a sealed combustion insert requiring specific airflow control. If your fireplace interior looks pristine despite its age, the doors are likely non-essential. However, the removal method depends heavily on whether you’re dealing with a prefab unit or a masonry fireplace.
Below, you’ll find every step, tool, and common pitfall explained clearly so you can remove your fireplace glass doors efficiently and without damage.
Identify Your Fireplace Type Before Starting
Before touching any tools, determine your fireplace model. This decision shapes everything that follows.
Prefab vs. Masonry Fireplaces
Prefab (zero-clearance) fireplaces are factory-built units installed in framed walls. They often use bifold doors with tension clips and may include removable frames secured by screws. These are common in modern homes and relatively simple to work with.
Masonry fireplaces, built from brick or stone, use frames anchored directly into the masonry. These rely on either masonry screws or tension-based brackets. The process is more delicate due to the risk of damaging brickwork.
Check for Retrofit Frames
Many prefab fireplaces have a surrounding metal frame that holds the doors like a picture frame. This frame is removable, but don’t confuse it with the black metal faceplate riveted to the firebox. That faceplate is permanent and should never be removed. Forcing it off can permanently damage the unit.
Remove Bifold Doors Without a Frame
If your doors sit directly in a built-in opening without an external frame, follow this method.
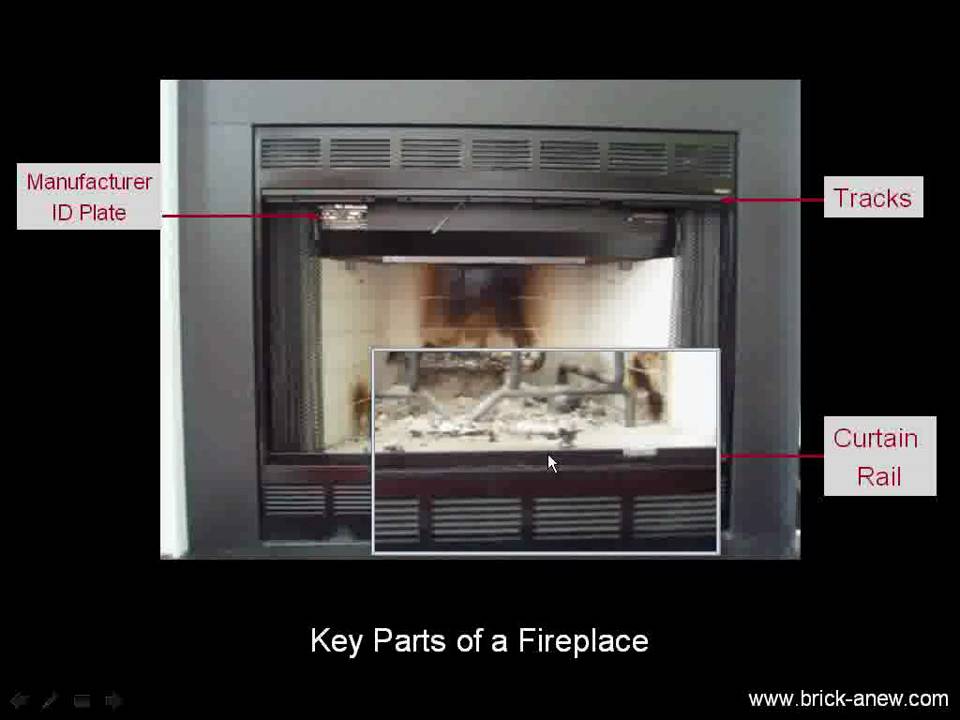
Locate the Tension Clips
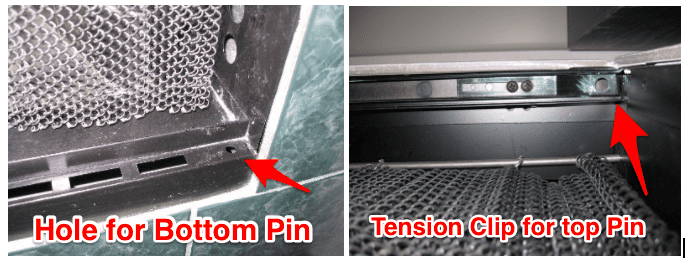
Bifold doors pivot on pins at the top and bottom. The top pin fits into a spring-loaded tension clip, which holds the door in place. Some models also have bottom clips.
Look closely at the top corner of each door when fully opened. You’ll see a small metal bracket with a hole, which is the tension clip. Your goal is to release the pin from this clip.
Release the Top Pin
Grab a flathead or Phillips screwdriver.
- Open the door fully to expose the pivot points.
- Press down firmly on the tension clip with the screwdriver to compress the spring.
- While holding the clip down, lift the door straight up slightly, just enough to clear the top pin from the clip’s hole.
Keep upward pressure steady. A helpful assistant can support the door’s weight during this step.
Clear the Bottom Pin
Once the top pin is free, continue lifting the door until the bottom pin clears its socket in the threshold.
Then, angle the bottom of the door inward toward the firebox and pull the top outward. The door should now come free.
Repeat for the second door.
Pro Tip: If the clip resists, don’t force it. Use the screwdriver to fully depress the clip before lifting. Forcing the door can bend the pin or break the bracket.
Remove Doors with a Retrofit Frame
When a frame surrounds the doors, removal often requires taking off the frame first or removing the doors before frame disassembly.
Remove Doors First
Start by removing the bifold doors using the method above. This reduces weight and gives better access to frame screws.
Wear gloves to protect your hands from sharp edges and soot buildup.
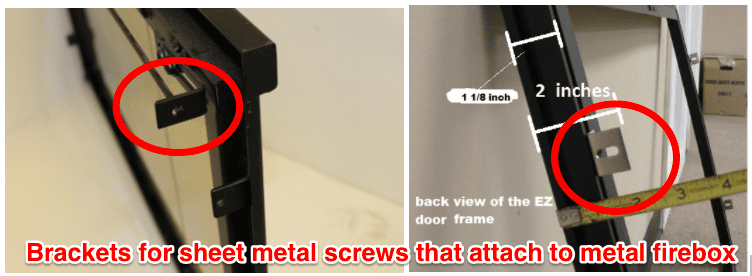
Locate Frame Fasteners
Inspect the inner edges of the frame. Look for sheet metal screws connecting it to the firebox. These are typically on side flanges or rear brackets.
Some frames have screws from the back, accessible only after door removal.
Unscrew and Remove Frame
Use a manual screwdriver or electric drill with the correct bit to remove all screws.
Ensure every fastener is out. Missing even one can cause the frame to bind.
Once all screws are removed, gently pull the frame straight forward. It should come away cleanly.
Warning: If the frame doesn’t move, double-check that you’re not trying to remove the riveted black faceplate. Those rivets mean it’s part of the firebox and cannot be removed safely.
Remove Masonry Fireplace Doors
Masonry units require more precision due to their permanent construction.
Method 1: Screw Bracket Removal
Many masonry frames are held by brackets with masonry screws drilled into the brick.
Find the Brackets
Open the doors and look behind the frame. You’ll see metal brackets extending from the frame into the masonry.
Each bracket has a screw, sometimes with a nut on the back side.
Unscrew Carefully
Use a screwdriver, wrench, or socket set to remove the screws.
Turn slowly to avoid stripping the head or slipping and scratching the brick.
Key Tip: Preserve the drill holes. If you plan to reinstall doors later, re-drilling brick is difficult. Avoid wobbling the screwdriver to prevent hole damage.
Once all screws are out, lift the frame straight off.
Method 2: Tension Clip Frame Systems
Some masonry frames use tension screws instead of deep anchors.
These screws press against the brick to hold the frame in place, so no drilling is required.
Loosen the Tension Screws
Locate the adjustment screws on the frame brackets. They usually have flat or hex heads.
Use a screwdriver or Allen wrench to loosen them completely.
As pressure releases, the frame will loosen.
Pull Frame Away
Once all tension is gone, pull the frame forward. It should come free without resistance.
No need to worry about holes, since this system leaves no permanent damage.
When to Replace the Entire Door Unit

You might be tempted to just replace broken glass, but that’s rarely practical.
Why Glass Replacement Fails
Most bifold doors are factory-sealed. The glass is sandwiched between frame halves with gaskets and permanently clamped.
Attempting to disassemble it risks:
– Shattering the glass
– Warping the metal frame
– Losing or damaging gaskets
Even if you succeed, old and new glass won’t match. Heat exposure causes micro-staining and clouding that cleaning can’t fix. A new pane will look noticeably brighter, creating a mismatched appearance.
Full Unit Replacement Recommended
For both aesthetics and reliability, replace the entire door assembly. It’s often cheaper than labor costs for glass-only repair, ensures a perfect match, and avoids reassembly issues.
If upgrading, remove all OEM hardware (brackets, clips) that could interfere with the new frame’s fit.
Essential Tools List

Having the right tools makes the job faster and safer.
- Flathead/Phillips screwdriver: Depress tension clips, remove screws
- Wrench or socket set: Remove masonry bracket nuts
- Allen wrench (hex key): Adjust tension screws on masonry frames
- Electric drill (optional): Speed up screw removal on frames
- Work gloves: Protect hands from sharp edges and soot
- Assistant (recommended): Support door weight during removal
No specialty tools are required. Most jobs can be done with a basic home toolkit.
Troubleshoot Common Problems
Even with preparation, issues arise. Here’s how to fix them fast.
Frame Won’t Budge After Screw Removal
Cause: You’re trying to remove the riveted faceplate, not the removable frame.
Fix: Check for rivets. If present, stop immediately. Only remove components held by screws or tension clips.
Top Pin Won’t Clear the Clip
Cause: Not enough downward pressure on the clip.
Fix: Use the screwdriver to fully depress the spring before lifting. Lift straight up first. Don’t angle the door until the pin is clear.
Damaged Brick Holes
Cause: Slipping screwdriver or corroded screws.
Fix: Use a well-fitting bit and turn slowly. If holes are stripped, use masonry anchors for future installations.
Glass Still Cloudy After Cleaning
Cause: Permanent heat staining or micro-etching from soot.
Fix: Accept that cleaning won’t restore clarity. The only solution is full door replacement.
Frequently Asked Questions About Removing Fireplace Glass Doors
Can I remove fireplace glass doors myself, or do I need a professional?
Yes, you can remove them yourself in most cases. Standard decorative doors on wood-burning fireplaces are designed for homeowner removal. Only sealed combustion inserts or riveted faceplates require professional service.
Will removing the glass doors damage my fireplace?
No, provided you avoid the riveted black faceplate on prefab units. Removing only the doors and their attached frame will not harm the firebox or compromise safety.
How do I know if my doors are decorative or functional?
If your fireplace burns wood and operates normally without the doors closed, they are decorative. Functional doors are typically found on sealed combustion inserts or high-efficiency units requiring controlled airflow.
What if the tension clip is stuck or rusted?
Apply penetrating oil and let it soak for several minutes. Then press down firmly with a screwdriver while lifting the door. Never pry or force the clip, as this can break the bracket.
Should I replace just the glass or the whole door unit?
Replace the entire unit. Factory-sealed glass is nearly impossible to replace without damaging the frame, and new glass will not match the clouded appearance of old panes.
How long does it take to remove fireplace glass doors?
Most removals take 15 to 45 minutes, depending on the mounting system and whether a frame is involved. Having an assistant speeds up the process significantly.
Final Thoughts on Removing Fireplace Glass Doors
Removing fireplace glass doors is a straightforward project when you identify your fireplace type and use the correct tools. The three most important takeaways are: never force a riveted component, always depress tension clips fully before lifting pins, and preserve masonry holes if you plan to reinstall doors later.
Your next step is to inspect your fireplace, gather the tools listed above, and begin with the door removal method that matches your setup. Work slowly, label any hardware you keep, and store removed doors flat on a soft surface to prevent warping. With the right approach, you can complete the job safely and enjoy your fireplace in its updated form.