Mirror desilvering is a common issue that plagues bathroom and vintage mirrors alike. When the reflective backing, typically silver or aluminum, begins to corrode, dark edges, cloudy patches, and peeling spots appear, especially along the perimeter. This degradation, often called mirror rot, stems from moisture seeping behind the glass, breaking down the metal layer and protective sealant. While the damage is irreversible at a molecular level, you do not need to replace the mirror right away. With the right techniques, you can repair, conceal, or prevent desilvering effectively and affordably.
Whether you are a homeowner tackling a foggy bathroom mirror, a renter seeking a no-damage fix, or a preservationist restoring an antique piece, you will learn how to stop the spread, improve appearance, and extend your mirror is life without breaking the bank or the glass.
Diagnose Mirror Desilvering Early
Before choosing a fix, confirm the damage is desilvering and not surface fog or residue. True desilvering starts at the edges and spreads inward, showing distinct visual cues.
Spot the Warning Signs
The most recognizable symptoms of mirror desilvering include dark or brown borders along the mirror is edge, cloudy or smoky zones near corners, jagged irregular patterns where reflectivity is lost, visible gaps or flaking when viewed from the side, and progressive spread toward the center over months. If you see these signs, moisture has breached the mirror is seal. The longer it is ignored, the worse it gets. Early action can save the mirror from full replacement.
Rule Out Other Issues
Not every mirror problem is desilvering. Surface condensation wipes away with a dry cloth and disappears after ventilation. Hard water stains appear on the front of the mirror and respond to vinegar cleaning. Paint overspray or adhesive residue is localized rather than edge-based. Desilvering occurs behind the glass, so front-side cleaning will not help. Once confirmed, move to repair or concealment.
Repair With Mirror Effect Paint
For mirrors you can safely remove, Rust-Oleum Mirror Effect spray paint offers a durable, reflective fix that mimics factory silvering.
Remove and Prepare the Mirror
Unscrew and extract the mirror from its frame or mount. Work on a flat, clean surface to avoid scratches. Wear gloves to prevent fingerprints on the glass. Handle older mirrors carefully since glass weakens with age.
Trim Damaged Backing
Use a razor blade and straight edge to cut away flaking silver. Make clean, straight lines to prevent future peeling. Only remove deteriorated sections and leave intact coating. This step stops the damage from spreading under new layers.
Clean the Glass Thoroughly
Apply Goo Gone to dissolve old adhesive. Wipe with glass cleaner to remove residue. Finish with 70% isopropyl alcohol on a lint-free cloth. Let dry completely since any contamination ruins paint adhesion. Moisture or grease will cause bubbling or poor reflectivity.
Apply Mirror Paint in Thin Coats
Shake the Rust-Oleum can for 60 seconds or longer. Spray from 10 to 12 inches away in light, even passes. Apply 2 to 3 coats, waiting 10 minutes between each. Spray from multiple angles to cover edges uniformly. Avoid heavy coats since they can drip or cloud.
Reinstall and Evaluate
Slide the mirror back into place. Hand-tighten screws but do not overtighten. View in natural light: the painted area should reflect well. The result is a seamless, shiny finish that hides black edges. While not as bright as original silvering, it is a dramatic upgrade for under $15. This method works best on medicine cabinets, closet doors, or framed mirrors, not full wall units.
Conceal With a Custom Mirror Frame
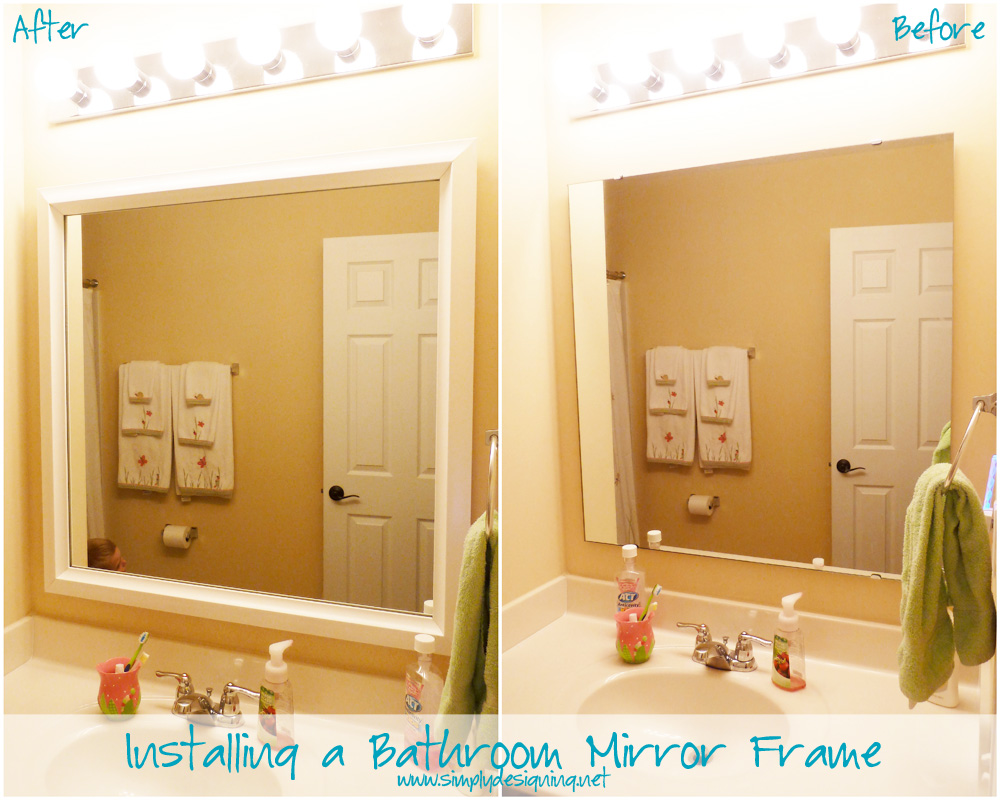
The most effective and stylish solution is to hide the damage with a frame. This approach is ideal for bathroom mirrors with edge rot and no need for full replacement.
Choose the Right Frame Style
Slim profiles of 0.5 to 1 inch work for minor damage. Wide frames of 2 to 3 plus inches cover deep black edges. Materials include moisture-resistant MDF, aluminum, or PVC. Look for bathroom-rated finishes that resist warping and mold.
Why MirrorMate and MirrorChic Work Best
MirrorMate is designed for clip-mounted mirrors and fits over existing wall brackets. MirrorChic is custom-cut to your dimensions and includes 3M industrial tape. Both apply without tools or wall damage. These brands are popular with flippers and renovators for their clean, upgrade-like appearance.
Install in Under 30 Minutes
Measure mirror width and height precisely. Order the frame to cover all damaged edges. Clean glass with alcohol to boost adhesion. Peel backing and press frame onto edge. Hold firmly for 30 seconds per side. No screws, no mess, no risk of breakage. A 20-year-old bathroom mirror looks new with a black metal frame at a cost of $75 in just 15 minutes.
Use Temporary Cover-Ups
When budget or permanence is a concern, simple fixes can mask desilvering fast.
Apply Black Electrical Tape
This method costs less than $1 and takes under 5 minutes with just scissors needed. Cut tape slightly longer than the edge. Press from corner to corner, smoothing as you go. Trim excess with scissors. This works best on bottom edges where water pools. Renters love this because it is removable and leaves no trace.
Try Mirror Repair Tape or Vinyl Trim
Reflective adhesive strips blend with the mirror surface. They are self-adhesive and apply like tape. Available in 1/2 inch, 1 inch, and 2 inch widths. Ideal for small gaps or pinholes but may peel in high humidity over time.
Restore With Professional Re-Silvering
Only re-silvering restores the original reflective layer. It is the true repair but not always practical.
How Re-Silvering Works
The process involves stripping the old backing chemically, cleaning and polishing glass to optical clarity, applying new silver or aluminum layer via chemical bath, sealing with copper and paint for protection, and reinstalling or reframing. Done in a dust-free lab, this process brings mirrors back to like-new condition.
When to Choose It
Choose re-silvering for antique mirrors with historical value, custom shapes that cannot be replaced, or sentimental pieces like heirlooms. For standard bathroom mirrors, the cost of $100 to $300 plus usually outweighs the benefits.
Risks and Drawbacks
There is high shipping risk since glass can break during transit. Long turnaround time of 1 to 2 weeks is typical. There is no guarantee of perfect edge sealing afterward. Only pursue this for high-value or irreplaceable mirrors.
Prevent Future Desilvering
Once repaired or concealed, stop the problem from returning with smart prevention.
Seal the Edges With Silicone
Use clear waterproof caulk or 100% silicone sealant. Apply a thin bead along all four edges. Smooth with a damp finger. Reapply every 3 to 5 years. This barrier blocks moisture from creeping behind the glass.
Control Bathroom Humidity
Run the exhaust fan during and 20 minutes after showers. Open the door or window to improve airflow. Use a dehumidifier in steam-prone bathrooms. Keep humidity below 60% to slow corrosion.
Clean Mirrors the Right Way
Never spray cleaner directly on the mirror. Apply to a microfiber cloth first, then wipe. Avoid ammonia, vinegar, or abrasive pads near edges. Direct spraying pushes liquid behind the glass, accelerating damage.
Upgrade to Mold-Resistant Mirrors
When replacing, choose back-painted or edge-sealed mirrors, moisture-resistant backing like aluminum with protective coating, or framed units with sealed edges. Avoid cheap, unsealed mirrors in wet areas.
When to Replace the Mirror
Replacement makes sense only in specific cases.
Replace If
Desilvering covers over 40% of the surface, the mirror is cracked, warped, or loose, re-silvering costs more than a new unit, or you are doing a full bathroom remodel. Be aware that removing old mirrors risks shattering, wall damage, and disposal issues.
Environmental Impact
Over 7 million tons of glass go to U.S. landfills yearly. New mirror production uses high-energy glass melting. Repairing or reframing reduces waste and carbon footprint, making it the eco-smart choice.
Compare Repair vs. Replacement Costs

Custom framing costs $50 to $150, takes 15 minutes, lasts 5 plus years, and provides high aesthetic value. Electrical tape costs under $1, takes 2 minutes, lasts 6 to 12 months, and has low aesthetic value. Mirror paint costs $10 to $15, takes 1 hour, lasts 2 to 3 years, and provides medium aesthetic value. Decorative trim costs $10 to $30, takes 20 minutes, lasts 1 to 2 years, and provides medium aesthetic value. Re-silvering costs $100 to $300 plus, takes days, lasts 10 plus years, and provides high aesthetic value. Full replacement costs $200 to $600 plus, takes 2 plus hours, lasts 15 plus years, and aesthetic value varies. The best value is custom framing since it is fast, durable, and transforms old mirrors into design features.
Match Fixes to Your Situation
Homeowners and renovators should use custom frames like MirrorChic to achieve a modern look without demo and match new vanities or lighting. Real estate investors should use MirrorMate frames for quick, high-ROI upgrades that install in minutes and look professional for staging. Renters should use black electrical tape or removable trim for no-perm changes at low cost while avoiding drilling, glue, or paint that damages walls. Antique mirror owners should use professional re-silvering to preserve the original piece and ensure re-sealing after restoration to prevent recurrence.
Frequently Asked Questions About Mirror Desilvering
Can you fix desilvering on a mirror yourself?
Yes, you can fix minor to moderate desilvering yourself using mirror effect paint like Rust-Oleum Mirror Effect for removable mirrors, or by installing a custom frame to hide the damage. Temporary solutions like black electrical tape work for quick fixes. Professional re-silvering is the only true restoration but costs $100 to $300 plus.
What causes mirror desilvering?
Mirror desilvering is caused primarily by moisture penetrating the backing seal, especially in humid bathrooms. Other factors include damaged or missing edge sealant, harsh chemical exposure from cleaning agents, age typically 20 to 30 years or older, and inferior manufacturing with substandard backing materials.
Does desilvering keep spreading?
Yes, desilvering typically spreads from the edges inward over time if left untreated. Moisture continues to break down the reflective layer, worsening the damage. Sealing edges and controlling humidity can slow or stop the spread.
How much does it cost to repair a desilvered mirror?
DIY repairs cost as little as $1 for electrical tape, $10 to $20 for mirror paint, or $50 to $150 for a custom frame. Professional re-silvering costs $100 to $300 plus. Full mirror replacement costs $200 to $600 or more.
Can you prevent mirror desilvering?
Yes, you can prevent desilvering by sealing edges with silicone caulk, using exhaust fans during showers, wiping mirrors dry after use, avoiding direct spray of cleaning chemicals, and choosing mirrors with moisture-resistant backing when replacing.
Key Takeaways for Fixing Mirror Desilvering
Mirror desilvering does not mean the end of your mirror. With early detection and the right fix, whether paint, frame, or tape, you can restore function and beauty without replacing the glass. The best approach depends on your situation: custom framing offers the highest return on investment for most homeowners, while professional re-silvering is reserved for antique or sentimental pieces. Focus on prevention by sealing edges and controlling humidity to stop the problem from returning. In most cases, repair beats replacement, saving you money, time, and the planet.